“White” filling placement – The procedure.
How dental bonding/white fillings are placed.
This page explains the individual steps that a dentist follows when they place a composite restoration (“dental bonding”).
The process outlined on this page is used for a wide range of individual procedures.
Applications for the use of dental composite can be quite varied. For example, some patient’s cases may involve placing a “white filling” as a repair for some type of tooth damage (like that from fracture or decay).
In other cases, and at the other extreme, the patient’s tooth may just need a layer of bonding placed on its surface (all or just a portion), so to cover over an imperfection or to improve its shape. (For more examples, see our applications for bonding page.)
But whatever your need for a composite restoration is, your dentist will use the same basic process outlined on this page because these steps are required by the science of dental bonding (meaning the way by which dental composite creates a bond with tooth structure).
The steps of placing dental bonding (composite restorations):
- Preparing (trimming) the tooth (when needed).
- Acid etching the enamel (and dentin)
- Applying the bonding agent.
- Placing the dental composite.
- Curing the restoration.
- Final shaping and polishing.
- Aftercare. / Precautions.
The steps of the bonding procedure:
A) Shade selection.
Dental bonding comes in a variety of colors, and an appropriate one will need to be chosen for the restoration being created.
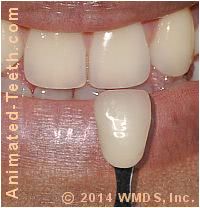
Selecting a shade of composite for a tooth’s restoration.
- They’ll simply hold each sample tab next to the tooth and compare its color, and level of translucency (if this option is available).
- They may choose a separate composite for different layers (internal vs. surface) or portions (body of the tooth vs. biting edge) of the restoration they’re creating.
Doing so can greatly affect how natural it will look.
What’s this step like?
There are various issues that can be of concern when determining the proper shade of composite to use.
- The type of light source chosen can greatly affect color matching results (Park 2006) [page references], so quiz your dentist about the type(s) they plan to use.
Daylight, artificial lighting that’s been spectrum-corrected to mimic daylight, and/or other types of light in which the patient’s smile may be viewed (incandescent, fluorescent, warm, cool, etc…) can each play a role in determining the proper shade of composite to use with a tooth.
- A tooth-dehydration effect tends to take place during dental procedures due to the fact that your mouth must remain open during them. And as teeth dry out, they become lighter/brighter in color, thus making precise color matching impossible.
Studies have demonstrated that this effect can take place in less than 30 minutes. And for this reason, the preferred protocol involves your dentist choosing the appropriate shade(s) of composite to be used with your tooth at the beginning of your appointment. (Burki 2013)
- Your dentist may value having additional opinions and therefore involve both you and their assistant in the shade taking process.
Some studies suggest that females typically do better in color matching than males, and that the level of experience of the person in doing so is not an important factor. (Haddad 2009).
- Although they could simply be removed or covered over for this step, it’s best not to wear bright colors (clothes, lipstick, jewelry, etc…) during the shade taking process.
B) Cleaning the tooth.
A strong bond can’t be formed unless the tooth’s surface is clean. The dentist will polish the tooth to remove any debris that’s accumulated (dental plaque, tartar, etc…).
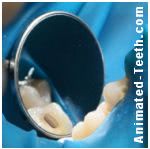
Preparing (trimming) the tooth.
The preparation has penetrated the tooth’s enamel layer and the underlying dentin is exposed.
C) Tooth preparation (drilling and trimming).
- With some cosmetic applications (closing tooth gaps, repairing minor chips, possibly even veneering the front surface of the tooth), little to no trimming may be needed.
The exposed tooth surface that the restoration will be bonded to will be primarily enamel.
- At the other extreme, like a restoration that’s needed to repair the damaged caused by tooth decay, the amount of drilling required may be relatively extensive.
It’s commonplace that with this type of restoration both a tooth’s enamel and dentin layers are involved.
Acid etching the tooth’s surface.
This step prepares the tooth’s surface so the bonding will adhere.
D) Acid etching the tooth’s surface.
The conditioner is spread out over the tooth where the bonding will be placed. It’s allowed to sit for at least 15 seconds (possibly more) and then is thoroughly washed off.
Tooth’s surface has now been prepared and is ready to receive the dental bonding. (If the dentist were to dry the tooth at this point, its etched enamel surface would have a frosted appearance, much like the appearance of etched glass.)
What’s this step like?
Etching a tooth is a non-event. You won’t feel a thing and if the etchant does get on your gums during the process it won’t harm them.
If your dentist doesn’t have you wearing protective eyewear, you should close your eyes while the etchant is being washed off. And when they’re doing that you might get a taste of the gel. If so, it will just taste bitter or sour.
Remember to stay open for the whole process, so the etched tooth surface doesn’t get contaminated with saliva.
E) Applying the bonding agent.
The dentist will now paint or dab “bonding agent” (a liquid plastic) onto the etched tooth surface using a small brush or applicator.
Sometimes they’ll also blow air gently over the tooth so to ensure that the bonding agent has been dispersed as a thin even layer over the tooth’s entire preparation and etched surfaces.

Applying and curing the bonding agent.
F) Curing the bonding agent.
An initial bond to the tooth has now been created. The bonding agent has established a micromechanical bond with the tooth’s etched surface.
Your experience may vary.
There always seem to be advancements in the way tooth etchants and bonding agents (now collectively termed “adhesive systems”) are formulated and used.
Some of these new systems incorporate the tooth conditioner right in with the bonding agent itself.
This means that there is no “etch then wash” step but instead, the bonding agent is applied on the tooth (without prior etching) and then, after a waiting period, is simply set with a curing light.
What’s this step like?
Except for needing to continue to stay open (so the tooth isn’t contaminated by moisture), this step should be of little concern to you. It’s quick and simple.
G) Creating the restoration. / Applying composite restorative.
Now that an initial bond has been established with the tooth’s surface (by way of the bonding agent), successive layers of dental composite are added, so to give the restoration its needed bulk and shape. As each one is added and set, it creates a chemical bond with the bonding agent layer and/or previously placed layers of composite.
Composite has the consistency of putty. The dentist will apply it in small portions and gently pat each into place, until that part of the restoration that they’re currently building has the needed shape.
Applying and curing the dental composite.
Curing the composite.
- The rated output (intensity) of the light. (A factor that must be checked periodically throughout the lifespan of the unit.)
- The thickness of the layer of composite being cured. (Obviously, insuring adequate exposure to the deepest portion of composite is paramount in ensuring restoration set and therefore integrity.)
What’s this step like?
The application of the curing light is a step that patients do tend to notice. They often get a glimpse of the light’s brightness and will hear the unit beep as it signals how long it has been on. Also, the light may have a cooling fan that can be heard running.
To protect your eyes from inadvertent irritation from exposure to the light, your dentist may have you wear sunglasses for those procedures that involve the use of one of these units.
Building up the restoration.
If after the placement of the initial amount of dental composite the shape of the restoration is not yet complete, the dentist will simply need to add additional layers.
Each one is usually limited to about 2 mm in thickness (that’s just a little bit thicker than a dime). And as each is placed, it’s fully cured before the next one is added.
Why a layering technique is used.
- One reason why dentists tend to place composite as multiple thin layers instead of just one lump is that the light emitted from a curing unit can only penetrate through so much thickness at a time. If a layer is too thick, it won’t get fully cured.
Factors involved in how much thickness is permissible include the intensity of the curing light that the dentist owns, and the color/translucency of the layer of dental composite being placed.
- Another reason has to do with the fact that as composite sets, on a microscopic level it shrinks (dentist refer to this as “polymerization shrinkage”). Keeping each layer thin helps to keep the cumulative effect of this distortion to a minimum (as compared to placing and curing the same total thickness of composite as a single lump).
Bulk-fill composites.
As a solution for both of these issues, especially when exceptionally large fillings are involved, a dentist might opt to use a “bulk-fill” dental composite. These products are designed to be placed in layers as thick as 4 to 5 mm (around twice that of conventional materials), requiring a curing time of as little as 10 to 20 seconds.
However, this is a newer class of restorative and as such is comparatively less tested than traditional ones. Also, a wide range of shades (tooth colors) isn’t yet available with many brands.
What’s this step like?
Depending on the size of the restoration being constructed and due to the requirement of placing composite in layers, building up your restoration to its needed shape may take a fair amount of time.
Since moisture control is so important during this step, you’ll need to make sure to stay wide open so your tooth remains dry during the whole process.
The good news is that once this step has finally been completed moisture control is no longer so vital. So your dentist should be able to give you a chance to relax your jaws for a moment before proceeding with finishing your procedure.
H) Trimming and shaping the restoration.
A dentist will usually purposely over bulk a restoration and then use their drill to trim it back to the proper shape.
Shaping and polishing the restoration.
Your opinion is important.
Everybody in the room (dentist, assistant and patient) will be looking at your tooth from a slightly different angle and each may notice something that the others don’t. And besides, it’s your tooth. Your opinion matters the most.
What’s this step like?
You’ll feel the vibrations of your dentist’s drill as it trims and polishes. But even in cases where no anesthetic was used, you shouldn’t experience any pain.
That’s because your tooth is all sealed up. Your dentist is just refining its exterior surfaces.
I) The dentist will check the patient’s “bite.”
At this point, even though the placement of the tooth bonding has been completed, it’s still very important for the dentist to check the patient’s “bite.”
They’ll need to evaluate how their patient’s teeth come together and whether or not the restoration they have just placed interferes with this motion.
Carbon paper.
To do this, the dentist will place a thin strip of carbon paper between the patient’s teeth and ask them to close gently and then make a motion where they slide their teeth against each other.
The paper will create marks on those points where the patient’s opposing teeth touch. If marks are observed on the new restoration, the dentist will adjust the bonding’s thickness until further testing demonstrates that it has the proper form.
What’s this step like?
This is a really important step and, unfortunately, it comes at a time when your jaw is stiff and tired and possibly numbed up.
Listen to your dentist’s instructions and do the best you can. Getting things right at this point can save you a trip back to your dentist’s office later (see below).
J) The final polishing.
Now that everything has been adjusted, the dentist will give the new restoration a final buffing and polishing. Once this has been completed, it’s finished and ready for use.
These steps may or may not be needed. –
A) Numbing the tooth.
Tooth bonding encompasses a wide range of applications and a local anesthetic (“Novocain”) may not be needed for many of them.
The necessity for it usually hinges on the amount of tooth shaping that the dentist must perform in preparation for placing the bonding.
With some cosmetic procedures, little to no trimming may be required. In other situations, such as one where the damage from a cavity is being repaired, more extensive shaping will be needed and probably an anesthetic too.
Tooth isolation via rubber dam placement.
When dental composite is used to fill this tooth’s hole, there will be no chance of moisture contamination.
B) Tooth isolation.
- Isolation can be as simple as placing rolls of cotton around the tooth.
- In other cases, the dentist may need to stretch a sheet of rubber (latex actually) around the tooth. This is called placing a rubber dam (see picture).
Aftercare / Precautions.
One of the great conveniences of having a bonded restoration placed is that it is fully hardened (cured) by the dentist when it’s placed.
This means that once your dental appointment has come to an end, your tooth is ready to be used, enjoyed and admired. However, there are some precautions that should be kept in mind.
a) Anesthetic –
If your tooth has been numbed up for your procedure, you’ll need to be careful with biting, chewing and other oral activities until the anesthetic you’ve been given has worn off. It may take an hour or two for this to occur.
b) Evaluate your bite –
Especially in those cases where an anesthetic has been used, the check of your bite that your dentist performs at the completion of your appointment may not give accurate results.
You shouldn’t apply substantial forces to a new restoration until after your numbness has worn off. Once it has, gently check your bite. If anything seems amiss you should report it to your dentist so they can make the minor correction needed.
Don’t assume that things will just take care of themselves. Seeking attention too late can result in a broken restoration, a broken tooth or tooth nerve damage.
Page references sources:
All reference sources for topic Dental Bonding.