Instructions for using Crest White Strips® (3D, Vivid, Supreme, …)
Directions for using whitening strips.
This page outlines how to use Crest Whitestrips® products. We originally wrote these directions for Whitestrips Classic®, a version that has been discontinued. We’ve since updated our pages (Parts 1 & 2) so they include information pertaining to the different products that currently make up the Whitestrips® line.
This lineup includes: Crest Whitestrips® 3D White – Glamorous White, 1 Hour Express, Gentle Routine, Professional White, Brilliance White, Classic Vivid, Professional Effects
Other product versions covered by our pages: Crest Whitestrips® 3D White – Vivid, Advanced Vivid, Stain Shield, Intensive Professional Effects, Luxe Supreme Flexfit and Luxe Glamorous White.
Instructions for using Crest Whitestrips® –
We’ve subdivided our discussion of this subject into the following sections.
- Getting ready to start your treatment session. – Best practices.
- Placing the strips. – Which side goes against your teeth? Which strip is for the top and which for the bottom? How to position the strips on your teeth.
- Performing your treatments. – Application times for the different White Strips products.
- Wrapping up your treatment session. – What to do. Precautions to take.
- Treatment frequency. – How often? What’s permitted?
- Which style of strip should you use? – Variations in whitening strip design.
Instruction steps –
1) Getting ready to perform your whitening strip session.
Actually, when using Whitestrips® products it’s not so much what you should do in preparation for applying them as opposed to what you shouldn’t.
a) Should you clean your teeth first?
Better adherence.
No, you shouldn’t. Crest’s® directions for their Whitestrips® products state that they’ll stay in place better if you do not brush your teeth before applying them.
Preventing gum irritation.
Crest® publications also suggest that you’ll tend to notice less treatment-associated gum tissue irritation if you don’t brush your teeth before using your strips.
An explanation.
One would have to presume that both of the above phenomena have to do with the dental (tooth) and mucosal (gum tissue) pellicles (biofilm layers) that naturally form and are evidently exploited to aid strip retention and protect gum surfaces from the whitener. And the act of brushing your teeth would tend to remove them.
How long should you wait after brushing?
While we don’t find any specific recommendation from Crest®, we see it stated on their website that if you have just brushed your teeth you should “allow for some time to pass” before using your whitening strips.
We can report that:
- A tooth’s pellicle starts to reform instantaneously upon its exposure to saliva.
At a period 1 hour out, it has developed substantial thickness. And at a point 2 hours following brushing, its formation (based on the number of different kinds of proteins it contains) can be considered substantially mature.
- Your gum tissue’s surface renews itself every 3 hours. So, whatever amount of protective film formation does help to reduce soft-tissue side effects, it forms more quickly than that.
(Dawes)
▲ Section references – Crest.com, Crest.com, Dawes
b) Removing the strips from their packaging.
- Whitestrips® come packaged in pairs (one upper and one lower) in individual pouches.
- The two strips in each pouch are used for one treatment session and then discarded.
Details.
Simply tear open the pouch and remove the thin plastic (polypropylene) carrier on which the whitening strips are affixed. The strip for the upper teeth is the larger one of the two.
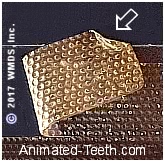
Which side of a whitening strip goes against your teeth?
The side of the strip that faces the plastic carrier is the side that’s been coated with tooth whitening gel and therefore is placed against the surface of your teeth.
That’s easy enough to remember. It’s the whitener side of the strips that needs to be protected until used. So, when packaged, it’s this side that faces the surface of the plastic carrier your strips come on. Also, packaging the strips this way helps to minimize how much the strip’s whitener side gets touched during the application process.
Peeling a Whitestrip® from its carrier.
c) Don’t peel a strip off until you’re ready to apply it.
Patience pays.
In general, as you peel the strip off its carrier, just be as careful as you can. You don’t want to do anything that will make you have to touch or otherwise disturb its surface that contains the whitener any more than you absolutely have to.
Be careful not to crinkle a Whitestrip®.
2) How to place whitening strips on your teeth.
(Once you’re ready, keep in mind that it’s the gel (coated, sticky) side of the strip that’s placed against your teeth. This is the side of the strip that was face down on the plastic carrier.)
Which whitening strip goes on top, and which on the bottom?
It’s the longer of the two strips that you peel off the plastic carrier that’s intended for use with your top teeth. The shorter one is for treating your bottom ones.
That’s easy enough to keep in mind because each of your upper front teeth is wider than their corresponding lower one. Hence, the added length of the longer strip is needed up on top so all of your upper teeth are covered and receive treatment.
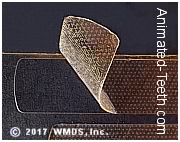
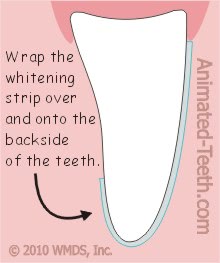
a) The strips need to be aligned properly.
When placing a Whitestrip®, you generally align it across the height of your gums. Of course, its straight edge and the scalloped outline of your gum line won’t match up exactly, so just do the best that you can. (See illustration.)
Place the strip so it fully covers your teeth.
Make sure to cover your teeth.
Any portion of a tooth that lies beyond the edge of the whitening strip won’t receive the same level of exposure to the whitener.
And yes, this type of positioning means that the strip will lie over small portions of your gums where they come up in between your teeth.
Take your time.
The sticky fit of Whitestrips® products tends to make them a tad difficult to work with. And if you position one incorrectly, while you can still just peel it back off, you’ll feel its strong tug and wonder how much whitener you’re leaving behind as you do. So it’s nice if get things right the first time.
b) Once positioned, press the Whitestrip® into place.
Once positioned, gently press the strip in place.
Then, fold the remainder of the strip back behind the biting edge of your teeth.
Repeat.
c) Wash your hands after handling Whitestrips®.
The bleaching agent that’s applied to Crest’s® products is hydrogen peroxide (it’s the standard for whitening strips in general). And this compound readily reacts with surfaces that it comes into contact with, not just your teeth.
Wash your hands afterward … in every case.
Signs and symptoms.
If you don’t wash up, you may notice that your fingers start to tingle, or even burn. That’s the peroxide reacting with your skin. It may even cause white patches to form. In any case, just wash your fingers off and you should be fine.
Be careful though, additional, possibly more serious, complications can occur too.
- Just like with your fingers, touching any portion of your skin can cause irritation and/or whitening. (Wash the area immediately with soap and water.)
- Touching your eyes can certainly result in irritation. (Immediately flush your eyes with water for 15 minutes as a first step. Seek medical attention if the irritation persists after rinsing.)
- The whitener may bleach your hair (on your head, eyebrows, beard or mustache) if you touch it.
- These same types of accidental harm can occur with your child or pet too if you touch them before washing your hands first.
Permanent damage may occur with clothing or any other possessions or objects you touch (towels, purse, furniture, etc…). So be careful and always wash your hands after handling whitening strips or the pouch they came in.
Jump ahead to Part 2 of our directions: Performing your whitening strips treatment session. ►
3) FYI: Whitening strip design.
Historically, Whitestrips® came in two basic forms. The big difference between them was that one type stayed in place better than the other.
At this point in time, this issue seems to be just historic. Crest’s® trend has been that newer/revised Whitestrips® versions have been designed with the tighter, more-adherent fit we describe below. And in fact, we are unaware of any types that don’t have this feature.
But for those considering using alternative or generic brands, especially if they have trouble with keeping them in place, the following discussion probably explains why.
a) Sturdy, strongly adherent strips –
Characteristics.
This is the newer type of Whitestrip®. And kits of strips that have this design are frequently (historically have been) labeled with the terms “Advanced Seal” or “FlexFit.”
The term Advanced Seal refers to the “no-slip grip” nature of the whitener that’s been applied to the strip, which also serves as its adhesive.
The FlexFit term applies to the way the strip can be “stretched and molded” around the user’s teeth. In this type of product’s instructions, it usually states to “stretch and apply” the strip.
The trend is that newer Whitestrips® versions have the tighter, more-adherent fit.

If you want a secure fit, look for Advanced Seal Whitestrips.
What you’ll notice.
- As compared to earlier Whitestrips® designs, the strip itself is made out of a relatively thick, tougher type of plastic.
- The nature of the whitener/adhesive that’s been applied is very sticky.
- The strips in this category are generally intended for longer wear times (30 minutes to 2 hours, depending on the product).
- We are under the impression that the following types of Whitestrips® have this design feature: Crest Whitestrips® 3D White – Advanced Vivid, Professional Effects, Intensive Professional Effects, 1 Hour Express, Luxe Glamorous White and Luxe Supreme Flexfit.
There is no question that these strips stay in place well. And if you’ve had difficulty wearing previous generations of Whitestrips®, this design will likely provide the solution that you need.
They are so adherent that Crest® suggests that you could whistle or drink water while wearing them (which to us, seems a fairly accurate claim).
b) Flimsy, less-adherent strips –
We’re currently under the impression that Crest® no longer manufactures this style of strip. But when purchasing generic brands, you may find that they still use this design.
- These strips are made out of a comparatively lighter weight, flimsier plastic. And the whitener/adhesive applied to them is much less adherent.
- The online reviews we’ve read for this type of product frequently include the words: slippery, slides around, don’t stick. So if you see these works associated with the product you’re considering, there’s your tipoff.
Which style of strip should you choose?
It only makes sense that most people probably prefer using a more-adherent style of strips.
But that’s not to say products (alternative or generic brands) that don’t have as snug a fit aren’t or can’t be equally effective. (If they have a similar whitener they can be.) But Crest® and their Whitestrips® products seem to excel in regard to the way they stay in place on your teeth, which can make performing treatments less of a task.
Continue to Part 2 of our instructions: Performing your whitening strips treatment session. ►
Page references sources:
Crest.com – Can I Brush My Teeth Before or After Using Whitestrips?
Crest.com – Crest Whitestrips Instructions.
Dawes C, et. al. The functions of human saliva.
All reference sources for topic Teeth Whitening Strips.
Comments.
This section contains comments submitted in previous years. Many have been edited so to limit their scope to subjects discussed on this page.
Comment –
3d white strips
i wish I read this page first,before I purchased this product,I would have purchased a more sticker one.
My 3d white strips don’t stick like I thought they would.
Stephen C.
Comment –
They don’t work.
Save your $$. Pulling them off the clear plastic strip and placing them is so difficult. And when/if you get it done, they DO NOT STICK. THey do not work. I wasted $72 when I bought from my dentist’s office following a recent visit. Save your $$.
Paul O.
Reply –
There seem to be a couple of issues being discussed here.
1) As far as staying in place, it would be our opinion that the “Advanced Seal” strips are very sticky and stay in place quite well (and infinitely better than previous generation Whitestrips).
2) “Pulling them off the clear plastic strip and placing them is so difficult” – We absolutely see how this might be a problem for some people. So the first time you do the process have all of your ducks lined up in a row so you have no interferences or distractions.
3) “They do not work” – This technology absolutely can work, and probably does for most people. But there can be a lot of variabillity in types of staining and between different people. There’s no way in advance to know what type of results you will get.
Staff Dentist
Comment –
Good sensible viewpoints
Thanks, farily reasonable viewpoints. Helps this old guy modernize his tooth care. LOL. I’m guessing I need to update some probiotics afterward to replace intestinal flora killed off by the peroxide?
Jim B
Reply –
We’re not really going to have an answer for you about intestinal flora. We’d anticipate that the bulk of the peroxide is neutralized in your mouth.
Staff Dentist
Comment –
They worked great for me.
The one problem I had was that they didn’t stick well to my lower teeth. I think that was because they were more wet with saliva. So, I eventually started to pat down my lower teeth with a paper towel to dry them before I applied the strips. That seems to take care of the problem. My teeth are much whiter now then when I started.
Neil
Comment –
Which side?
I recently purchased the crest white strips professional effects. I opened my first strip and I was confused which side goes on my teeth. Is it the side i peeled off the plastic? Or the other side.? There also little patterns on one side of the strip. Need some clarity on which side of the strip goes against my teeth.
Buster
Reply –
The side of strip that faces down on its plastic packaging is the side that is coated with the whitener and is placed against your teeth.
Staff Dentist
Comment –
Just some advice.
After pressing the strips into place on your teeth make sure you wash your hands off. I know the whitener is only on the other side of the strip but I didn’t wash and ended up getting whitener on my new Christmas blouse by touching it. It made a white spot.
JuleB
Comment –
Kinda confused.
So I’m reading all the comments and it looks like these strips only whiten your teeth after a week or more of consisted used. I know it’s not gonna whiten my teeth completely after one use but I think it’s a little crappie that it takes so long to see any resultimate and that it only keeps them white for as long as you use them. Not to mention that they are painfully expensive. I cold NEVER afford to use thesearch things on a daily basis. Great idea but not a realistic possibility for a middle/lower class person such as myself.
Tina W.
Reply –
Some of what you state is accurate.
This part is not: “and that it only keeps them white for as long as you use them”
The results you get with whitening strips will last as long as with any other whitening method, because all methods are based on the same chemistry (peroxide tooth whitening).
Also: “I think it’s a little crappie that it takes so long to see any resultimate”
There just wouldn’t be anyway a user’s gum tissue could tolerate the concentration of peroxide that would be needed to produce single-treatment results using a whitening strip method.
If your goal is same-day results you should ask your dentist about having professional/in-office whitening treatments. However after comparing costs, you’ll probably consider at-home treatment a bargain.
Staff Dentist
Comment –
Lesson learned.
Don’t take a WhiteStrip off its plastic sheet until the moment when you’re ready to apply it. I’ve wasted more than one set by letting them get tangled up.
Tess
Comment –
Which is top?
Which strip for uppers? And is the smaller one for the bottom?
Magpie
Reply –
In this picture, the longer strip is for the front upper teeth, the smaller one is for the front bottom teeth.
Staff Dentist
Comment –
Line across top two front teeth.
1/2 of my upper front teeth are lighter on bottom and darker on top. It’s like a middle line where shades are noticeably different . Not sure what I did wrong except I brushed first and not after. I have never used these before . What happened and how can I get the my top teeth to look one color ? I am freaking out a bit .
TReynolds
Reply –
There can be a few variables involved, so you’d be best served by calling the help number on your product so they can collect all pertinent information and advise you accordingly.
It’s not uncommon that teeth initially lighten unevenly due to the make up of the tooth internally. The biting-edge 1/2 of a front tooth may respond to whitening treatments more quickly because this aspect of the tooth is often almost entirely enamel.
The composition of the 1/2 of a tooth toward the gum line is one where an enamel layer covers over a darker center of dentin. This portion of the tooth may take longer to respond to the whitening treatments.
A common scenario is one where the biting-edge side of the tooth reaches a point where it lightens no further. Then due to continued treatments the gum-line portion tends to catch up in color.
Due to this anatomical difference, natural teeth frequently have some shade variation in these two regions. Bleaching treatments may or may not be able to overcome this and make a tooth entirely uniform in color.
Staff Dentist
Comment –
Brush before or after?
I’m confused about brushing before or after using the strips
BJH
Reply –
As this page states, Crest’s advice is that you should not brush your teeth before placing the strips. Not brushing first helps to improve strip adhesion and tends to decrease gum sensitivity to the strips.
Then after your treatment, yes, you can gently brush your teeth to remove any whitener that remains on your teeth.
Staff Dentist
Comment –
More than twice a year.
Can a kit be used as often as needed, more than twice a year, until the stain is removed, if there are no side effects?
SAL
Reply –
We’ve just completed a page that explains considerations associated with your question. Whitening strips- Can you use additional kits?
Staff Dentist
Comment –
Dry your teeth first.
Many people complaining that they don’t stick. Likely due to saliva on your teeth. Try drying them with tissue paper well first.
CJ