Looking for information about other Dental Topics?
Full Website Index• Animated-Teeth.com •

The dental implant procedure. – Part 1.
This page outlines and illustrates the series of steps that a dentist follows when placing a dental implant. In most cases, a person’s procedure can be performed right in their dentist’s office.
The steps of the dental implant procedure. –
Part 1 of our overview (this page) covers the beginning of the process through the completion of the pilot hole for the implant. The remainder of the procedure is outlined in Part 2.
Step 1 – Anesthesia.
Having an implant placed is a surgical procedure. And for that reason, a local anesthetic (and possibly also sedation or a general anesthetic) is used. We discuss this issue at the bottom of this page.
Step 2 – Accessing the jawbone.

The gum tissue is flapped back to reveal the bone at the implant site.
- They’ll first use a scalpel and score incisions in the overlying gum tissue that outline two separate flaps.
- They’ll then use a hand instrument (an elevator) to push and peel each flap of gum tissue back, so the bone underneath is exposed.
Evaluating the implant site.
Once the gum tissue flaps have been raised, the dentist will evaluate the shape of the bone that’s been exposed.
Ideally, this portion of the jaw should be relatively flat and smooth on top. If the dentist finds differently, they will use their dental drill and reshape it so it meets the needed conditions.
Treatment variation – A less invasive way to access the jawbone.
- There is no question about the suitability of the gum tissue and bone in the region where the implant will be placed.
- And no concerns about being able to suitably position the implant itself.
- This technique involves the use of a circular tissue punch that scores and removes a small round section of gum tissue (one slightly larger in diameter than the planned implant).
- The procedure (bone drilling and implant placement) is then performed through this opening.
The advantage of using this process is that it reduces the amount of surgical trauma that’s created during the procedure.
Step 3 – Identifying the position for the implant.
Once the bone has been accessed, the dentist will use a series of drills, each of increasing diameter, to prepare a hole into which the dental implant will ultimately be placed.
As a starting point for this process, the dentist will first use a small round bur (bur = dental drill bit) to make a divot in the bone.

Initial penetration of the pilot drill.
Step 4 – Creating the pilot hole for the implant.
This is simply a small diameter drill bit which, as its name implies, is used to create a hole that serves as a guide for other drills used later on.
A guide for the drill.
When using the pilot drill, the dentist may make use of a plastic jig. This is a device that they’ve created ahead of time using plaster casts of the patient’s mouth. When it’s used:

A bone drill used during the implant procedure.
- It’s fitted into position.
- The pilot drill is then inserted through its opening that’s centered over the implant site.
- The jig helps to center and guide the drill’s orientation.
During this initial phase of drilling, the pilot is just used to create a hole about one-third to one-half the total length needed for the dental implant.
Checking the orientation of the pilot hole.
Step 5 – Evaluating the initial orientation of the pilot hole.
If its alignment seems off-target (such as tipped too far in one direction), since the hole is only a partly as deep and wide as it will need to be, its orientation can still be corrected.
Taking the pilot drill to full depth.
Step 6 – Completing the pilot hole.
The bone must be treated with care.
Overheating can result in bone cell death which, in turn, will prevent successful osseointegration (bone to implant fusion).
What they’ll do.
So to avoid this complication, the dentist will ensure that the drills they use are sharp and not used with excessive drilling speed or pressure.
During the drilling process, they’ll continuously flush the tooth implant site with water or saline solution as a way of minimizing the amount of bone-damaging heat that’s generated.

Evaluating the depth and orientation of the completed pilot hole.
Step 7 – The final check of the implant’s pilot hole.
An x-ray may be needed.
anatomical structures (nerves, blood vessels, neighboring teeth).
If so, the dentist may need to take an x-ray of the implant site while the alignment pin is in position so they can evaluate its relationship to them.
Skip directly to Part 2 of the implant procedure. >>
What types of anesthesia are used for dental implant surgery?
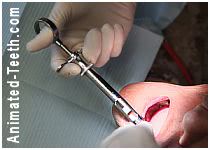
Administering a local anesthetic.
a) Local Anesthetic.
Related page: Will my dental injection hurt?
Sedation is an option.
For patients who have anxiety about their proposed surgery, a decision might be made to use some type of conscious sedation technique during their procedure so they are more relaxed. (The use of a local anesthetic is still required.) Here’s more information: Conscious Sedation.
b) General Anesthesia.
Some implant cases may benefit from the use of general anesthesia. With this technique, medication is used that places the patient in a state of deep sleep. (One where the patient is unable to react to stimuli.)
c) What type of anesthesia should be used for your surgery?
A decision about anesthesia typically hinges on factors such as case difficulty and expected treatment time. Here are some examples:
- For simple dental implant surgeries, such as the placement of one or two implants, the use of a local anesthetic, alone, is probably all that’s needed.
- For more complex cases, and those requiring longer surgical times, both the patient and the surgeon may benefit from the use of conscious sedation or general anesthesia technique.
Last reviewed: September 22, 2019
Author: Paul Cotner, DMD — retired dentist.
Published by: WMDS, Inc. — owner of Animated-Teeth.com.
Educational information only — not a substitute for professional dental care.
Comments.
This section contains comments submitted in previous years. Many have been edited so to limit their scope to subjects discussed on this page.
Comment –
Timining of implant placement.
How soon after extraction do they need to be placed to stop tooth movement (in prep for future potential implant)? An oral surgeon is doing the procedure, not a prosthodontist, do I need to go to two offices in a day?
Mark E
Reply –
It seems that you plan to have a tooth extracted. And you’re curious about when some type of replacement tooth needs to be placed, so to keep the neighboring teeth from shifting (especially to the extent that would interfere with implant placement later on).
Historically, edentulous spaces (a location without a tooth) have been left unrestored for a period of 6 months to even a year before finally being filled in via implant placement (a new completed artificial tooth).
And while there probably is some degree of tooth shifting that takes place during this type of time frame, it’s typically minimal enough that it’s not problematic. Your dentist’s thoughts would be the definitive opinion on this.
To shorten how long the space goes without a completed tooth, nowadays:
1) Implants are sometimes placed immediately following a tooth’s extraction (same visit). Then 4 to 6 months of healing are allowed before the artificial tooth is placed on the implant.
2) In cases where an implant is placed immediately following the tooth’s extraction, it may be possible to “load” the implant then too (its artificial tooth placed on it immediately).
In your case, it’s not so clear that you’ve yet consulted about having your tooth replaced. Nor is it clear that your oral surgeon knows you plan to have an implant placed. Having made plans prior to your extraction may make one of the two options above possible (they both involve special considerations), thus shortening the period you have to go without a tooth.
In the case of #2 above, yes, you would typically have an appointment with your dentist (to have the tooth put on the implant that the oral surgeon placed) within 48 hours of the implant’s placement.
Comment –
Compromised Bone
I had 11 teeth, all with fillings, removed. Cheaper than replacing fillings. Can’t afford implants now. How long before I need graft?
LIZ
Reply –
In regard to performing bone grafting following tooth extractions in preparation for implant placement, a great idea would be to appoint with the dentist who you have chosen to restore your mouth (the dentist who will create your artificial teeth, which may be different than the dentist who will place your implants).
It is this person who should direct your reconstruction activities. If expertise beyond their level is needed for some aspect of your treatment (like performing grafting and placing your implants), they will then consult with the dentist they or you have chosen for that work. After all needed information has been collected, a decision can then be made.
The timing for the grafting procedure will be affected by whether or not implants will be placed at the same time.
In the case where these two steps are separate procedures, this paper suggests (in the “ridge preservation” section) that waiting 6 to 8 weeks for grafting is common. But this issue is for your dental professionals to decide.
If you haven’t already seen our page, here’s where we discuss the “sinus lift” grafting procedure.
Staff Dentist