Looking for information about other Dental Topics?
Full Website Index• Animated-Teeth.com •

Tray-based teeth whitening – Whitening teeth using bleaching trays.
Tray-based teeth whitening 101: Understanding how the process works.
Teeth whitening, also known as teeth bleaching, is a popular cosmetic dental treatment. It provides a non-invasive way to reverse the normal accumulation of tooth stain and discoloration that tends to occur due to factors like diet, lifestyle habits, and aging.
This page explores how the tray-based teeth whitening approach works and what you can expect during the treatment process. It makes an excellent choice for people who like to do things themselves. It’s the original at-home method and the one that’s still considered to be the most effective and predictable of them all.
How do tray systems work?
Tray-based systems like those dispensed by dentists to their patients work like this:
- Clear plastic bleaching trays are made that fit over the user’s upper and lower teeth.
- To perform treatments, the user places whitening gel in the trays and then slips them over their teeth.
- The trays are then worn for a prescribed period of time (typically multiple hours per day, or else overnight), for a series of days or weeks, as the effects of the whitening process gradually take place.
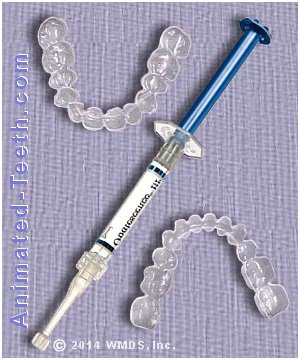
Tray whitening kit: Custom-made bleaching trays and whitener.
This is the method that started everything.
- The technique of tray whitening was first introduced in dental literature in 1989.
- During the 1990s, this method gained widespread acceptance by the dental community as a whole.
- As its popularity grew with patients, manufacturers scrambled to respond to customer wants. The result is the whole range of at-home whitening kits you see in stores today.
Due to its simplicity, safety, range of applications, and comparatively low cost, more dentists use a tray-based approach with their patients than any other whitening method.
Where should you get your bleaching kit?
There’s no shortage of tray-based whitening kits available to you as a consumer, either from your dentist, local store, or else online.
a) From your dentist.
When you purchase a tray system from your dentist, what you get isn’t necessarily better than what you could purchase from other sources on your own. But taking this approach does have some very distinct advantages. Having said that, not every person’s case necessarily requires them.
When your dentist is involved, here’s what you get …
1) Materials they’ll stand behind.
- The bleaching gel – You won’t have any concerns about the quality and safety of the whitener you’re using.
You’ll know its concentration is one that’s been picked with you in mind. Both in terms of being able to produce results with your type of tooth staining and keeping side effects manageable.
- Custom trays – The bleaching trays you get from your dentist will have been made especially for you.
They’ll stay in place well and have design features that help to maximize effectiveness and minimize your potential for side effects (see below).
2) Their expertise.
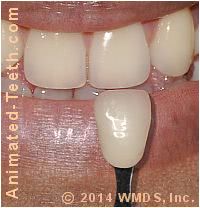
Documenting a patient’s pre-treatment shade.
a) Your dentist’s pre-treatment examination will evaluate these issues:
- They’ll make sure the type of tooth staining you have is likely to respond to the whitening process, and give you an idea of how long that is likely to take.
- They’ll document the pre-treatment shade of your teeth so they have a baseline for comparison as they monitor your progress throughout the bleaching process.
- They’ll look for existing dental work and make sure you know the time and cost that will be needed to replace it so your restorations match the new color of your teeth.
- If side effects crop up, you’ll have an expert available to help you get them under control.
- They’ll recognize your whitening endpoint, or know if extending your treatment period is likely to produce further results.
FYI –Having your dentist in charge of your whitening activities may be more expensive but you do get a lot of value. Doing so helps to remove a lot of uncertainty from the bleaching process.
b) Buying a kit on your own.
There’s a multitude of OTC tray-based bleaching kits available both from your local store and online.
Buyer beware.
You might assume that all of the teeth whitening products you see for sale have been approved by the U.S. Food and Drug Administration (FDA). However, this is not the case. The FDA does not categorize these kinds of products as drugs and therefore does not regulate them.
For this reason, buying a whitening kit on your own carries some risk. But by no means does that mean that good products don’t exist. The fact that OTC products have been on the market for 20-plus years suggests that people who use them tend to be satisfied with their whitening experience and outcome.
- It only makes sense to go with an established brand name.
- Some of the brands sold directly to dentists for use with their patients can also be found in stores and online. Our search came up with these: BriteSmile, Discus Dental, Lumibrite, Nite White, Opalescence, Pola, Ultradent, and Zoom.
The main difference with OTC kits is the type of bleaching trays you use.
If you get a system on your own instead of through your dentist, the biggest difference is less likely to be an issue with the whitener you’re given as opposed to the kind of bleaching trays that you’ll use.
Store-bought kits utilize “stock” trays, not custom-made ones. And although stock trays may be customizable to some extent, they’re unlikely to have the same design features as those you get from your dentist (see below).
(With some kits, especially those obtained through an online service, you may find that there’s an associated dental laboratory through which custom trays can be acquired.)
We will point out, however, that while the use of custom trays does offer potential advantages (maximizing effectiveness, minimizing side effects), using them does not always or necessarily impact the person’s treatment experience or outcome in any significant way.
When does getting an OTC whitening kit make sense?
- An OTC kit can make an appropriate choice for people who have already performed tray whitening treatments before. (People who already know what to do and what the experience is like.)
- OTC products are best suited for cases that are routine or average. – See our “Types of tooth stain and solutions” page.
- A user’s potential for side effects typically correlates with the strength of the whitener they’re using. So, when in doubt, less (strength) might be more, in the sense of avoiding problems.
A 10% carbamide peroxide whitener is usually considered an entry-level product and a good choice for 1st-time users. (Note: Using a higher concentration whitener doesn’t equate with the phrase “better results.”)
Talk to your dentist.
It’s always best to discuss your whitening plans with your dentist before you initiate any type of whitening treatment. And even if you do anticipate that you’ll just go ahead and get your kit on your own, you shouldn’t feel sheepish about approaching them.
A part of your dentist’s role is that of a dental counselor. It’s their professional obligation to provide you with objective advice and opinion.
They may feel that an OTC system makes a poor choice and explain to you why. Or, they may instead have some OTC product recommendations for you. You’ll never know unless you ask.
How does tray-based whitening work?
A) The bleaching trays.
1) Custom trays.
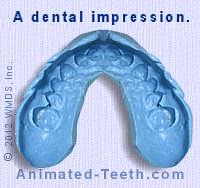
A dental impression used to make a bleaching tray.
- An upper and lower impression is taken of the patient’s teeth and surrounding gum tissue.
- A dental technician then uses the impressions to make plaster models of the patient’s mouth.
- The trays are then vacuum-molded directly on these models, thus ensuring a custom fit.
What do custom trays look like?
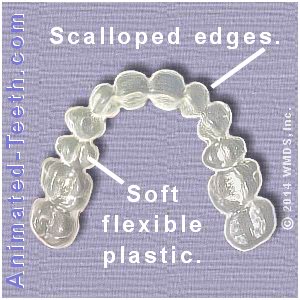
The edges of a custom tray are trimmed so they end right at the gum line.
- They’re made out of a soft, flexible clear plastic.
- One tray is made for the upper teeth and a separate one for the lowers.
- They’re trimmed so they fully cover over each tooth but come just short of the gum tissue.
- They can be designed with “reservoirs.” These are minute “extra” spaces on the front side of the teeth that hold just a little bit of extra whitener.
While it’s debated if they actually help to improve the effectiveness of the whitening process, they have been shown to help to reduce the amount of gel that the user ends up swallowing.
Overall, the design of a custom tray helps to maximize the whitener’s effectiveness and minimize the process’ potential for creating side effects.
2) Stock trays.
- In some cases, they’re just pre-formed plastic shells that crudely fit over your teeth.
- Some kits feature thermoplastic “boil and bite” trays. With these, you soften them up in hot water and then squish them over your teeth to personalize their fit. (See picture below.)
- You don’t necessarily have to buy a “kit.” If you prefer, you can purchase your trays from one source and your whitening gel from another.
Disadvantages of stock trays.
As compared to their custom counterparts, stock bleaching trays (including those that are user modified) can’t offer the same features and advantages.
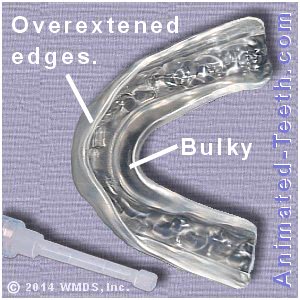
Stock bleaching trays have some disadvantages.
- Their fit is frequently loose or slack, which can make wearing them difficult.
If you’re performing your whitening sessions in public (like when doing errands) having snug-fitting trays can be important. But if you’re just at home alone, this issue may not be much of a concern.
- Because they’re not custom trimmed, their edges are typically overextended and therefore may poke or rub your gums.
Overextended trays also tend to hold whitener against your gum tissue, which can cause irritation. This usually isn’t much of a concern with 10% carbamide peroxide gels but it can be with higher concentration products.
- In some areas, a stock tray’s edges might be short and not cover over each tooth fully. Minor discrepancies aren’t usually a problem but trays that are substantially too short may result in uneven whitening.
- Ill-fitting trays may not hold the whitener in close contact with your teeth, thus inhibiting its effectiveness.
- Stock trays don’t have reservoirs. Because of this, you’ll tend to swallow more whitener, which may increase your risk for throat soreness.
These differences may not be all that important.
From a practical standpoint, it’s easy enough to say that, despite all of their shortcomings, millions upon millions of people have bought over-the-counter whitening kits and have successfully and uneventfully lightened their teeth using stock trays.
B) Performing treatments.
To perform a whitening session, you simply place bleaching gel in your trays and then slip them over your teeth.
What kind of gel is used?
The original type of whitener used with tray-based technique was 10% carbamide peroxide gel (it makes a good choice) but others can be used too. (We discuss whiteners in greater detail on our next page.)
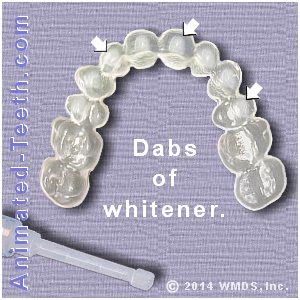
Just put small dabs where it will touch the front side of your teeth.
Dispensing the gel.
Wipe away the excess.
After your trays have been seated, there will usually be some excess gel that escapes onto your gum tissue.
As a way of minimizing your potential for gum irritation, it’s best to wipe away the excess gel with your finger or a toothbrush. (Be sure to rinse your hands or brush off immediately afterward so you don’t get the gel on other things or body parts.)
How long do you wear your trays?
The answer to this lies in the instructions of the specific whitener you are using. It could be as short as 30 minutes. 2 hours or more is common. With some products, you have the option of wearing your trays overnight.
You should never wear your trays for longer than what’s stated in your whitener’s instructions.
Wrapping things up.
At the end of your session, you simply take your trays out. You’ll want to brush any remaining gel off your teeth and rinse your mouth out. (Be careful, you may find your teeth are sensitive to cold water.)
Remove any remaining gel from your trays too, rinse them out and place them somewhere where they can air dry.
How effective is tray teeth bleaching?
Is it as effective as having professional/in-office treatments?
There’s plenty of research evidence (discussed below) that suggests that tray-based technique can deliver results on par with professional (in-office) whitening treatments. That’s right, neither one of these approaches is the “best.” Both methods can be used to create the same end result.
So, if the idea of wearing trays over a few weeks is acceptable to you, then there’s no reason why this method shouldn’t be your first choice and preferred whitening method
How is this possible?
The way peroxide tooth whiteners work is primarily a function of the following two factors:
- The concentration of the peroxide in the whitener.
- The amount of time the whitener is in contact with the teeth.
That means, to produce the same whitening results, a system can either:
- Utilize a low concentration whitener that’s applied to the user’s teeth over an extended time frame. (The method used by tray-whitening technique.)
- Or utilize a high concentration whitener that’s applied for a much shorter period of time. (The method with in-office bleaching.)
Both methods can be used to create the same total amount of exposure of peroxide whitener to the person’s teeth and therefore can produce the same level of whitening effect.
Evidence documenting the effectiveness of tray-based teeth whitening.
As proof of what we’ve stated, consider the findings of these published papers.
Study: Matis (2009)
Title: Review of the effectiveness of various tooth whitening systems.
This review compared the findings of 9 published studies conducted at the Indiana University School of Dentistry involving 25 in-office, at-home, and OTC (over-the-counter) whitening products.

Shade guide use to document the pretreatment tint of teeth.
- Overnight use of an at-home tray-based system created the most effective tooth whitening.
- In-office systems produced immediate results but 2 weeks after treatment even OTC products (whitening strips / wraps) were shown to be as effective.
The whitening relapse typically associated with in-office results was given as the reason why many professional systems recommend the use of an at-home tray-based product as follow-up treatment. (The various rationales associated with the use of this type of combined treatment approach is an interesting read in itself, see below.)
Study: Dawson (2011)
Title: A clinical study comparing the efficacy and sensitivity of home vs combined whitening.
This study evaluated at-home tray-based whitening with a combined approach (in-office and at-home treatments).
- Its conclusions were that the in-office aspect of combined therapy contributed no significant difference in tooth color over at-home whitening alone.
Study: Tay (2012)
In this study, 60 participants who had a Vita tooth shade of C2 or darker (a relatively dark color) were randomly assigned to groups where they either received in-office (35% hydrogen peroxide whitener) or at-home (tray-based system/16% carbamide peroxide whitener) treatments.
- The findings of the study were that both techniques produced an equivalent (and significant) color change.
- No significant color rebound occurred after 2 years with either method.
Study: Basting (2012)
One goal of this study was to determine the comparative effectiveness of at-home tray-whitening technique (using either 10 or 20% carbamide peroxide) and professional treatments (utilizing either a 35 or 38% hydrogen peroxide whitener).
- The study determined that all of the bleaching methods were effective and there was no difference in the color outcome among them.
Study: Basson (2013)
Title: Guidelines for the selection of tooth whitening products amongst those available on the market.
This paper reviewed the findings of 49 studies published between 1998 and 2011.
It stated that in general:
- Dentist-dispensed at-home bleaching and in-office treatments produced approximately the same initial color improvement.
- When measured at 4 weeks or longer after treatment, in-office bleaching showed significantly more color relapse.
They concluded that the treatment of choice should be a dentist-supervised at-home system using a 10% carbamide peroxide whitener (the technique we describe on our pages).
To wrap things up about the comparative effectiveness of tray whitening technique …
The common misperception that in-office tooth bleaching is superior to the use of at-home systems like tray whitening likely stems from the fact that it involves the use of a higher concentration, quicker-acting whitener, and, of course, all of the impressive equipment (bleaching light or laser) that’s used when sessions are performed.
As stated above, what really counts is simply the tooth’s cumulative (total) exposure to the peroxide. And both methods can create the same one.
And as far as lasers and bleaching lights go, while they do add fanfare and glitz to the process, a number of studies have shown that they don’t contribute significantly to the whitening process. (That is the opinion we hold.)
We’ll also point out that …
Some professional whitening systems follow up with at-home tray-based treatments.
Many in-office systems include the continued use of an at-home product (usually a tray-based one) after the completion of a bleaching session. Here’s why this combined approach is used:
- The in-office treatment is used to create a rapid, noticeable color change. (A “jump-start” so to speak for the at-home process.)
- The tray whitening system is then used to compensate for the color relapse that typically occurs following a professional session. (This relapse is often due to the dehydration effect this method frequently creates.)
- Over time the use of the at-home system progresses the whitening process to its level of “maximum whiteness” (that point where further exposure to the whitener creates no further whitening effect for the teeth), thus avoiding the need for additional (costly) in-office sessions.
- In the case where back teeth weren’t included in an in-office session, utilization of tray-based treatments can help to lighten them so they blend in better with the new shade of the front teeth.
Last reviewed: January 11, 2025
Author: Paul Cotner, DMD — retired dentist.
Published by: WMDS, Inc. — owner of Animated-Teeth.com.
Educational information only — not a substitute for professional dental care.
Page references sources:
Basson RA, et al. Guidelines for the selection of tooth whitening products amongst those available on the market.
Basting RT, et al. Clinical comparative study of the effectiveness of and tooth sensitivity to 10% and 20% carbamide peroxide home-use and 35% and 38% hydrogen peroxide in-office bleaching materials containing desensitizing agents.
Dawson, P. et al. A clinical study comparing the efficacy and sensitivity of home vs combined whitening.
Dietschi D, et al. In vitro colorimetric evaluation of the efficacy of various bleaching methods and products.
Hasson H. Home-based chemically-induced whitening of teeth in adults (Review).
Heymann HO. Tooth whitening: facts and fallacies.
Matis BA, et al. Clinical evaluation of bleaching agents of different concentrations.
Matis, B. et al. Review of the effectiveness of various tooth whitening systems.
Tay LY, et al. Long-term efficacy of in-office and at-home bleaching: a 2-year double-blind randomized clinical trial.