10 things you shouldn’t do when you floss your teeth.
Dental flossing don’ts.
This page contains a list of misconceptions and errors frequently associated with using dental floss. And if you need instruction, it also outlines the process you should be following when you do clean between your teeth.
10 errors and misconceptions about flossing.
- Don’t think that using mouthwash can replace flossing.
- Don’t floss a million times a day. Just floss once but do it right.
- Don’t direct pressure on your gums with the floss.
- Don’t ignore places that snag or break your floss.
- Don’t fail to clean all 3 must-do locations between your teeth.
- Don’t use too short of a piece of floss.
- Don’t hold floss this way. It’s not usually very effective.
- Don’t try to get fancy with your flossing.
- Don’t use floss that’s too big or tiny for your situation.
- Don’t be put off if your gums bleed.
- FYI: Here’s how you should be flossing. (Instructions with illustrations and animations.)
- FYI: Tips, pointers, and things about flossing you should know.
Tooth flossing don’ts and misconceptions.
Here’s our list of mistakes and errors frequently associated with the use of dental floss.
#1- Don’t think that using mouthwash replaces flossing.
Using mouthwash doesn’t replace the need to floss, period. And if you think about it, it’s easy enough to understand why.
- Flossing is a mechanical action (tooth scrubbing) that affects bacterial colonies by stripping them off tooth surfaces.
- In comparison, using mouthwash is a chemical action. And for all practical purposes, the agent only comes into contact with (and therefore only affects) those bacteria that reside in the surface layer of plaque.
This topic has even come up in court.
In 2005 a US District judge ruled that a well-known manufacturer’s claim that the use of their mouthwash replaced flossing was “false and misleading.” (Link)
#2- Don’t floss a million times a day, just floss once but do it right.
Some people tell their dentist that they floss several times a day. But when their dentist looks in their mouth they see little evidence of it.
The usual problem is that these patients are equating activity with effectiveness. They think they’re accomplishing when they’re not. As examples:
- Possibly they have a location that traps food, so they floss it after every time they eat something but nowhere else.
- Or maybe they floss every time they brush but just the teeth that are easy to reach.
In both cases, the person really is “flossing” a lot, just never thoroughly and effectively. And unfortunately, it’s the latter two factors that count the most.
So rather than giving your teeth the once over multiple times a day, look for just one setting where you can take the time to do things right. And if you can do that more than one time a day, all the better.
Can you floss too much?
Not if you’re doing it right.
- If when you floss you do so thoroughly, using a proper technique that’s not harmful to your gum tissue, then you can floss as often as you like.
- If you floss multiple times per day but never once effectively. Excessive flossing will only provide limited benefit, build a false sense of accomplishment and be harmful in the sense that it still allows damage to your teeth and gums to occur.
- If you floss using a technique that directs pressure onto your gums in a manner that harms them, then yes, flossing excessively would simply amplify the amount of damage that’s caused.
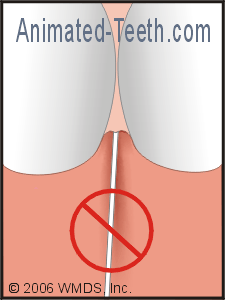
Directing pressure onto your gums with floss can hurt or damage them.
#3- Never let the floss put pressure on your gums.
- Doing so does nothing in terms of helping to remove plaque from this area …
- … Instead, it just traumatizes your gums. (It will make unhealthy gums bleed and/or hurt.)
- If you do things this way long enough, you can actually create a damaging cleft or furrow in your gum tissue.
The correct way to use floss between teeth is to pull it up against the side of each one and clean each separately. Remember, you floss your teeth, not your gums.
#4- Don’t ignore places that snag or break your floss.
You need to heed the hints that flossing can give you.
The sides of teeth are smooth. So if there’s a place where your floss snags, shreds, or breaks, something is not right.
- At a bare minimum, in locations where these types of events occur you won’t be able to clean the area effectively. And any plaque that you can’t remove will simply increase that location’s risk for the formation of tooth decay and/or gum disease.
- As a worst-case scenario, the area already involves active dental disease, and the plaque that gets left behind just feeds that process.
Possible flossing obstacles.
The overhang on this filling interferes with flossing.
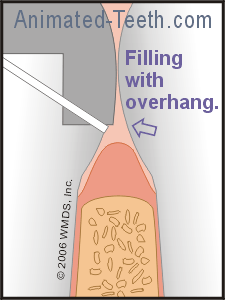
a) Dental overhangs.
- When your floss snags on this type of protrusion it may get stuck, fray, or break in two.
- In some cases, the pressure of the floss may even pull your dental work out. (So to avoid this type of catastrophe, try letting go of one end of your floss and pull it out to the side.)
b) Scenarios involving dental disease.
Beyond man-made problems, existing dental conditions can also be the reason why your floss shreds, traps, or breaks.
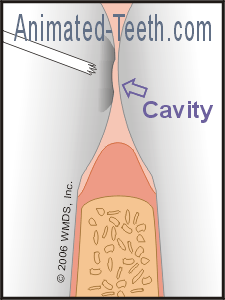
The sharp edges of a cavity can cut dental floss.
Just like with a cavity, this problem won’t take care of itself. You’ll need to appoint with your dentist so they can evaluate your situation. If tartar is the culprit, a dental cleaning will be needed.
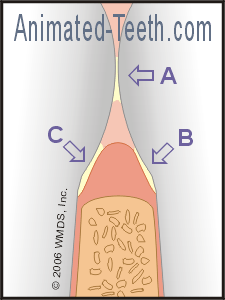
Flossing away plaque from these three locations is the goal.
#5- Don’t fail to clean all 3 must-do locations between your teeth.
- A) The contact point – Plaque that accumulates where teeth touch is exactly the place where cavities are most likely to form.
- B) Below the gum line (on one of the two teeth). – Just flossing the contact point does little to disrupt dental plaque that lies at and below the gum line.
Since this is the plaque accumulation that most affects gum health, disrupting and removing it is important to do.
- C) Below the gum line (on the other tooth). – The same below-the-gum-line location on the 2nd tooth is important to clean too.
Cleaning areas B and C are referred to as “subgingival” (below the gum line) flossing. Here are details about how to accomplish it.
#6- Don’t use too short a piece of floss.
You’ll do best using a piece of floss that’s longer rather than shorter. Flossing is difficult enough without struggling with your equipment.
Start out by using a piece that’s about 18 inches or so.
- That will give you enough to wrap around your “holding” fingers for a firm grasp.
- It’s also enough that you can release an inch or so from one hand and take up the slack on the other so you have a fresh section to work with as you move on to the next location to clean.
Later on and once your flossing habit has settled in, if 18 inches seems like more than you really need, then use less.
Holding your floss this way makes it hard to floss.
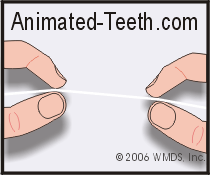
#7- Holding floss this way usually isn’t very effective.
- Doing things this way is too cumbersome.
- You’ll have trouble reaching your back teeth.
Divide and conquer is the better way. Hold the floss with some of your fingers and work it around your mouth using others. These instructions describe how: Proper flossing technique.
#8- Don’t try to get fancy with your flossing.
Next time you’re at your dentist’s office and need a good laugh, ask your dentist or hygienist about some of the flossing techniques they’ve seen patients demonstrate for them.
- They’ve probably seen routines where the person tries to floss teeth on both sides of their mouth at the same time.
- Or else multiple teeth in a row by way of threading floss around several and sawing it back and forth.
It boggles the mind as to what these people think they’re doing. And while they may be flossing, there’s no question that they’re not being thorough and effective.
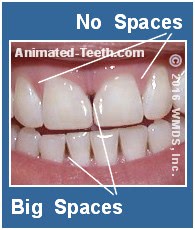
Bigger spaces are easier to clean with a larger size floss.
#9- Don’t use floss that’s too big or tiny for your needs.
For large interdental spaces.
For normal interdental spaces.
Unwaxed, waxed, Glide®, or Satin® flosses can each be suitable choices.
#10- Don’t be put off if your gums bleed.
Bleeding gums is a sign to you that something is wrong. It’s an indication that the area can’t be or hasn’t been cleansed effectively.
- At a minimum, bleeding gums is a sign of gingivitis (gum tissue inflammation). This condition is reversible if you begin an effective flossing (and brushing) routine. Possibly a good dental cleaning is needed too.
- At the other extreme, the bleeding you experience may be a symptom of periodontitis (advanced gum disease that involves both gum tissue and the bone underneath).
This condition can’t be expected to resolve without treatment from your dentist. But having an effective flossing habit in place (along with good brushing) means that the treatment they provide is much less likely to relapse.
With either scenario, continued flossing, as opposed to discontinuing your routine because it makes your gums bleed, is a big part of the solution.
How to use dental floss.
This next section is an illustrated outline describing how to floss your teeth. We’ve broken it down into the following two sections:
- The steps of proper flossing technique. – Illustrations and gifs showing what you need to do.
- When and how often do you need to floss? – This section answers these questions and provides additional flossing tips and pointers you should know about. It also explains the reasoning that lies behind them.
Proper technique for flossing your teeth.
Step #1 – How to hold the floss.
As trifling as it sounds, a really important part of setting the stage so your flossing efforts are as effective as possible has to do with the way you hold your floss.
The problem:
- A lot of people try to hold the floss with the same fingers they use to manipulate it.
While this may work well enough for some front teeth, doing so tends to make it hard, if not impossible, to reach back ones.
Proper technique:
- The better way is to wrap the floss around your middle two fingers (like shown in Picture #1).
Picture #1 – Hold the floss using your middle two fingers.
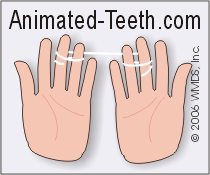
(But use a longer piece, on the order of 18 inches or so.)
You’ll need to use a long enough piece.
Start out by using a piece that’s about a foot and a half long (18 inches or so). Later on, you’ll develop a sense of precisely how much (more or less) you actually need to use.
Picture #2

Manipulate the floss using different combinations of your thumbs and index fingers.
Step #2 – Working the floss between your teeth.
As you do, you’ll find that you’ll need to use various finger and thumb combinations (see descriptions below) to be able to reach all of the different areas of your mouth.
Sliding the floss between your teeth.
When inserting dental floss between any two teeth, ease it in gently so it doesn’t snap down and traumatize your gums. If you have difficulty getting the floss to go, use a slight back-and-forth (seesaw) motion. Doing so will help it to slide through the contact point between the teeth.
Flossing finger combinations.
- Using all four digits. – There probably won’t be many locations where you’ll use both hands’ thumb and index finger to work the floss (Picture #2).
You may find that you can clean between some of your front teeth this way. But more than likely you’ll find this method cumbersome.
Picture #3
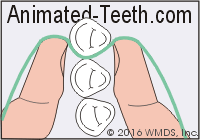
Cup the floss around each tooth as much as possible.
- Using both index fingers. – A way that works well with lower teeth, especially back ones, is to stretch the floss tightly over the tip of your index fingers (see Picture #3). Which of the two is positioned inside your mouth will change as you switch from right to left side.
Notes: Since proper technique involves maximizing the amount of tooth surface that gets cleansed (see below), push the floss toward the back of your mouth so it wraps around the front side of the tooth to the rear when cleaning it (Picture #3). And then pull it forward so it wraps around the backside of the other tooth when cleaning it.
- One thumb and one index finger. – With upper teeth, a good way of doing things is to draw the floss tightly over the tip of one index finger and the tip of the thumb on the other hand (which digits are chosen will simply depend on if you’re right or left-handed).
Using this method, position your index finger inside your mouth and the thumb outside as you work your way around your teeth.
Can’t you just use a floss holder?
Well yes, that’s a possibility. The effectiveness of your flossing activity simply relies on how you work it around once it’s in between your teeth. And in theory, you could accomplish this with a floss-holding device.
By-hand probably makes the better choice.
The use of a holder might make a good or at least reasonable choice for people who have limited dexterity or a physical disability, large hands, a strong gag reflex, or even those who just can’t be motivated to floss by hand.
But for the average person, ask your dentist or dental hygienist what they think (these are people who really know what it takes to get flossing done). Ask them if they personally use a floss holder or consider it a first choice for most people. We’d be very surprised if they do on either account.
Picture #4 – Maximizing the amount of surface area the floss scrubs.
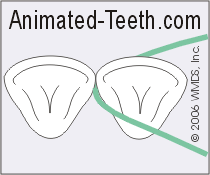
Pull the floss into a C-shape around the tooth.
Step #3 – Maximize the amount of tooth surface that gets cleansed.
Wrap the floss across the tooth’s surface.
Doing so maximizes the total surface area that the floss will scrape over and remove dental plaque from (Picture #4).
Make sure to clean both teeth.
If you haven’t realized this already, between any two teeth you will need to clean each one using a separate set of motions (flossing the side of one tooth, then the other).
This point is fundamental to effective flossing.
Pulling the floss into a C-shape and then cleaning each tooth individually is a very important aspect of carrying out proper flossing technique. And unfortunately, a concept that a great number of people never seem to grasp.
Effective flossing can’t be accomplished by just snapping it between your teeth and then back out. You must place it between them and then deliberately draw it up against the side of each one individually, scrubbing as much of each tooth’s surface as possible.
Step #4 – Clean the full length of each tooth.
Another fundamental aspect of proper flossing technique is that as you work the floss up and down the entire side of each tooth must be scrubbed. That includes the part that lies below the gum line.
When you floss there are two important locations that must be cleaned.
1) Cleaning the contact area.
Dental plaque has a tendency to accumulate right at and below the area where any two teeth touch (their “contact point”). And it’s important to clean this region because it’s precisely the spot where cavities are most likely to form between teeth.
The good news is that just the act of flossing (even when using improper technique) tends to dislodge or at least disrupt plaque that’s accumulated in this area twice. (Once when the floss first goes in between your teeth and then again when it’s pulled back out.)
Picture #5 – This gif shows subgingival flossing (cleaning under the gum line).
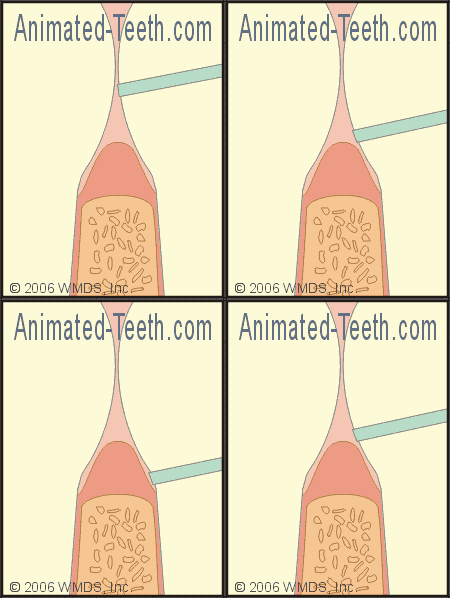
(The full length of the side of the tooth is cleansed. But the floss’ pressure is always kept against the tooth and never directed onto gum tissue.)
2) Cleaning underneath the gum line.
It’s only by drawing the floss snugly up against the side of each tooth (wrapping it into a C-shape) and sliding it up and down its full length repeatedly (two or three strokes), that ensures that subgingival (below the gum line) dental plaque is scraped away.
! Keep the pressure of the floss up against the side of your tooth.
When flossing, always keep the pressure of the string directed against the side of your tooth. Never draw it onto your gum tissue.
You don’t floss your gums, you floss your teeth. Directing the pressure of the dental floss onto your gum tissue will only serve to traumatize it.
Step #5 – Use a fresh section of floss.
Performing proper technique involves the use of a fresh section of floss in every new area that you clean.
This is easy enough to do. You simply need to unwrap the string from the fingers of one hand and then take up this slack by wrapping it onto the fingers of the other. (This is referred to as “spooling” the floss.)
The idea of using a fresh section is twofold:
- Spooling the floss helps to prevent spreading bacteria from one location to the other.
- Floss tends to deteriorate and shred when used. Using a fresh section between each pair of teeth helps to ensure that your efforts produce maximal effectiveness. It also reduces your potential for difficulties, like having your floss get stuck.
Step #6 – Finishing up.
Once you’ve cleaned between two teeth, ideally you’ll just bring the floss back up past their contact point and on out.
Avoiding trouble.
If when removing the floss you notice that it seems as if it wants to get hung up, just let go with one hand and pull it on out to the side.
Possibly this method leaves a greater amount of plaque behind. But that minor loss in flossing efficiency is a small price to pay as compared to getting it stuck or pulling out some of your dental work.
Shift to a new section of floss.
As a best practice, you should shift to a new section of floss before cleaning your next pair of teeth. The way to do this is simply unwind the floss from one hand and take up the slack on the other.
The idea is that after being used to clean a location the section might be frayed. Also, this process helps to minimize transferring bacteria from one location to another.
Rinse out afterward.
Once you’re completely finished, it’s not a bad idea to rinse out with water. Flossing dislodges plaque from your teeth. Rinsing helps to remove it from your mouth.
Tips, pointers, and things about flossing you need to know.
How often do you need to floss?
To maintain good oral health, proper flossing needs to be performed on a daily basis. Here are two reasons why:
1) Once-a-day flossing is based on the rate at which dental plaque reforms.
The goal of flossing your teeth is to scrub dental plaque off their surface. Once this task has been completed, plaque will start to reform immediately. It generally takes about 24 hours for it to form fully, hence the once-a-day recommendation for flossing your teeth.
2) Daily flossing helps to minimize tartar accumulation.
When left undisturbed, plaque can transform into dental tartar. Tartar is simply calcified plaque. The minerals needed for the calcification process come from saliva and other oral fluids.
The initial stages of the transformation of plaque into tartar can take place in as little as 24 to 72 hours. Once it has fully formed it really can’t be brushed or flossed off. For this reason, it’s important to floss daily so dental plaque is cleansed away before it ever has a chance to begin the calcification process.
When should you floss?
- The best time to floss is whenever you have enough available time to do it properly.
- Since saliva flow (and therefore the various protections it provides) diminishes when we sleep, flossing at bedtime makes a good plan.
Should you brush or floss first?
It doesn’t really matter all that much. The important thing is that you do both. Having said that, however, …
- The act of flossing dislodges debris but it may still remain in between or around your teeth. Brushing after flossing (and especially the spitting out and rinsing routine that frequently follows brushing) will help to ensure that this loose debris is removed from your mouth.
- Toothpaste ingredients (like fluoride) will be more effective if they have direct access to tooth surfaces (as opposed to them being covered with plaque).
Which teeth are the most important to floss?
The old joke is you only need to floss the teeth you want to keep, so you really need to clean all of yours, every time.
And don’t overlook the fact that floss can be used to clean some tooth surfaces that don’t have a neighboring tooth. This includes the backside of your last molars. Or teeth adjacent to spaces due to missing or lost teeth.
What kind of floss should you use?
Two of the most important factors to consider when choosing a type or brand of floss are:
- How easy is it to get the floss between your teeth? – If your tooth contacts tend to be tight (meaning it’s hard to get your floss through them), experiment with using very fine, waxed, or Teflon (Glide®) floss as a solution.
- Is the size of the floss appropriate for the amount of space that exists between your teeth? – If you’ve had some gum recession and the spaces between your teeth are comparatively large, dental tape or very thick, yarn-like floss may do a better job at cleaning these areas.
For young people or those who have not experienced any recession, fine or even very fine floss is probably the better choice.
Waxed vs. unwaxed flosses.
The preferred choice between these two is simply the one you find easiest to get between your teeth and use.
- In theory, since the individual fibers of unwaxed floss are loose and free, as you wrap the floss against tooth surfaces they will conform to the shape of your tooth more closely, and therefore clean more effectively.
Mono vs. multifilament flosses.
Recent decades have witnessed the introduction of monofilament dental flosses. These single-strand products are typically made from Teflon (brands include Glide® and SATINfloss®).
- Teflon flosses are less likely to shred when used. They are also more likely to break and come out easily rather than snag on rough dental restorations.
- The slippery nature of Teflon also assists in working this type of floss between your teeth.
Does it matter which kind of floss you use?
For the most part no. By far the most important factor is choosing a type that you find easy to use, so you are more likely to floss frequently and properly.
Can you reuse a piece of dental floss?
As long as it’s in good shape (isn’t frayed or shredded) you can consider reusing it. If you do …
- You should rinse it off and then drape it somewhere where it can dry out between uses. (Oral bacteria have difficulty surviving in dry environments.)
Some feel reusing floss is a bad idea.
We must report that contrary to what we state above some dental authorities, including the American Dental Association (ADA), don’t recommend reusing dental floss. So you’ll need to make your own decision about this issue.
- A part of their stance has to do with the condition of once-used floss and its potential loss in cleaning efficiency.
- Another is that it “may deposit bacteria in the mouth.” This quote taken from the ADA website seems to refer to bacteria picked up previously by the floss that are re-deposited back into the person’s mouth.
What blanket recommendations don’t seem to address.
- In regard to the latter point above, we’re unclear how reusing floss would differ substantially from reusing a toothbrush, which is something we all do every day.
However, we would agree (and similar as with toothbrushes) that you shouldn’t share a piece of floss with someone else. (Doing so might introduce new strains of bacteria into your mouth.)
- We will concede that multi-stranded (multifilament) types of floss do tend to harbor bacteria between their fibers and deteriorate/shred rapidly with use. But we’re not so convinced that this is also true for monofilament types.
After rinsing and drying, we’re not really sure where offending bacteria would find refuge in single-strand products. And even though we realize that they can only withstand so much wear and tear, these flosses are specifically marketed as non-shredding and therefore their suitability for reuse seems likely.
What about gum tissue bleeding and tenderness?
If you notice that your gums bleed or are tender when you floss, it’s typically a sign that you’re not doing it frequently enough, or else you’re using an ineffective or improper technique. It’s almost never a sign that you should discontinue flossing.
Having said that, if after a week or two of practicing correct, diligent, and thorough flossing you still notice regions that bleed, you should consult with your dentist so they can evaluate your situation and recommend a remedy.
The solution may be as simple as a routine dental cleaning. In other cases, it may be an indication of more serious gum problems. And as disappointing as that may be, the fact that you now have a proper flossing habit in place makes the long-term outlook for your condition after treatment as favorable as possible (regular flossing makes relapse less likely).
Demonstrate to your dentist how you floss.
It’s difficult for a website to fully explain all of the nuances of flossing. So our advice to you would be to study the information on this page and then at your next appointment demonstrate your interpretation of our instructions to your dentist or dental hygienist. That way they can evaluate and refine your technique as is required for your specific situation.