Looking for information about other Dental Topics?
Full Website Index• Animated-Teeth.com •

The steps of the porcelain veneer procedure.
The steps of porcelain veneer placement– Both conventional and ultra-thin.
the tooth.

This page outlines the individual steps a dentist follows when they make and place a porcelain veneer (dental laminate) for a patient.
(Although we only illustrate this process for a single tooth, multiple teeth can be treated simultaneously as a group.)
Page Table of Contents.
- The initial portion of this page outlines the protocol used to place conventional porcelain veneers.
- The second half then explains how those steps may be augmented when ultra-thin laminates are placed.
(Other names for ultra-thin veneers are no-drill, no-prep laminates, and the brand names Lumineers®, Vivaneers®, and DURAthin®.)
FYI: The veneering procedure is typically broken down into two separate appointments (as noted in our text). And usually, the needed time span between the two is one to two weeks.
It is possible, however, for dentists who have the necessary equipment to make and place a tooth’s veneer in a single appointment. We discuss that form of this procedure here.
The steps of the dental veneer procedure.
A) Conventional porcelain veneers.
Step 1: Preparing the tooth.
With conventional porcelain laminates, the idea is that the enamel on the front side of your tooth is trimmed back about the same amount as the thickness of the veneer that will be bonded to it. That way, once the procedure has been completed, the overall thickness of your tooth will not be dramatically changed (increased).
Issues your dentist will address while preparing your tooth.A tooth with stained fillings being prepared for veneer placement.
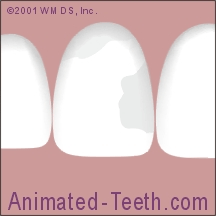
The tooth’s entire front surface is trimmed back about 1/50th of an inch.
a) While performing their work, your dentist will constantly keep in mind recognized guidelines as to the maximum amount of enamel that’s generally considered permissible to remove and try to stay within those ideal limits. (The box below explains some of these guidelines.)b) If your tooth has some areas of decay, your dentist will trim it more extensively in those locations so to remove it.c) At least in theory, porcelain veneers can be bonded over existing white (dental composite) fillings. However, replacing them with new ones helps to ensure the most secure bond possible.
A tooth with stained fillings being prepared for veneer placement.
The tooth’s entire front surface is trimmed back about 1/50th of an inch.
A study by Walls determined that bond strength is maximized if the new veneer is placed within 2 weeks of placement of the new filling. (Fabrication time for laboratory-crafted veneers typically lies on the order of 2 weeks.)
d) Your dentist will give the tooth’s preparation an outline form where the veneer’s edges are neither easily seen nor lie at a point where opposing teeth make contact.
e) There’s some debate as to whether the edge of a porcelain veneer should end right at the biting edge of its tooth or wrap around to its backside. (A study by Smales determined an 86% vs. 96% 7-year survival rate for veneers having these respective configurations.)
▲ Section references – Walls, Smales
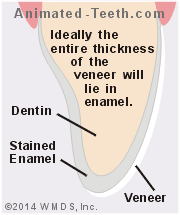
The ideal situation is one where all surfaces of the veneer only rest on tooth enamel.
FYI – For the most part, a dentist will try to limit the depth of the trimming to just the tooth’s enamel layer.
That way, all aspects of the veneer’s internal surface will be bonded directly onto enamel. (The type of tooth structure with which the most secure and predictable bond can be made.)
It’s permissible that in some areas the trimming may extend deeper and on into the tooth’s dentin layer. Dentists have agents that can adhere to this type of tooth tissue too. It’s just that the bond created is less secure than with enamel.
At a minimum, your dentist’s goal will be that at least all of the edges of the veneer will end on enamel. However, the further the tooth’s preparation strays from the ideal (a 100% enamel surface), the more likely the veneer is to fail.
This tooth’s preparation has been completed.
Only its front surface has been shaved back.
Exactly how much is trimmed away?
Trimming more.
In some cases, the dentist may decide to trim the tooth more, possibly on the order of 1.5 mm or so (about a 1/16th of an inch).
- More aggressive tooth preparation means that a thicker veneer can be placed. One that can both mask the color of the tooth underneath yet still retain a high degree of restoration translucency (a characteristic that helps to create a very natural-looking appearance).
- On the other hand, excessive preparation may expose regions of tooth dentin (the hard tooth tissue that’s found under enamel). If so, restoration longevity may be affected. (See boxed text above).
Will anesthetic be needed?
It can be possible to prepare teeth for veneers without the use of an anesthetic (a dental “shot”). But you may find that you want it.
Some teeth and tooth tissues are naturally sensitive to cold sensations (like those created by the dentist’s suction device or the water spray from their drill). And if the veneer’s edges will extend below the gum line, those tissues will need to be manipulated and may be sensitive.
FYI – Ultra-thin porcelain veneers (like the brands Lumineers®, Vivaneers®, and DURAthin®) offer an alternative to traditional laminates. And in some applications, their placement may not require any tooth trimming (tooth preparation) at all.
Note: While this technique does offer the no-drill advantage, its use is also associated with some disadvantages, which we discuss here.
Using a shade guide to determine which color of porcelain matches best.
Step 2: Taking the shade.
They may decide that different colors need to be used for different portions of the veneer. They’ll also make notes about which regions of the laminate need to be comparatively more or less translucent.
FYI – A veneer’s color can be adjusted when it is cemented onto its tooth (see below). And that means that the shade recorded at this point is less critical than with some other procedures (especially dental crowns).
Even so, we discuss general issues associated with shade matching here.
Step 3: Taking the impression.
Once the trimming has been completed, your dentist will take an impression of your tooth and its surrounding teeth and gums. It’s this copy of your mouth that will be used to fabricate your veneer.
There are two ways an impression can be taken.
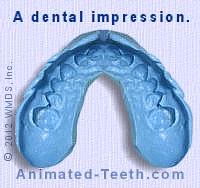
A dental impression.
Option A – Most dentists will take an impression using impression “putty” or “paste.”
This impression is then sent to a dental laboratory and they will use it to make your porcelain veneer. Depending on what arrangements have been made, the turn-around time for this process is usually about 2 weeks.
Placing retraction cord.
It’s common that a dentist will have prepared (trimmed) your tooth so the edge of your veneer tucks just underneath the gum line. And if so, they’ll probably pack retraction cord (a string similar to yarn) in the crevice between your tooth and its gum tissue just before taking its impression.
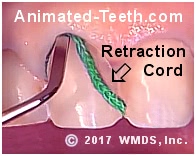
The placement of retraction cord before impression taking.
- Once in place, the cord pushes the gum tissue away from the tooth.
- Then, right before the impression is taken, your dentist will remove the cord.
- The idea is that even though the retraction cord has been removed, your gums will still remain pushed away from your tooth’s surface for a few moments.
- This lag provides an opportunity for the impression material to squeeze into the space below the gum line, thus capturing the full extent of the tooth’s preparation.
Option B – Your dentist may have a dental milling machine that’s coupled with a camera that can take an impression of your tooth optically.
Using this image, the machine can then grind your veneer out of a block of ceramic (synthetic porcelain), in a matter of some minutes.
The obvious advantage of this technique is that your tooth can be trimmed and its veneer bonded in place, all in one visit.
As convenient as this sounds, if your dentist doesn’t have one of these machines it can be for good reason.
- Milled veneers are ground out of a block of uniformly-colored ceramic.
- In comparison, veneers crafted by a laboratory technician can be characterized. Layers of porcelain, each having a different color and degree of translucency, can be used to create a veneer that truly mimics the unique characteristics of the neighboring teeth.
FYI – Characterization can be added to milled veneers by “staining and glazing” them. This is a process by which different colored stains are applied and then fused to the porcelain in a high-heat oven.
While this process can create reasonable results, this type of characterization is only a front-surface phenomenon and does not create the same life-like luster that variances crafted into the full thickness of a veneer can (as described here).
Step 4: Placing a temporary veneer (if needed).
In those cases where your veneer will be fabricated by a dental laboratory, you will usually have to wait 1 or 2 weeks while it is being made. The question then becomes whether or not you will wear a temporary veneer during this time period.
A) Situations where no temporary is placed.
This can be the plan for cases where just a minimal amount of tooth structure has been removed (like in our picture above) or when ultra-thin, no-preparation laminates (Lumineers®, Vivaneers®, DURAthin®, etc…) are placed. (The process explained.)
In cases where some minimal amount of tooth preparation has been performed, admittedly, on close inspection, your tooth will look a little strange. And since some of the surface layer of your tooth has been trimmed off, you may notice that it has an increased sensitivity to hot and cold foods and beverages and it feels a little rough to your tongue and lips.
But just how much of an inconvenience these issues actually are and whether or not a temporary veneer is therefore needed to offset them is something that only you and your dentist can decide.
FYI – When just a single tooth is being treated, its look may be different enough that a temporary may need to be placed.
In comparison, when several teeth are being treated as a group (like all 6 upper front teeth), it’s likely that their combined look will at least be uniform. If so, their appearance may not seem as strange or objectionable (at least to others).
B) Situations where a temporary is used.
It’s more common to place a temporary veneer when treating cases where there’s been a need to trim a relatively greater amount of tooth structure.
These are teeth whose appearance would be noticeably strange, or where the issue of thermal sensitivity might be a problem for the patient.
If having a temporary placed is important to you, and your dentist has not yet discussed this issue with you, you absolutely need to ask about it when your appointment is initially scheduled.
A dentist frequently uses a mold that’s filled will plastic and then slipped over your teeth to form the temporary. In some cases, this mold is made from a wax/plaster mock-up of your teeth that due to the time involved in making it must be arranged for in advance of your appointment.
FYI – Your dentist would probably prefer not to place a temporary unless it’s absolutely necessary.
A temporary veneer needs to be secure enough that it stays in place well but is also easy to remove at your next appointment. Keep in mind that, unlike a temporary dental crown that entirely encases its tooth, this type is just anchored on the front side. And this difference can make creating a successful temporary a bit of a challenge.
Dentists have solutions for these challenges but they usually come at the expense of creating some degree of gum inflammation (because you can’t floss and clean around the temporary veneer thoroughly). Inflamed gum tissue can be harder to manage when a veneer is cemented, primarily because it bleeds easily.
If you decide that no temporary is needed, your dentist doesn’t have to be concerned about it coming off, or being able to get it off. And during your cementation appointment, it’s more likely that they’ll have healthy gum tissue to work with. And that’s a very positive thing for the outcome of your case.
Step 5: The pre-cementation evaluation.
At this point, your porcelain veneer has been fabricated and is ready to be bonded onto its tooth. If a temporary veneer has been placed, your dentist will remove it.
FYI – Temporary veneers aren’t usually cemented, they’re just held in place by the way their plastic has set and locked in place on and in between your teeth.
Getting them off is easy enough. Your dentist will just use their drill and trim the temporary in half, then tease its parts off.
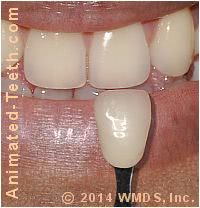
The veneer is placed on its tooth as a test, so to evaluate its fit and shade.
A) Checking the fit.
B) Evaluating the shape.
Even though the laboratory or milling machine that has crafted your laminate has crafted it to what it thought was the ideal shape, you and your dentist may decide differently.
Possibly certain edges need to be shortened, squared off, or rounded so it looks right. If so, your dentist will complete these changes.
FYI – Without question, the goal of this step is to get everything as right about the shape of your laminate as possible. But you don’t have to be too worried if you have some minor reservations about what you notice.
Further refinement can still be made later on after cementation. In fact, at this point, while your veneer just sits loosely on your tooth, trimming it too much might be the bigger concern.
C) Evaluating the color.
Your dentist will have chosen a shade of porcelain for your veneer that they expect will result in a close match with your tooth’s neighboring teeth. But because it’s translucent, its precise color can be fine-tuned by way of the shade of the cement that’s used to bond it in place.
Testing with “trial” paste.
Take note.
!! It’s important for you to understand that this is your last chance to make an objection about the color of your new veneer. Once it’s been bonded in place, it can’t be changed.
FYI – Just in case you missed it, the last point we mentioned bears repeating. This point in the placement process is the absolute last chance you have to express any objections you have about the color of your veneer.
Once it has been cemented in place, this issue is a closed matter.
[Having said that, there is one possible way a change might still be made (via whitening treatments). However, this is not a process you want to have to rely on. This is a stop-gap measure that may or may not work.]
Step 6: Bonding the veneer.
Once you and your dentist have determined that its shape and shade are right, your veneer can be bonded into place.
Your dentist will first wash out the trial paste and clean and prepare your laminate’s internal surface. They’ll also wash off and polish the surface of your tooth, so it’s clean and ready.
1) Etching the tooth. 2) Bonding the veneer in place. 3) Trimming the excess cement.
Etching the tooth.
Cementation.
After washing the etching gel off your tooth and drying it, your dentist will apply a layer of clear “bonding agent.”. (This creates the actual bond with the tooth’s etched enamel surface.)
Cement (having the color previously chosen) is then placed inside the veneer, which is then squished into place.
Once it’s been positioned properly, your dentist will set the cement by way of shining a “curing” light on your tooth.
This light (which has a blue coloration) activates a catalyst in the bonding agent and cement, causing them to set in about a minute.
The completed porcelain veneer restoration.
Step 7: Wrapping things up.
They’ll also need to evaluate your new restoration’s contours and trim and polish them as is needed.
As a last step, your bite will be evaluated so to confirm that it hasn’t been altered by the placement of your veneer.
Precautions.
Your dentist’s curing light set your veneer’s cement, so from that standpoint, it’s ready to be used, even immediately. Despite that, it’s not a bad idea to be cautious with your tooth at first.
Its shape might be slightly different than before (either a planned change or an oversight). Or in the case where an anesthetic was used or your jaw is still stiff from staying open during your procedure, initially you may find yourself closing your teeth together in completely abnormal ways.
Experiment with and settle into the use of your new laminate. If you notice anything that seems strange or amiss, don’t look for trouble. Just let your dentist know.
FYI – As a way of helping you protect your new restorations, your dentist may present you with a nightguard to wear.
The fragile nature of porcelain veneers makes them susceptible to fracture when exposed to excessive forces such as those associated with tooth clenching and grinding.
Since you have no control over these activities when you sleep, routinely wearing a guard can help to prevent this type of damage.
Step 8: The follow-up appointment.
Most dentists will want you to return to their office in about one week.
They’ll want to evaluate how your gums have responded to the presence of your new veneer. And if you have decided that its shape needs to be adjusted some more, they can do that at this appointment too.
Some people may notice that their veneered tooth has some hot and cold sensitivity. If you do, let your dentist know during this visit. While it’s common that it will resolve on its own, they may be able to speed the process up.
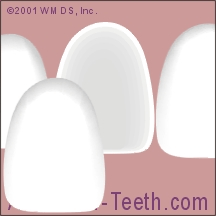
Single-appointment porcelain veneers.
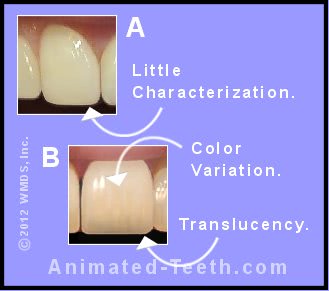
An issue to consider.
And due to this fact, they generally lack the same lifelike characterization that can be built into handcrafted veneers. As an example, consider the look of “A” (monolithic construction) vs.”B” (handcrafted construction) in our graphic.
The porcelain veneer procedure when ultra-thin, no-preparation laminates are placed.
One thing that makes ultra-thin laminates special as compared to conventional ones is that placing them doesn’t necessarily have to require any tooth preparation (trimming). And if so, that means that the patient avoids the dentist’s use of a dental drill on their tooth and possibly their having to get any shots (dental injections).
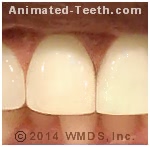
Conventional veneers vs. Lumineers®.
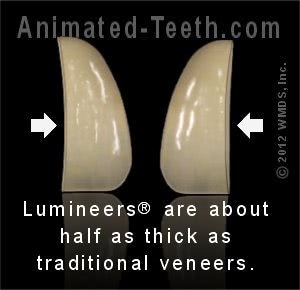
It’s the thinness of Lumineers® that makes them unique.
How is it that no-drilling placement is possible?
Differences between ultra-thin and conventional porcelain veneer placement.
Here’s how a no-drilling/no-shots protocol (the one that can be used with ultra-thin laminates) compares to a traditional veneering technique.
A) Conventional placement.
When traditional porcelain veneers are made, the dentist will first grind away some of the front surface of the tooth. (See picture “A” in our graphic.)
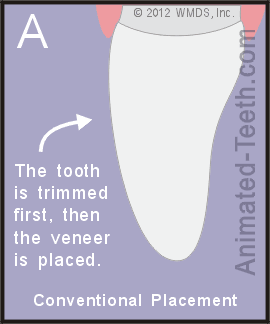
Conventional veneers vs. Lumineers®.
- The patient will have to endure the drilling process.
- An anesthetic will probably be required.
- Temporary veneers will likely need to be worn until the next appointment when the final restorations are cemented.
For more details, use this link for an overview of the steps a dentist follows when placing conventional porcelain veneers.
B) No-shots, no-drilling veneer placement.
Since ultra-thin products like Lumineers® can be made wafer-thin, they can be bonded right onto a tooth’s surface without unduly increasing its size (see picture “B” in our graphic).
- There’s no need for any tooth preparation (trimming) and therefore no need to administer a dental anesthetic (“shots”) to keep the patient comfortable during their procedure. (See the possible exception associated with impression taking mentioned below.)
- The dental work involved with the procedure’s first appointment is quick and comparatively easy. It can be as simple as just polishing the teeth so they’re good and clean and then taking a dental impression. Really.
- No temporaries are needed. Unlike with conventional technique where temporary veneers are sometimes needed to cover the patient’s trimmed teeth (because they may be rough, sensitive, or unsightly), with a no-drilling protocol they are never required.
But all of this simplicity comes with trade-offs. And you should know that not all dentists think that the use of this technique creates the best results. And in fact, for decades there’s been continued heated debate in the dental community about if and when a no-drilling approach makes an appropriate choice.
(This page discusses specific disadvantages and problems associated with placing ultra-thin veneers using a no-drilling technique.)
When the use of ansthetic may still be needed.
As just mentioned, no-drilling, no-shots Lumineer® placement has some disadvantages associated with it. And one of these is that the veneers often need to be relatively thick at their gum line edge so they adequately mask over the tooth structure that lies underneath. Unfortunately, this configuration makes it more difficult for the patient to remove gum-line dental plaque from around their tooth.
This problem can be minimized if the dentist is able to finely taper and extend the edge of the veneers underneath the gum line (where their inability to mask the tooth won’t show). But doing so typically requires retracting (pushing back) the gums right before the impression is taken.

Placing retraction cord usually pinches.
So if experiencing dental injections is not a big issue for you, allowing them will probably aid in creating the best outcome for your case possible. (You’ll still reap the benefit of no tooth trimming.)
Actually, ultra-thin laminates can be used with either protocol.
We’re not trying to confuse the issue here but the following point needs to be made.
Lumineers® (and similar ultra-thin products) can be placed using either a traditional or no-prep technique (the two techniques discussed above).
- Just because they can be made to wafer-thin tolerances (.2 to .3 mm in thickness) doesn’t mean they have to be.
- They can be made to conventional dimensions too (.5 mm thickness or more).
That makes them possible to place no matter what the patient’s case (or even individual teeth involved in the case) calls for.
C) Minimal-prep veneers.
As yet another variation, dentists have the option of placing ultra-thin veneers using a minimal-tooth preparation technique.
This procedure is defined as the situation where the tooth is trimmed down, but less so or less extensively than it would when using conventional placement protocol. (Typically .3 to .5 mm vs. .5mm or more for conventional veneers.)
Advantages.
The patient still reaps some benefits (minimal drilling, likely no “shots,” no need for temporaries, etc…). Yet by trimming back the most prominent portions of each tooth, the dentist can create a better functioning or more aesthetically pleasing end result than they could with a no-drill technique.
Minimal-prep brand names.
Each of the ultra-thin veneer brands mentioned above (Lumineers®, Vivaneers®, and DURAthin®) can be placed using a minimal-prep technique. MAC® (MicroDental Laboratory), daVinci®, and IPS e.max veneers are suited to this type of placement too.
Last reviewed: June 14, 2022
Author: Paul Cotner, DMD — retired dentist.
Published by: WMDS, Inc. — owner of Animated-Teeth.com.
Educational information only — not a substitute for professional dental care.
Page references sources:
Smales RJ, et al. Long-term survival of porcelain veneers using two preparation designs.
Walls AW, et al. Crowns and other extra-coronal restorations: porcelain laminate veneers.