Looking for information about other Dental Topics?
Full Website Index• Animated-Teeth.com •

A step-by-step guide to the Dental Sealant Procedure.
How dental sealants are placed.
Dental sealants are a proven method to protect teeth from cavities, especially for children and teens. This guide outlines the step-by-step process of applying them, from cleaning the teeth to finalizing their application.
This is a simple procedure.
Understanding the process of placing tooth sealants is important, especially for younger patients, because few dental procedures are as quick, easy, and painless. And since sealant placement can help to prevent the need for a filling, anyone and everyone should be eager to have this simple procedure performed. In fact, it makes a great introductory dental procedure for young children.
The steps of the Dental Sealant procedure.
Here’s an outline of the steps your dentist will follow when sealing your child’s tooth. If adjacent teeth are being sealed, the same step can be carried out for each tooth in tandem.
Step 1 – Isolating the tooth receiving the sealant.
Before a dentist can get started working with a tooth, they’ll need to figure out how they’re going to keep it saliva-free and dry while they work. This is called “isolating the tooth.”
A lot of times, adequate isolation can be accomplised just by placing a roll of cotton along side the tooth. However, a more secure method involves stretching a sheet of rubber around it (termmed “placing a rubber dam”).
Both techniques are simple enough, we explain them in greater detail here.
Step 2 – Cleaning the tooth’s surface.
To start, the dentist must clean the surface of the tooth, otherwise the sealant will not bond to it properly.
Slideshow of the individual steps of dental sealant placement.
- As the drill spins the brush, they’ll scrub the tooth’s surface and clean out its grooves.
- It’s common for a dentist to dip the brush in a slurry of pumice. Its gritty nature assists the brush in cleaning the tooth.
Variations: If after using a brush, if the grooves of the tooth still seem to harbor debris, the dentist may take extra steps.
- Air-abrasion technique. – This method involves using a mini-sandblaster on your tooth. The machine itself will make a “blowing” noise, and using it can be a little messy. But overall the process of cleaning out the grooves of your tooth this way is painless.
- Enameloplasty. – With this method, the dentist uses their dental drill to buff out the remaining debris. The amount of trimming is very slight. No anesthetic is required.
FYI –It’s also suggested that the use of these additional mechanical techniques may help to improve the retention and seal of the sealant.
A study by Agrawal evaluated the microleakage of sealants following different types of tooth surface preparation.
Its conclusions were: 1) Surface preparation using a drill produced results that were significantly superior to any other technique. 2) Air abrasion technique was significantly better than the use of a brush.
However, not all studies have reported these same kinds of findings. And in fact, many suggest that these kinds of extra steps really aren’t as beneficial as they might seem.
So if your dentist does do some additional groove cleaning and shaping, don’t be surprised. But if not, there’s no reason to be especially concerned.
▲ References for both the above section and the remainder of this page – Dean, Nowak
Step 3 (picture B) – Conditioning the tooth’s surface.
After cleaning the tooth, the dentist will spread “etching” gel over the area where the dental sealant will be placed.
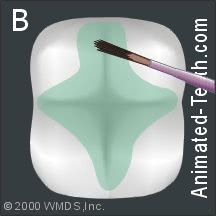
Etching gel is applied to the tooth’s surface in preparation for sealant placement.
What does etching the tooth’s enamel do?
The etchant prepares the tooth’s surface so the sealant will be able to bond to it (explained below).
Etchant FYIs:
- Tooth etchants are acidic (they usually contain in the neighborhood of 30 to 50% phosphoric acid). If you were to get some on your tongue, it wouldn’t hurt but it would taste bitter or sour.
- The acidic nature of the etchant has the added benefit of killing bacteria that lie at the bottom of the tooth grooves being sealed.
- Instead of etching gel, some dentists may prefer the use of an etching solution (liquid). Acid solution and gel work in the exact same way and accomplish the exact same goals.
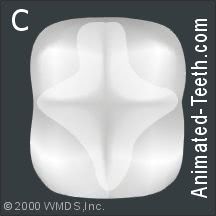
Etched tooth enamel has a frosted-glass appearance.
Step 4 (picture C) – Evaluation of the etching step.
A simple warning.
Once your tooth’s surface has been conditioned (etched), it must remain dry for the remainder of the sealing process. If saliva gets on your tooth (like if you close to swallow unexpectedly), it must be re-etched. So keep your mouth open wide from here on out.
What the etching step has accomplished.
The tooth’s frosty look holds the key to the whole dental-sealant bonding process.
At a microscopic level, the acidic etchant has dissolved some of the mineral content from the tooth’s enamel surface. That means the tooth is now rough rather than smooth (hence the change in its appearance).
The dental sealant is able to stay in place because it can grasp onto (bond to) this roughened surface. (If you’re interested in more details, this page explains the science associated with dental bonding.
FYI –The type of material whose use we describe on this page is referred to as resin-based sealant. And it is the kind most frequently used for this procedure.
Resin dental materials are plastic in nature, and this group includes the restoratives dentists use to create white (bonded) fillings.
Other classes of materials can be placed as sealants (most notably glass ionomer) but usually just in special situations. Some don’t require an etching step, or the use of a curing light (the next steps discussed).
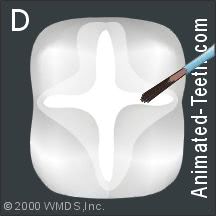
The sealant (a thick liquid) is dabbed into the tooth’s grooves.
Step 5 (picture D) – Applying the sealant.
- The liquid nature of the sealant is such that it will flow into each groove’s nooks and crannies.
- The sealant isn’t used to fill in the tooth’s entire chewing surface but instead just those areas (chewing surface and sides) that have pits and fissures that have the potential to trap and retain debris.
The sealant is set by shining a curing light on it.
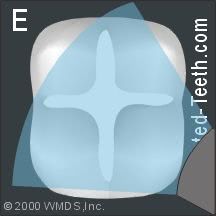
Step 6 (picture E) – Curing the sealant.
That means the sealant will stay in liquid form for as long as the dentist needs it to. But once it’s been positioned properly, it can be set instantly (in about 60 seconds or so) simply by shining the curing light on it.
FYI –As a variation, some types/brands of sealants are autopolymerizing (self-set). Two components (part A and part B) are mixed together. The mixture then sets on its own within a minute or two, which means the dentist has to work pretty quickly.
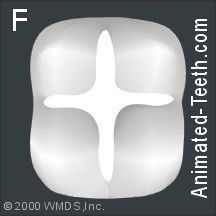
The sealant is finished and ready to go.
Step 7 (picture F) – Evaluating the sealant.
Of course, the dentist will need to evaluate their work. For example, they’ll run a pointed hand tool (a dental explorer) across the tooth’s surface to check to see that all of its grooves are filled properly and the surface of the tooth is smooth.
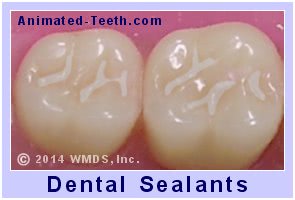
Completed dental sealants.
Checking your bite.
If it does, the dentist will buff the sealant for a split second or two with their dental drill, so to thin it out.
Step 8 – The sealing process has been completed – Your tooth is now protected.
After it’s passed its evaluation, the new sealant is ready to be used. Eating and drinking, even immediately, pose no problem.
FYI –Sometimes after you’ve left your dentist’s office you’ll notice that your bite seems to be just a little bit off.
That’s usually because after staying open for a procedure, it’s hard for a patient to just close normally when their dentist checks their bite. And as a result, something is missed and not buffed down.
You should let your dentist know if you notice this problem. However in most cases, since dental sealant material is relatively soft, it will wear off prominent locations fairly quickly on its own, thus returning your bite back to normal.
As one last point, over time your dentist will need to monitor the condition of your sealants (like during future dental checkups) to make sure they remain fully intact or, if needed, replaced or repaired. More details about Monitoring dental sealants.
How long does the sealant procedure take?
From start to finish, it can take as little as 5 to 6 minutes to seal a tooth. This can be whittled down to even less time per tooth if multiple adjacent teeth are sealed during the same appointment.
Factors that will affect how long the procedure will take include how cooperative the patient is and if the dentist has easy access to and good visibility of the tooth.
Case Study: Breaking up an appointment for a nervous patient.
A 6-and-a-half-year-old girl is scheduled to have all four of her first permanent molars sealed but feels scared about keeping her mouth open for too long.
Sensing her worry, the dentist gently says, “Don’t worry, we’ll take it one tooth at a time. After I finish each one, you’ll get a little break to rest your mouth and even rinse if you’d like. You don’t have to do everything at once—we’ll go nice and slow.”
Reassured, the girl feels more confident, and the procedure proceeds successfully.
Tooth isolation during your procedure.
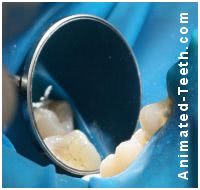
Teeth that have been isolated using a rubber dam and are ready to be sealed.
Rubber dams.
A rubber dam is a sheet of latex. The dentist punches holes in it (one for each tooth) and then fits it over the teeth receiving treatment. Because it separates the portion of the teeth that the dentist is working on from the rest of the mouth, it is easy for the dentist to keep them dry.
Case Study: Overcoming a child’s apprehensions about a rubber dam.
A little girl arrives for her sealant placement procedure. However, different than explained before, the dentist feels that placing a rubber dam is necessary to predictably isolate her molars.
Noticing the girl’s hesitation, the dentist calmly explains, “This is like a little raincoat for your tooth. It keeps it nice and dry while we work.” The dentist shows the girl the materials, letting her touch the dam and see how soft it is. Reassured, the girl relaxes, and the procedure is completed smoothly.
What type of sealant material is placed?
- The materials most frequently used to seal teeth are dimethacrylate monomer (BIS-GMA) diluted with a co-monomer, or else urethane dimethacrylate (UDMA).
As complex as these names sound, they’re just plastic compounds (or as dentists refer to them, “resins.”) These materials are similar in nature to those that are used to create white fillings.
FYI: Concerns with Bisphenol A (BPA).
- As alternatives to resin-based products, other types of materials can be used instead. This includes glass-ionomer dental cement, which has the added benefit that it releases fluoride. This is the most frequently used alternative.
Historically, zinc phosphate dental cement has also been used. (FYI, both of these products, zinc phosphate and glass ionomer, can be used for other applications, like cementing dental crowns.)
FYI –When glass ionomer cement is used to seal teeth, the steps of the sealing process remain essentially the same as outlined above.
- A major exception is that no etching step is needed. (An etched enamel surface is not required to create its bond with tooth enamel.)
- Additionally, moisture control is less critical when glass ionomer cement is applied. This factor may be quite beneficial for some cases (like those involving patients that are very young or else uncooperative, or teeth that are not yet fully erupted).
Resin-based sealant options and variations.
- Resin sealants can be white, clear, or tinted. White and colored plastics are generally easier to see and therefore easier to monitor. However, using clear resin makes it possible for the dentist to visualize and monitor what’s going on underneath.
- Some sealant formulations contain fluoride, which is considered an aid in increasing the tooth’s resistance to decay formation.
Tips on preparing your child for their dental sealant procedure.
Children who have never had a filling placed will have little concept of the difficulties the simple act of placing a tooth sealant can avoid. And because of this, they may lack the motivation to offer their highest level of cooperation during their procedure.
Preparing your child mentally for their upcoming appointment can go a long way in ensuring that your dentist receives the cooperation they need to do their best work. It will also help to ensure that your child’s appointment is a positive experience for them.
Toward these goals, here are some suggestions of things you might do before their appointment.
1) Talk through the sealant placement procedure with your child.
We’d like to think that after reading our pages a parent will be knowledgeable enough about dental sealants to be able to explain to their child why placing them is so important and how quick and painless the procedure can be expected to be.
2) Use visual aids when having your talk.
During your discussion, don’t overlook using our illustrations, animations, and quiz to explain the procedure. A picture often is worth a thousand words. Also, you might role-play the procedure using a familiar doll or stuffed animal.
3) Be upbeat and reassuring.
Make sure to use positive language when explaining the procedure and, of course, avoid using negative terms or phrases that may induce fear. Also, encourage your child to ask questions about points that are of interest or unclear to them.
4) Be honest about what to expect.
Be candid when explaining to your child what to expect. For example, it can be difficult for a child to stay open for the few minutes that it takes their dentist to apply the sealant, as can just sitting still. And yes, they may experience some unexpected, not-so-great tastes during their procedure.
But reinforce that they can also expect this to be a quick and painless process that pays big rewards in terms of preventing cavities and needing fillings.
5) Schedule a morning appointment.
You know your child best but kids tend to be more alert and cooperative in the morning.
6) Bring comfort or distraction items.
Your child may feel more at ease during their appointment if you allow them to bring a comfort item, like a favorite toy or blanket.
Or, distraction may make the best plan. If so, have them bring along headphones so they can listen to their favorite music or audiobook while their work is being completed.
7) If you accompany your child into the dentist’s operatory …
Make sure to offer positive reinforcement for good behavior and bravery during their appointment.
Teach your child simple relaxation techniques beforehand, like deep breathing to stay relaxed, and coach them them during their appointment.
Of course, every child is unique and as their parent you no doubt know which approaches will tend to favor their individual needs and preferences. And using these techniques to create a positive and supportive atmosphere will certainly go a long way in helping to ensure a successful dental sealant procedure.
When explaining things to your child …
You may find the following picture set and our quiz helpful when explaining their upcoming procedure to them.
a) Our Dental Sealants Procedure picture set.
The pictures grouped here are the same ones we use above to explain the steps of the procedure and might be used for a quick review or talk-through with your child.
When you hover your computer’s cursor over each graphic’s number (the gold box), a brief description of the step will show.
1
2
3
4
5
6
b) Our Dental Sealant Procedure quiz.
Our illustrated quiz is too advanced for very young kids. But when taken with a parent, it provides a good way to talk through the procedure with a child.
https://www.animated-teeth.com/?p=1120#quiz
What else should you know about dental sealants?
Frequently asked questions.
In brief, here are some FAQs about dental sealants. If you want more detailed information, use the link that follows our FAQ section.
What are dental sealants?
A tooth sealant is a protective thin plastic coating that has been bonded into the grooves (pits and fissures) of a tooth. A sealant helps to prevent tooth decay by filling in the grooves of a tooth so dental plaque and food debris can’t accumulate there.
What teeth are sealants usually placed on?
Permanent molars and bicuspids (premolars), especially those that have deep grooves (pits and fissures) on their chewing surface, are the most likely candidates for sealant placement. Somewhat less frequently, sealants are placed on primary teeth (baby teeth).
At what age should sealants be placed?
Most sealants are placed on the teeth of children 6 through 12 years of age. Generally speaking, a sealant should be put on a tooth as soon as it has erupted far enough through the gum line that the procedure can be performed.
First permanent molars come around 6 years of age and second molars typically around 12 years. First and second premolars also come in within this time span. Ideally, each tooth is sealed as it comes in, although a tooth can be sealed any time before decay formation has started.
FYI: Our page Dental Sealant Basics explains all of these points (and more) in much greater detail.
Or, if you’re looking for other topics related to dental sealants, scroll on down a few lines to see our ‘What’s Next?’ menu. Thanks for visiting.
Last reviewed: December 16, 2024
Author: Paul Cotner, DMD — retired dentist.
Published by: WMDS, Inc. — owner of Animated-Teeth.com.
Educational information only — not a substitute for professional dental care.
Page references sources:
Agrawal A, et al. Comparison of six different methods of cleaning and preparing occlusal fissure surface before placement of pit and fissure sealant: an in vitro study.
Cvikl B, et al. Pit and Fissure Sealants—A Comprehensive Review.
Dean JA, et al. McDonald and Avery’s Dentistry for the Child and Adolescent. Chapter: Pit-and-Fissure Sealants and Preventive Resin Restorations
Nowak AJ, et al. Pediatric Dentistry: Infancy through Adolescence. Chapter: Pit and Fissure
Sealants. Scientific and Clinical Rationale
Comments.
This section contains comments submitted in previous years. Many have been edited so to limit their scope to subjects discussed on this page.
Comment –
Simple
I had this done. My dentist sand blasted my teeth. Then they washed and dried each tooth and then put a blue light on it. I’m 8. Easy
Brian
Reply –
Thanks for the testimony Brian.
To others reading, from Brian’s (the patient’s) perspective, that does seem to be about all that goes on. However for a fuller description of each step involved, see our text above.
The “sand blasting” he refers to is the dentist’s use of air abrasion technique. This optional step is described above too.
Staff Dentist
Comment –
Super easy.
I had this last year when I was 8. It was easy and now I have stronger teeth. Perfect!
Danny
Reply –
We think it’s important for other kids to know how easy this very valuable procedure is, so thanks for reporting Danny.
And of course, your teeth are “stronger” in the sense that they are better protected from the process of tooth decay formation due to the presence of the sealant. That’s great.
Staff Dentist