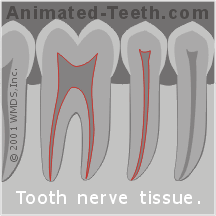
The root canal procedure. –
the tooth.

the tooth.
The steps of endodontic therapy.
This page outlines the process a dentist follows when providing conventional root canal treatment for a patient’s tooth. (The basic procedure most frequently performed for teeth.) And with each step’s description, we explain what it’s like for you the dental patient when it’s carried out.
However, as a start for our discussion, we first answer some quick questions that people usually have about this procedure. Then, on the remainder of this page, we describe each step of the procedure in detail. Jump ahead. So, let’s begin …
a) What is a root canal?
Root canal treatment (endodontic therapy) is a dental procedure aimed at treating the nerve space inside a tooth. It’s used to remove inflamed, necrotic, or infected pulp tissue (and associated contaminates) from the tooth’s interior. This cleansed and disinfected space is then filled in (sealed) to prevent further infection.
Other terms for this procedure are “non-surgical” and “orthograde” endodontic therapy. Both of these names indicate that the dentist’s work is performed through an opening made in the tooth’s crown (the portion that lies above the gum line), as opposed to accessing the root directly through the bone via some type of surgical procedure.
b) What takes place when root canal treatment is performed?
This procedure can be thought of as a two-part process.
- Stage 1 – Cleaning, shaping, and disinfecting – During the first part of your procedure your dentist will use their instruments to remove all remnants of pulp tissue (nerve) from your tooth’s root canal system (pulp chamber + root canals).
At the same time, they’ll disinfect this space and use their tools to idealize its contours (in preparation for Stage 2).
- Stage 2 – Filling and sealing – As a second step, your dentist will fill in your tooth’s cleansed root canal system to seal it off from further infection.
c) Why would you need a root canal?
Performing endodontic therapy becomes necessary when a tooth’s pulp tissue has become irreversibly inflamed, infected, or has died. These conditions can be a result of extensive tooth decay, bacterial insult, acute tooth trauma (chipping, cracking, fracture), or accumulated trauma (teeth grinding/clenching, repeated dental procedures).
Performing treatment resolves the pain and infection frequently associated with endodontic problems and creates a healthy foundation for rebuilding your tooth.
d) What are the signs of needing root canal?
Common signs and symptoms include:
- Tenderness in the tissues that surround your tooth. | Persistent pain (intermittent or steady, possibly throbbing). | Swelling (in the soft tissue around your tooth and possibly your face too).
- Your tooth may exhibit – Sensitivity to pressure (tapping or biting on your tooth). Thermal sensitivity (especially to hot foods and liquids).
- A recurring abscess (a gum boil / transient pimple-like swelling) sometimes forms near the tooth and periodically discharges pus and a bad taste.
e) What are the steps of the root canal process?
This subject is the primary focus of the lower portion of this page. If you’d like, use any of these links to jump ahead.
- Isolating your tooth for its procedure.
- Creating the procedure’s access cavity.
- Identifying your tooth’s root canals.
- Measuring the length of the canals.
- Cleaning and shaping your tooth.
- Filling and sealing your tooth.
- Placing a temporary restoration.
- Additional dental work required for your tooth.
f) What’s it like to have root canal treatment?
Since your dentist will numb you up for your procedure, you should find your experience to be a non-event. However, you will feel the minor vibrations created by your dentist with their instruments as they work.
Note: Along with our explanation of each step of the root canal process (see below), we also explain what that step is like for you the dental patient.
g) What happens after root canal? | Recovery.
- Most people won’t experience any after-effects following their treatment. However, some minor level of discomfort might be noticed. If so (and if an appropriate medication for you), taking ibuprofen (Advil, Motrin) makes an effective choice.
- Following your treatment you’ll need instructions from your dentist about precautions to take with your tooth before its final restoration is placed. You’ll also need to be told how soon that needs to occur.
FYI – For more details check out our page: What to expect after your root canal appointment. Go
h) What additional dental work will your tooth require?
In all cases, following the completion of your tooth’s endodontic therapy, your tooth will need to have some type of permanent restoration placed
In some cases, a filling may suffice. Often, placing a dental crown makes the best choice. Choosing the right kind of final restoration is important because it helps to seal and protect the work you’ve had done.
FYI – For more details visit our page: Rebuilding your tooth after its root canal treatment. Go
The steps of the root canal procedure.
FYI: Collectively, the three videos found on this page provide a brief overview of the root canal treatment process. Our most detailed and thorough information, however, comes from this page’s text.
Page highlights as a video –
Note: Dental-Picture-Show’s content and videos have now been absorbed into Animated-Teeth.com.
Step 1 – Isolating your tooth.
Placing a “rubber dam.”
After numbing up your tooth and its surrounding gum tissue, as a first step of your root canal procedure, your dentist will “isolate” your tooth by way of placing a rubber dam.
A dental dam is simply a sheet of “rubber” (actually, in most cases a sheet of latex is used) that’s had a hole punched through it. The dam is then stretched over your tooth so it pokes through the hole. (See picture below.)
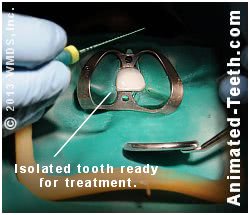
A rubber dam creates a controlled environment where successful endodontic therapy can be performed.
If you’ll notice, the portion of the tooth that sticks through the dam now lies totally isolated (separated) from the rest of your mouth. This is the portion of your tooth that your dentist will be working with. And because a dam has been placed, it now occupies a position where its environment can be totally controlled. It can be kept dry and contaminant-free during its procedure.
FYI: If you’d like more information about dental dams you can find it here. What is a rubber dam? Pictures | Diagrams
Why is tooth isolation so important?
- One of the fundamental goals of root canal therapy is removing contaminants from within the tooth. Why that’s important.
- The barrier created by a dam aids with this goal by preventing saliva (a source of bacteria and debris) from gaining entry into the tooth while its work is being performed.
What’s placing a dam like for the patient?
Having a rubber dam placed should be a non-event.
- Since you’ve already been numbed up for your procedure, there shouldn’t be any discomfort involved, either as it’s placed or while it’s worn while your dentist performs your work.
- Your dentist will place a small metal rubber dam clamp on your tooth to hold the dam in position and you may feel the pressure of its grasp. But nothing about the clamp should be painful.
FYI: We have an entire page that’s dedicated to details about rubber dams A to Z., including how they’re placed, what it’s like to wear one, and why the use of one during your root canal work is so important.
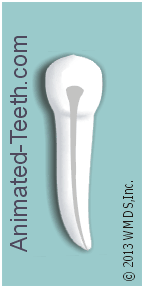
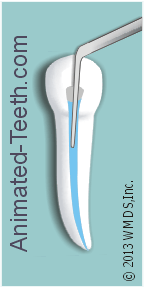
Step 2 – Creating the access cavity for your procedure.
As a starting point for working inside your tooth, your dentist will need to create an opening that extends into its nerve space. This step is called creating an “access cavity.”
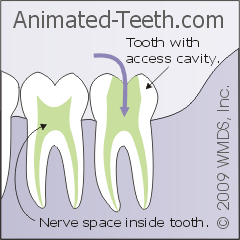
The process is simple enough. Your dentist will just drill into your tooth not unlike when a filling is placed. But in this case, the hole will extend deeper inside your tooth all of the way into its nerve space.

The hole through which the dentist will perform your tooth’s root canal work.
As our picture here shows, with back teeth the opening is characteristically made through their chewing surface. With front ones (like the tooth shown in our previous picture above), it’s made through the tooth’s backside (lingual/tongue side).
FYI: There are a few specific goals and objectives that the shape and extent of an access cavity must meet. If you’re interested, we discuss these issues in detail on our page: Endodontic access cavities. A to Z.
FYI: A question that patients frequently have is what becomes of their current dental crown if an access opening is made through it. We discuss this matter on our page: Issues involved when treating teeth that have dental crowns. Can the crown be reused?
What’s this step like for you the patient?
Even though you’ve been numbed up for your procedure, dental local anesthetics don’t have the same profound effect on nerve fibers that transmit pressure sensations as they do pain transmitters. So, when your dentist starts to drill into your tooth, you likely will feel the (just minor) vibrations the process creates.
In regard to your potential for feeling pain, it is possible that the anesthetic that your dentist has given you has not had as profound an effect as expected. And if not, as your dentist’s drill gradually penetrates further and further into your tooth, (with some kinds of cases) there is a potential that you might start to feel some discomfort.
In preparation for this scenario, most (the best) dentists will establish a prearranged hand signal for you to use to indicate that they should stop and investigate what’s bothering you. Once they realize that a problem exists, they can then determine what steps are needed to control your discomfort. What they can do.
Step 3 – Identifying all of the tooth’s canals.
Once entrance into the nerve space of your tooth has been made, your dentist will need to locate the openings of each of its root canals. (How many canals does your tooth have? What’s normal? | Variations.)

A very important aspect of endodontic therapy is that each root canal is identified and treated. Falling short of this goal will lead to case failure. Here’s why.
A surgical operating microscope may be used.
It’s becoming more and more common for dentists to use a surgical operating microscope when searching the floor of your tooth’s pulp chamber for the openings that lead into each individual canal. That’s because some of these openings may be so minute that they’re easily overlooked by the naked eye.
FYI – The use of a microscope increases the likelihood Study findings. that all of your tooth’s canals will be found and therefore treated, which is an important factor in obtaining treatment success.
However, these instruments have a price tag associated with them. So while it’s commonplace that an endodontist (root canal specialist) will have one in their office, it’s less likely that your general dentist will.
What’s this step like for you the patient?
Your dentist searching for the openings to your tooth’s canals should be a non-event for you. Pain should not be a factor.
For this task, a dentist will typically use a pointed hand instrument or root canal file (see below), and use it to feel around on the floor of your tooth’s pulp chamber until each opening is found.
In cases where a canal’s location isn’t immediately apparent, your dentist may need to trim away a little more inside your tooth to expose it. If so, at most you should just feel the slight vibrations of your dentist’s dental drill as it’s being used.
Page highlights as a video –
Note: Dental-Picture-Show’s content and videos have now been absorbed into Animated-Teeth.com.
Step 4 – Measuring the length of your tooth’s root canals.
When performing your tooth’s endodontic therapy, your dentist’s goal will be to treat the full length of each of your tooth’s root canals but not beyond. Adhering to this rule is not only important for creating treatment success but also in helping to minimize your potential for complications with post-operative pain. What causes it.
To meet this goal, your dentist must measure the length of each of your tooth’s root canals. The measurement is typically calculated to a tolerance of 1/2 millimeter (about 1/50th of an inch). (Hargreaves)
FYI: You might be surprised to learn that there’s considerable controversy about just where in a canal its endodontic therapy should terminate. (Where the appropriate treatment endpoint lies.)
- Some studies have concluded that treatment should extend all the way to the root’s apex (very tip). Others suggest that a point 1 to 2 mm shorter gives a better chance of case success. (Hargreaves)
- To confuse matters even further, other studies have determined that the endpoint chosen should be influenced by both the current status of the tooth’s pulp tissue (i.e. necrotic, vital, inflamed), and the degree to which the tooth’s pathology has affected its surrounding bone tissue. (Hargreaves)
▲ Section references – Hargreaves
How does a dentist make root canal length calculations?
There are two methods that a dentist can use to measure a canal. It’s not uncommon that they will use both techniques, with one confirming the other.
A separate measurement is made for each of the tooth’s individual root canals. (Teeth can have several canals and/or roots. Depending on the kind of tooth.)
Measurement methods –
a) Taking an X-ray.
Traditionally, dentists have established/confirmed/documented canal length measurements by way of taking an X-ray of a root canal file What’s this? that’s been positioned in the canal. (Since these files are metal, they show up very distinctly on a radiograph.)
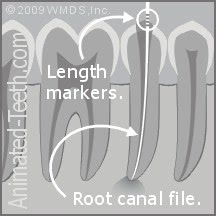
Measuring the length of a canal.
b) Electronic measurements.
The same measurement can be made using an electronic device termed an “apex locator.” (The word “apex” refers to the tip of the tooth’s root.)
FYI: We discuss how measurements are taken using both methods on our “Measuring the ‘working length’ of root canals” page. How it’s done. Our page also explains the strengths and weaknesses of each method.
What’s this step like for you the patient?
Neither method poses any risk for you to feel pain. The electronic method is quick and simple. Your only hint that work is going on may be the beeps that the machine makes as it performs its calculations.
In comparison, taking an X-ray can be a bit cumbersome for you and your dentist. (They may need to reposition your chair as well as have you hold the film/sensor.) But the information that an X-ray picture reveals can be a great asset in treating your case. In most cases, both methods are used.
Step 5 – Cleaning and shaping your tooth’s root canals.
The next step of the root canal process involves “cleaning and shaping” the nerve space inside your tooth. Its component parts are the tooth’s pulp chamber and each of its root canals More details..
Total tooth nerve space =
pulp chamber + canal(s).
In regard to this step:
- The cleaning aspect of this process removes nerve tissue (live and/or dead) along with bacteria, bacterial toxins, and other accumulated debris harbored inside the tooth. Why this is needed.
- Shaping refers to a process where the contours of the tooth’s canals are enlarged and flared so they have a more idealized shape for the procedure’s filling and sealing step. Why that’s important.
The whole cleaning process is a delicate balancing act. One where the dentist will seek to accomplish the step’s needed goals without removing an excessive amount of internal tooth structure which might compromise the tooth’s structural integrity or the outlook for its completed work.
▲ Section references – Tronstad
a) What tools does a dentist use to clean and shape your tooth’s root canal system?
For the most part, the interior portions of a tooth are cleaned and shaped (rasped and planed) via the use of a series of different-sized root canal files.
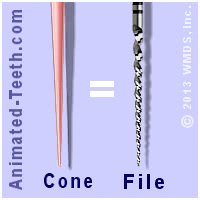
What do root canal files look like?
At first glance, files tend to look like tapered straight pins. But on closer inspection you can see (or feel) that their surface is grooved, not smooth. In general, files can be thought of as miniaturized rasps that come in an assortment of (very precise) sizes.
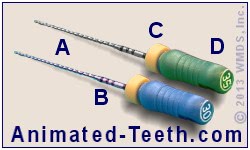
Root canal files.
FYI – If you’d like more details, we cover this subject in greater detail on our page: What are root canal files? A to Z.
b) How are root canal files used inside a tooth?
The basic filing motion.
In general, a dentist will work a file with an up-and-down motion, combined with some type of twisting action. However, the specific motion used will depend on both the file’s design and what the dentist is trying to accomplish. Filing technique.
The primary cutting action of a file is on the upstroke.
Aids to the filing process.
To assist the filing process, your dentist will probably coat each file with EDTA paste or gel (ethylenediaminetetraacetic acid) before it is used.
- EDTA is a chelating agent. This class of compound softens the mineralized walls of a tooth’s canal and therefore helps to make the actions of the file more effective.
- The wet, thick consistency of the paste also serves as a lubricant for the file.
Both of these functions can be especially helpful when the dentist is trying to negotiate, clean, and enlarge very tight and narrow canals.
▲ Section references – Ingle
c) Your dentist will use several files.
Note: What we describe here is the work required for a single root canal. Some teeth do have just one canal. Others, like molars, can have four or more.
(How many canals does your tooth have? What’s normal? | Variations.)
To clean and shape each of your tooth’s individual root canals, your dentist will use a series of files, each of which has a slightly larger diameter and taper.
Each file will be worked for multiple repetitions (until it starts to feel loose inside the canal, this may take a minute or so). Your dentist will then insert the next larger size file into that same canal and continue on with the process. Don’t be surprised if your dentist uses a half dozen different files in a single canal, maybe more.
The idea is that each of the files, when used in order, gradually increases the dimensions (diameter and flare) of the root canal.
Cleaning and shaping enlarges and flares the canal.
This is important for a couple of reasons:
- Enlarging the canal has a cleansing effect by way of removing the surface layer from its walls. (This layer has often become impregnated with debris and contaminants.)
- A wider canal can be irrigated more effectively (see next section).
- It gives the canal a shape that’s better suited for the sealing process (discussed below).
d) Your dentist may have a handpiece that can manipulate the files for them.
At least some of the root canal files that your dentist uses in your tooth will be worked by hand. But they may also have a specialized handpiece (dental drill) that can be used for this purpose. We discuss aspects of rotary-file endodontic systems here. The benefits for you.
When this type of setup is used, a tooth’s root canal system can usually be cleaned and shaped more rapidly. That can be an important factor in making one-visit root canal treatment Versus two. possible for a case.
Tooth irrigation is an important part of the cleaning and shaping process.
While performing their work, your dentist will periodically irrigate (flush out) your tooth.
- At a minimum, they’ll use this as a means of flushing debris and contaminants from within it. Doing so enhances the effectiveness of their cleaning efforts.
- But another important function that irrigation provides is to flush away loose debris before it has a chance of being compacted (by the up and down action of the files) into a plug or blockage.
a) What kinds of irrigating solutions are used?
A number of different types of solutions might be chosen:
- Conceivably, just sterile water or saline solution could be used to flush out debris.
- By far, the most frequently used irrigating solution is sodium hypochlorite (bleach, Clorox). That’s because it’s effective in killing bacteria and digesting organic debris (two functions that can help disinfect the tooth’s root canal system). It also happens to be quite inexpensive.
- Because different solutions have their own set of advantages, your dentist may consider it optimal to use more than one kind of solution during your tooth’s treatment.
▲ Section references – Hargreaves
b) How is tooth irrigation performed?
While your dentist may have a specialized (automated) unit they use for this step, the process they use can be as simple as flushing your tooth out using an “irrigating” syringe.
- This is a normal-looking, smallish syringe that has a bent/curved, blunt-tipped needle.
- The needle is rested inside your tooth and the solution is gently expressed.
(There’s nothing sharp about the needle. You are not getting a shot. The goal is to gently flush out your tooth. No solution pressure is generated.)
- A normal dental suction device is used to catch any excess or to remove the bulk of the solution from inside the tooth.
An irrigating syringe inserted into a root canal.
c) Why irrigation is such an important part of the root canal procedure.
It’s easy to imagine how placing a liquid inside a tooth has the ability to seep into minute nooks and crannies, which are precisely the locations that are impossible for root canal files to access.
And especially in the case where the solution itself has properties that help to disinfect the tooth, this ability can substantially enhance the effectiveness of the dentist’s work.
- Expect that your dentist will repeatedly irrigate your tooth, seemingly ad infinitum.
- A minimal goal is to have the tooth’s root canal system exposed to the irrigant for a period of 30 minutes or longer. (Darcey)
Generally, this step is so beneficial that sometimes the process of “cleaning and shaping” a tooth is instead referred to as “shaping for cleaning,” as in the tooth’s root canal system is flared and opened up to enhance the volume and access of the irrigation solution used.
What is the cleaning and shaping step like for you the patient?
You’re almost certain to find the cleaning and shaping portion of your root canal treatment to be the most boring part. And as such, the time when they’re most likely to fall asleep.
The process itself is just multiple cycles of using files in your tooth … flushing it out … and then repeating the process again and again.
During tooth cleaning and shaping.
If your dentist uses a handpiece to manipulate the files, its noise may keep you awake. Or if your tooth is especially hard to get at, they may have to ask you to open really wide each time they insert the next file into your tooth. You probably will feel the vibrations they create while using their instruments.
Other than that, this step should be a non-event. Your procedure has been going on for quite a while by now and if pain issues were going to be a problem, you and your dentist would know about it before this point.
During tooth irrigation.
Your dentist may agitate the solution they use to irrigate your tooth using an ultrasonic instrument. The intense vibrations it creates can help to increase the solution’s effectiveness. If they do, you may hear or feel its vibrations. Other than that, this whole process should be a non-event.
Bite blocks.
During this portion of your treatment (or anytime during your appointment), if you start to find it hard to stay open, your dentist can put a rubber prop (a “bite block”) between your teeth. A lot of patients really like having a prop to rest their jaw against instead of struggling to stay open.
Will your tooth’s treatment be completed in one or two appointments?
At this point in your tooth’s procedure, a potential stopping point has been reached. Its interior has been thoroughly cleansed and properly shaped and is now ready to be sealed (have its hollow interior filled in).
- With some cases, the dentist will go ahead and proceed with this process immediately. (One-visit endodontic therapy.)
- With others, they may feel that it’s best to wait about a week, or even two or three, before the completion of the tooth’s procedure is performed. (Two or more visit treatment.)
For a discussion about how this decision is reached, use this link: How many appointments will your root canal therapy take? What decides?
- As a process that further disinfects your tooth’s root canal system, your dentist may place calcium hydroxide paste inside its canals and let it sit until your next appointment.
Doing so can be especially effective, and a primary reason why a two-appointment approach is chosen.
- They will also need to place a temporary filling that seals the access cavity opening they have performed their work through, so to keep contaminants from reentering your tooth.
(Related: Precautions you should take with this filling. Consequences.)
Page highlights as a video –
Note: Dental-Picture-Show’s content and videos have now been absorbed into Animated-Teeth.com.
Step 6 – Sealing the tooth.
a) What type of root canal filling material is used?
The most frequently used root canal filling material is a compound called Gutta-percha. It has a flexible, rubbery nature, both at room temperature and even more so when warmed.
Gutta-percha comes in preformed cones (often referred to as “points”) whose sizes exactly match the dimensions (diameter, taper) of root canal files.
Gutta-percha points come in sizes that exactly match the dimensions of root canal files.
b) Placing the Gutta-percha.
One method of Gutta-percha placement that a dentist might use is referred to as “lateral condensation.” When performing this process:
(Note: We describe and illustrate this process for a single-rooted tooth that has just one root canal. In actuality, different kinds of teeth frequently have more than one root canal and/or roots. Examples. For those that do, this process will need to be repeated for each individual canal.)
Sealing the tooth’s root canal system with Gutta-percha.
- The dentist will first select an initial cone of Gutta-percha for the canal. The size chosen will be the same one as the last (largest) file used to clean and shape the canal’s full length (see picture above). This is termed the “master point.”
- The dentist will evaluate how the master point fits inside its canal both by the way it feels as it’s worked into position, and by visualizing it on an X-ray that they’ll take. It’s important that this first cone extends the full length of the canal, and fits snugly in the region of the root’s tip.
If it doesn’t, the cone can be removed and adjusted by way of trimming it shorter. Or on occasion, the dentist may find that the next size smaller, or larger, Gutta-percha cone makes a better choice.
- The cone is then removed from the tooth. A sealer (a thin paste) is then applied to its sides, and possibly directly inside the root canal too, and the cone is then reinserted back into position. (Frame “A” in our animation below.)
(The paste enhances the seal that’s created by way of filling in any voids that exist between the Gutta-percha and the walls of the canal.)
Because a master point has a snug fit in the portion of the canal that lies at the root’s tip, that cone alone (its single mass of material in conjunction with a thin layer of surrounding sealer) will create the needed seal for that region.
Higher up, however, usually the cleaning and shaping process has flared the taper of the upper portion of the canal significantly. And in order to create a solid (free of voids) mass inside the canal to seal it, the dentist will need to place additional cones of Gutta-percha in this region.
To do so:
- The dentist will insert a “spreader” into the canal. (This instrument’s working end looks like a root canal file, with the exception that its sides are smooth. It’s used as a conically shaped wedge).

Working a spreader inside a root canal. (The master point is visible.)
- The spreader is worked laterally (side to side, hence the term “lateral condensation” for this procedure) to compact the Gutta-percha that’s already been placed up against the walls of the canal.
- An “accessory point” (a Gutta-percha point smaller than the master point) is then dipped in the sealer and inserted into the space that’s been created by the spreader.
- This process is then repeated until the entire space within the flared portion of the canal has been filled in (sealed). (Frame “B” in our animation.)
▲ Section references – Tronstad
Lateral condensation technique is just one of the methods your dentist might use. But all processes are the same in the sense that their goal is simply filling in (sealing) the tooth’s root canal system with a solid core of material (usually Gutta-percha and sealer).
What’s this step like for you the patient?
For the most part, sealing your tooth will be just another boring step for you. However, performing this process does mean that you’re getting close to the end of your appointment.
- You’ll feel the firm pressure your dentist applies as they use their instruments to condense and pack the Gutta-percha inside your tooth.
- As they work, your dentist may heat the Gutta-percha so it becomes soft and pliable and is more easily condensed. If they do, you will smell that odor (a hot odor) and maybe hear a faint sizzle as they touch their heated instrument against it.
Other than that, this step should be yet another non-event for you. There’s pretty much no chance pain should be a factor.
Step 7 – Placing a temporary filling.
Once your dentist has finished sealing all of your tooth’s individual root canals (many teeth have more than one, see link above), they’ll take an X-ray of your tooth so they can evaluate and document their work.
They’ll also need to place some type of temporary restoration. It will seal off the access cavity created at the beginning of your procedure, therefore protecting the work that’s just been completed. (The filling prevents oral bacteria and contaminants from seeping back into the tooth’s treated space.)
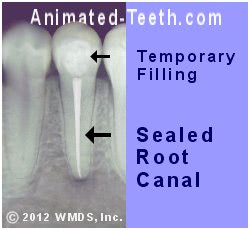
X-ray of a tooth’s completed treatment and temporary filling.
What’s this step like for you the patient?
Placing the temporary filling in your tooth will just take a few moments and will be a total non-event for you. However, there are some very important things that you need to make sure of about it:
- Once everything has been removed from your mouth (rubber dam, suction device, etc…), per your dentist’s instructions, you’ll need to confirm for them that your bite on the temporary filling feels normal and right. If it’s not, complications can occur.
- You’ll need to understand your dentist’s instructions about what precautions need to be taken with your temporary restoration.
Related page – Precautions with temporary restorations. Possible consequences.)
- You’ll need to make note of how long your dentist feels your temporary restoration can provide adequate service before your tooth’s permanent restoration is finally placed. (See below.)
Step 8 – The root canal process has now been completed but your tooth still requires additional work.
At this point, the individual steps of performing the root canal procedure have been finished but your tooth’s treatment is not yet complete. A permanent restoration must still be placed.
Choosing an appropriate type of dental restoration What’s needed., and having it placed promptly, will help to ensure the long-term success of your tooth’s endodontic therapy.
What do you need to know about this step?
Take note of the link in Step 7 and use it. It details precautions you should take after your tooth’s treatment has been completed. (For the most part, don’t look for trouble. Just take it easy with your tooth.)
The link given above here in Step 8 is important to understand too. You must have the right type of permanent restoration placed, within the right time frame. Otherwise, you put your tooth and its just completed treatment at risk.
Aftercare and recovery.
Following your procedure, you should be able to return to normal activities. Experiencing post-operative pain isn’t usually a problem. Antibiotics aren’t typically needed following treatment.
For more details check out our page: What to expect after your root canal appointment. Go. It explains what may occur, why, and simple precautions and remedies for them.
If you have additional questions …
Page references sources:
Darcey J, et al. Modern Endodontic Principles Part 4: Irrigation.
Hargreaves KM, et al. Cohen’s Pathway of the pulp. Chapter: Cleaning and Shaping of the Root Canal System.
Ingle JI, et al. Ingle’s Endodontics. Chapter: Endodontics instruments and armamentarium.
Tronstad L. Clinical Endodontics. Chapter: Root canal instrumentation.
All reference sources for topic Root Canals.