Looking for information about other Dental Topics?
Full Website Index• Animated-Teeth.com •

How the Invisalign® system works – Aligners, attachments, buttons and elastics, power ridges, bite ramps.
How does the Invisalign® system work?
The clear, removable aligners you wear with the Invisalign® system are entirely different from traditional wire-and-bracket braces. And you may wonder, how can these thin, flexible trays actually shift your teeth into proper alignment?
This guide explains the mechanics of the Invisalign® system, breaking down how the aligners apply controlled forces to gradually move your teeth and how specialized components—such as attachments, buttons with elastics (rubber bands), power ridges, and bite ramps—enhance treatment precision and give your dentist greater control over tooth movements.
Through our guide’s diagrams and animations, you’ll gain a clearer understanding of how each component contributes to the treatment process, helping you achieve the perfect smile.
1) How Invisalign® aligners move teeth.
With Invisalign®, and, in fact, all other orthodontic systems that use removable plastic aligners (like ClearCorrect®, eCligner®, ClearPath® Simpli 5®, or direct-to-consumer options like Smile Direct Club®), it’s the fit of the appliance over your teeth that generates the forces that straighten them.
a) Each aligner starts out “ill-fitting” on purpose.
When you initially start wearing an Invisalign® aligner, you’ll probably notice that it doesn’t seem to fit quite right. It may feel snug, or even a bit too tight. It might be hard to get in and out.
That’s because it hasn’t been shaped to fit your teeth. It’s been shaped to fit the alignment that your teeth need to have at the end of the two weeks after you’ve finished wearing it.
b) Each aligner is responsible for just one step of your treatment.
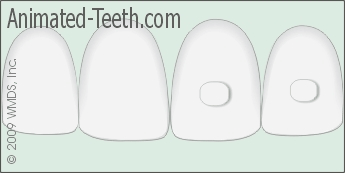
When your Invisalign® aligners are made The whole set is shipped together., each one has been fabricated on an individual dental cast.
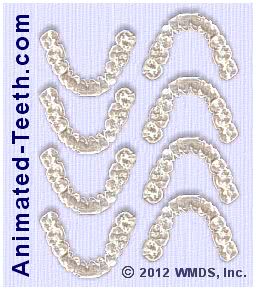
A series of tooth aligners (4 sets of upper and lower appliances).
c) Each aligner just repositions specific teeth.
Since each aligner’s shape represents a future arrangement of your teeth (not their current one), when it’s worn it won’t exactly fit right in some regions. And it’s the teeth in these areas that the aligner has been designed to move.
It may just be a few teeth, or possibly many. It just depends on what tooth movements are called for at that particular stage in your treatment plan.
How orthodontic aligners (i.e. Invisalign®) works
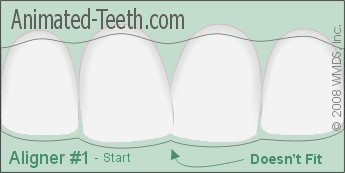
a) Aligner #1 creates some tooth realignment.
b) Aligner #2 finishes the job.
d) It’s the “poor” fit of the aligner that causes your teeth to move.
And, gradually, this pressure will guide your teeth into an alignment that perfectly matches the aligner’s shape.
The aligner’s fit will change.
As evidence of the movement it generates, you should notice that during the two weeks that you wear an aligner its fit will gradually become more relaxed. This isn’t because the aligner has changed, it’s the alignment of your teeth that’s different.
Potential discomfort.
Overall, the tooth movement process may cause some pain, especially during the first few days of wearing each successive aligner. Use this link for details. What to expect. | Remedies.
As a solution for this annoyance, the eCligner® system makes use of three individual aligners, each has a different thickness, for each stage of the tooth moving process.
The thinnest appliance, which applies the lightest force, is used initially. The needed tooth movements for the stage are then completed using the latter two aligners, each of which is thicker and thus delivers a greater force.
The idea is that the use of a gradually increasing force helps to minimize the patient’s discomfort levels.
e) Each aligner only straightens your teeth a little bit.
That may seem tiny. But after a whole series of aligners has been worn (10, 20, possibly even 30 or more), the total amount of tooth movement that can be accomplished can be quite substantial.
Enough so to transform your crooked old smile into a new perfect one.
Removable aligner systems use standard orthodontic techniques.
The appliances used with removable systems (Invisalign®, ClearCorrect®, Simpli 5®) are quite different than conventional braces. But beyond that, it’s business as usual. Plastic tooth aligners accomplish their goals using the same basic orthodontic approaches that dentists have always used.
2) What are Invisalign® “attachments”?
Treating some patient’s cases requires the use of “attachments”. (With the ClearCorrect® system this type of add-on is referred to as an “engager.”)
They are:
Invisalign® attachments.
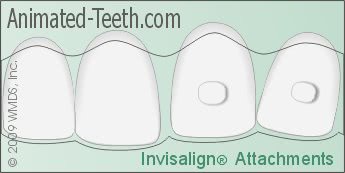
An attachment allows the aligner a more positive grasp on the tooth.
- Small tooth-colored dots (bumps) of dental bonding (white filling material) that are placed at specific locations on specific teeth. (They’re usually placed at about the middle of the tooth, meaning at a level that’s halfway between its biting edge and gum line.)
- They may be rectangular, square, circular, ellipsoidal or triangular in shape. The shape and orientation of a button are dictated by the purpose it serves (such as tooth rotation, translation, intrusion or extrusion).
An example of size:
- An ellipsoidal (oval) attachment might measure about 1/16th of an inch wide, a little more than that in height, and roughly 1/32nd inches thick (about the same thickness as a credit card).
a) Why are attachments needed?
Some types of alignment changes are difficult to accomplish with removable braces.
- It might be that the needed movement itself creates the challenge, such as rotating a tooth or extruding it (bringing more of it above the gum line).
- In other cases, various characteristics of a tooth (its size, shape, angulation) may make it difficult for the aligner to apply pressure to it.
In situations like these, placing an attachment may be the solution that’s needed.
The idea is that this added bump provides an anchor point (a handle of sorts). One that helps to direct the forces of the aligner more effectively and predictably to the tooth.
Examples
- 1/16th of an inch thick vertically aligned rectangular attachments are often placed on teeth to assist with translation (moving into an adjacent space), tipping, torquing or rotational movements.
- 1/16th of an inch thick horizontal beveled rectangular attachments are frequently used to aid with intrusive (pushing in) or extrusive (pulling out) tooth movements.
Will your case require attachments?
Even before it’s begun, your dentist will be able to tell you if any phase of your treatment will require the placement of attachments. Your digital treatment simulation Like Invisalign’s ClinCheck® animation. will show you on which teeth and when during your treatment process they’ll need to be placed.
Some systems place less dependence on the use of attachments than Invisalign®. This is possible in part due to the outline shape they give their aligners.
- Invisalign® appliances have scalloped edges (the aligner follows the actual shape of the patient’s gum line).
- In comparison, eCligner® and ClearCorrect® aligners have a design where they have a straight-across edge that extends over the patient’s gums just slightly. This extra length tends to make them more retentive and thus better able to direct their forces to the wearer’s teeth without the use of attachments.
Examples of Invisalign® attachments.
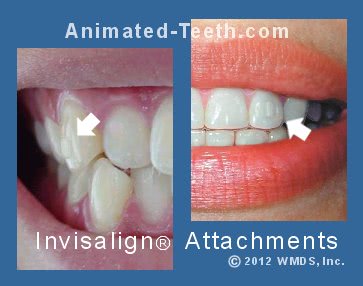
While attachments may not be easy to see, they’re never totally invisible.
b) How visible are Invisalign® attachments?
- Where they’re placed. (Of course, needing them on your front teeth is the most obvious situation.)
- How well the color of the bonding used matches the shade of your teeth.
(In some cases, the patient’s tooth shade isn’t an exact match with any of the colors the dentist has to offer.)
However, no matter how much they do show, just keep in mind that they’re less visible than conventional braces would be.
(This link discuss the issue of attachments and buttons Examples. and how they affect the visibility of your Invisalign® treatment on this page.)
c) How are Invisalign® attachments placed?
Placing attachments is simple. It makes use of the same basic bonding technique that’s used with many other dental procedures. And don’t worry; no anesthetic (shot) is required.
Attachments are placed using a template.
- Your dentist will receive a clear plastic template from the Invisalign® people. It will look a lot like a regular aligner, with the exception that it has small bulges in it that correspond to specific locations, on specific teeth, where your attachments need to be placed.
- Your dentist will clean and prepare the surface of your teeth for the bonding process. (A few very simple steps. Bonding procedure page.)
- They’ll then fill the bulges in the template with tooth-colored dental bonding (dental composite). The shape of the bulge creates the shape of the attachment being placed (rectangular, square triangle, round, ellipsoid).
(Your dentist will try to pick a color of composite that matches your teeth as closely as possible. They may even ask for your opinion about the match.)
- The filled template is then seated over your teeth and your dentist will cure the bonding by shining a blue-colored light on it.
- Once it’s hardened, your dentist will remove the template and trim away any excess. The small bump of bonding that then remains on your tooth is your new attachment, all set to go.
Is it possible to place attachments on teeth that have dental restorations?
Generally speaking, even if some of your teeth have had some type of dental restoration placed (like a crown, veneer or filling), your dentist should still be able to bond an attachment to them. Although, some types of restorations can pose more of a challenge than others.
- Composite restorations (white fillings, composite veneers) – Since this is the same type of material that’s used to create attachments, placing one should pose no problem.
- Metal or porcelain restorations (crowns, veneers, fillings) – Generally speaking, adding an attachment to a restoration whose surface involves one of these types of materials should be possible.
In some cases, the strength of the attachment’s bond may not be as strong as that which is possible with tooth enamel or dental composite. If so, and depending on the level of forces involved, it may be difficult or a nuisance to keep it in place over the course of the patient’s treatment.

Our affiliate links can be used to shop for Invisalign accessories on Amazon.com
They offer many innovative devices that provide solutions for the issues Invisalign® wearers encounter.
d) Having attachments can be a minor nuisance.
Wearing attachments isn’t usually too much of an issue for patients. But for some, it does have to be said that there can be certain aspects of having them that can be annoying, or even painful. For example:
- When you’re not wearing your aligners, attachments can feel sharp or irritating to soft tissues (lips, cheeks, or tongue). They may even rub a sore spot.
With time, you’ll probably get fairly used to having them. The skin they irritate should toughen up as days and weeks pass. When your aligners are out, orthodontic wax can be mounded around your most irritating attachments so to give them smoother contours.
- When you eat, you may find that food accumulates around them. So, be careful if you’re eating in public.
- The fit of an aligner over its attachments can be quite snug, especially if you have several of them. This can make putting your appliance in or taking it out difficult, or even painful.
- Each time you place or remove your aligners the way they rub against your attachments will wear them down a tiny bit. Over time, this will make placement and removal easier, and may also resolve, or at least diminish, whatever attachment sharpness issues you notice.
Attachments are easily removed.
One method is to buff them off using a dental drill.
e) How are attachments removed?
This is a painless procedure. No anesthetic is needed.
f) What should you do if you have an attachment come off?
It’s doubtful that having an attachment come off will create an emergency situation.
- You may feel some roughness or sharpness on the surface of your tooth when your aligner is out.
- Your aligner may not fit as snugly until the attachment is replaced.
Let your dentist know.
All attachments are placed for a reason. And if you have one come off, you should let your dentist know immediately so they can make plans with you to replace it.
Remember, an attachment provides an anchor point that allows your Invisalign® braces to more effectively control that tooth’s movement. If one is lost, your aligner may not be able to accomplish the task it was designed to do.
Invisalign® Power Ridges.
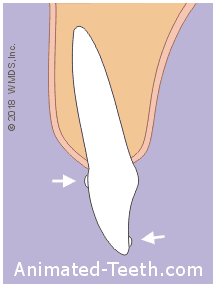
The dual pressure applied at power ridge points can straighten inclined teeth.
3) What are Invisalign® Power Ridges?
Example.
Reversing the positioning of the power ridges can be used to produce a tilting in/backward rotation for bucked teeth.
4) What are Invisalign® “buttons”?
An Invisalign® button with elastic placed.
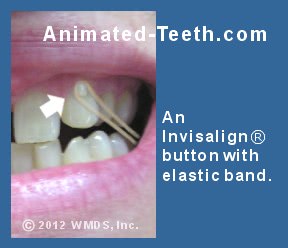
The patient’s aligners have been trimmed to accommodate the presence of the buttons (on upper and lower teeth) and band.
“Buttons” are the term Invisalign® uses for small plastic or metal brackets that serve as anchor points for elastic bands (“rubber” bands). As examples:
- One button may be placed on an upper eyetooth and the other on a lower molar, with an elastic band running between them (see picture).
The patient’s aligner is trimmed to accommodate the buttons and wearing the band (a precision cut / button cutout / elastic cutout).
- In some cases, the second anchor point for the elastic may be the Invisalign® aligner itself.
The plastic of the aligner is trimmed to provide hook shape for the band to fit over (an elastic hook).
a) When are buttons and elastic bands needed?
Just as with attachments, buttons and elastics are used to assist the dentist in creating tooth movements that the aligners, on their own, would otherwise have difficulty making.
Your dentist will be able to tell you, before your treatment is begun, if buttons and elastics will be required.
b) How are buttons placed?
Buttons come pre-made from Invisalign®. They are bonded onto your teeth using a simple process that requires no anesthetic.
c) How much do buttons show?
- A dentist will usually position a button close to the tooth’s gum line (this creates clearance between it and the aligner). This positioning helps to keep its visibility to a minimum.
- Of course, no matter where your buttons are placed, the elastic running to them will be obvious. Choosing clear or ivory colored rubber bands helps to blend them in.
(We discuss the issue of attachments and buttons and how they affect the visibility of your Invisalign® treatment on this page. Examples.)
5) Invisalign® Bite Ramps
Bite ramps are different than any of the other Invisalign® add-on features we’ve discussed on this page, in the sense that they are something that’s incorporated into the design of your aligners themselves. Nothing is added/bonded onto your teeth.
- A bite ramp is an increased thickness of plastic that’s designed into the shape of your aligners (typically on the backside of the upper incisors).
- The idea is, when you close your jaws together you end up biting on this added thickness, which keeps certain teeth (like your upper and lower back ones) from touching.
- This disocclusion (separation) gives these teeth more freedom to be moved (for example, they will no longer be exposed to forces when you close down), thus speeding up and adding to the predictability of your treatment.
Last reviewed: January 29, 2025
Author: Paul Cotner, DMD — retired dentist.
Published by: WMDS, Inc. — owner of Animated-Teeth.com.
Educational information only — not a substitute for professional dental care.
Page references sources:
Malik OH, et al. Invisible orthodontics Part 1: Invisalign. Dental Update. April 2013.
Comments.
This section contains comments submitted in previous years. Many have been edited so to limit their scope to subjects discussed on this page.
Comment –
Reusing Invisalign Trays
Hello: I had a 6 month Invisalign Treatment Plan. A total of 14 Trays back in 2011 and it was a great success!
I had a Metal Retainer placed on my Bottom Teeth after my Treatment Plan was complete. The Metal Retainer kept breaking & I eventually gave up & stopped going to my Dentist. It is now 2017, 6 years later & my Teeth have been shifting back. I decided to try the Treatment Plan again but on “My Own” because I kept “All” of my Invisalign Trays but I no longer have the “Buttons/Attachments” on my Teeth which did fix my one “Crooked” Tooth. I have also seen another Orthodontist who advised another Treatment Plan, which I declined but was told I could “reuse” my “Old Trays if I still have all of them, which I do. Would you advise “Reusing” the Invisalighn Trays without the Buttons?
Rochelle S
Reply –
Your orginal set of Invisalign trays provided a path from your original (crooked) alignment to the (perfect) end result.
It is true that when the alignment of teeth relapses the teeth tend to shift back to their original position. But it’s unlikely that your teeth are at that exact same point where they were at the beginning of the first time around. And then as you discuss, you won’t have the buttons which help the trays grasp the teeth and manipulate them.
It is common that when an Invisalign patient gets off track that they are asked by their dentist to back up and rewear the previous set or two, and possibly that is what that dentist was referring to. Possibly they are under the impression that the relapse has been so slight that that will work.
But expecting to repeat your entire course of treatment, not knowing that you have the exact same starting point, and then without the buttons … that seems unrealistic and something we couldn’t encourage.
Staff Dentist
Comment –
Attachments are excruciating.
I was expecting to get a few attachments placed on some side teeth. As it turns out, they have been placed on many of my front ones too. Their sharpness rubbing against my lips makes it painful to eat. One spot is even rubbed raw. I’ve been told they need to be there for the whole time of my treatment. CAn they be smoothed down? Help!
St. M
Reply –
We don’t necessarily have a lot of good news for you.
As you probably know, attachments help to improve the grasp that an aligner has on a tooth, thus making it so the tooth can be moved more precisely and predictably (see explanation above).
Your dentist may be able to polish off some of the sharpness you notice but by doing so they’re sacrificing some of the precision of the fit between the attachment and aligner. Since that’s generally a bad thing for the progress of your case, your dentist may feel they can only polish them down minimally, or may not offer to do anything at all.
One solution is to ask your dentist for some “orthodontic wax.” The idea is that the wax is mounded around each attachment, so to give it smoother contours. The wax is placed when your trays are taken out. The wax is removed (picked or brushed away) before you put your trays back in.
In passing, we will mention that there should be some general wear and tear on your attachments each time you take your aligners in and out. With time, enough wear may occur that this problem ultimately resolves on its own. Also, the skin inside of your lips should “thicken up” over time as it adapts to the roughness of the attachments.
Staff Dentist
Comment –
Do all cases require attachments or brackets?
Do all cases require attachments or brackets for Invisalign to work for correction?
Reply –
No, Invisalign cases don’t always require the use of attachments.
The general idea is that attachments aid the Invisalign aligners in making tooth movements. So, using them will tend to help a case go more quickly or more predictably. Often a case can be treated with or without. It’s just that by having attachments you get those extra benefits.
Your dentist will be able to tell you if attachments are a part of your treatment plan when they show you your treatment animation. Then, if you don’t want attachments used, they can resubmit for a new treatment plan. One that doesn’t include them. Or you might just mention your objections to them before your case is even initially submitted to Invisalign.
There can be situations where the person’s malocclusion is so severe that it can’t be treated via Invisalign without the extra help that attachments provide. If that’s the case with yours, Invisalign will let your dentist know.
Staff Dentist
Comment –
Invisaligns
Hi, can invisaligns be worn with a gold tooth? Or does the gold tooth need to be removed before an impression can be made? Thanks.
T.G.
Reply –
As far as taking Impressions, the gold tooth is a non-issue. That’s part of the beauty of the Invisalign system, the aligners simply fit over your teeth, whatever the surface material of them happens to be.
The only potential conflict is if attachments are needed for your case. If so, bonding one to a gold surface, while possible, can be troublesome/difficult.
With this in mind, possibly your case can be adapted so it can be treated with or without attachments.
After your impressions have been taken and submitted to the Invisalign people, they’ll create a computer simulation of your treatment plan. Your dentist will have told them about the gold tooth/attachment issue. The Invisalign people will no doubt figure out a way your case can be accomplished.
Staff Dentist
Comment –
Aligners over attachments.
Are the trays a lot harder to put in with the attachments? Getting them tomorrow. I had a tough time for a day or two with trays without attachments but mastered it in a couple of days. Hoping its the same with these brackets.
Sandy
Reply –
Everybody’s situation will be different, but generally speaking, you have to expect that having attachments (brackets?) placed will increase the level of difficulty of removing trays, at least a little bit. After all, the whole purpose for placing them is to improve the intimacy (snug, positive fit) between the tray and specific teeth so its force is more effectively directed to them (and therefore more effectively produces tooth movement).
But just like before, after a little bit of practice, no doubt you’ll adapt just fine.
Staff Dentist
Comment –
Attachment removal.
I’m a little more than halfway done with my invisalign plan, I have attachments on almost every tooth and they annoy me so much. I was wondering if I could ask my orthodontist if she could remove some since my teeth are mostly straight because they are ugly and painful and annoying.
lindsey
Reply –
It never hurts to ask. Generally, attachments help to give your aligners more effective and precise control over tooth movements. And your dentist may need that at this point in your case.
It’s possible that even with the attachments removed your aligners may still be able to move your teeth as needed. But only your dentist can wager a guess, so ask.
Some removable aligners systems don’t make use of attachments as much as Invisalign, so it’s possible.
Staff Dentist
Comment –
Button for elastics.
The button for the rubber band keeps coming off my tooth. I was told to superglue the button to my invisalign. Is this safe?
Joann
Reply –
As some simple explanations as to why you should not attempt what you suggest:
Elastics are sometime anchored on teeth instead of aligners because the retention of the aligner over the patient’s teeth at that point in their treatment isn’t snug enough to withstand the force of the elastic. (The elastic would tend to dislodge the tray, thus affecting the patient’s treatment.)
Also, since your aligner has been trimmed away in the area of the troublesome button (so it sticks through), it wouldn’t be possible for you to glue the button onto the correct location. (The elastics you have now would either be stretched longer or shorter than intended, thus affecting the amount of force they apply).
There’s also the issue that if you would somehow damage your aligner it would need to be remade.
Don’t look for a solution on your own. Contact your dentist’s office.
Staff Dentist