Looking for information about other Dental Topics?
Full Website Index• Animated-Teeth.com •

Porcelain Laminate Veneers.
Page contents:
1) Porcelain veneer basics. – What are they? | What’s unique about them compared to other kinds of dental restorations?
- What advantages do they offer? – As compared to other types of dental procedures.
- Common applications.
- When shouldn’t they be placed? – Best practices in case selection.
2) Ultra-thin porcelain veneer basics (Lumineers®, Vivaneers®, DURAthin®, etc…). – What are they? | What’s unique about them compared to conventional porcelain veneers?
- What advantages do they offer? – As compared to conventional veneers?
- Favorable applications.
- When shouldn’t they be placed?
3) Choosing between ultra-thin and conventional veneers. – The questions to ask.
1) What are porcelain veneers?
Porcelain veneers (also referred to as dental laminates) are wafer-thin shells made out of dental ceramic that are bonded onto the front side of teeth.
They’re generally about .5 to .6 mm thick. That’s about 1/2 the thickness of a dime or twice the thickness of an eggshell.
(Some types of laminates, like Lumineers®, can be even thinner. We discuss ultra-thin veneers below.)
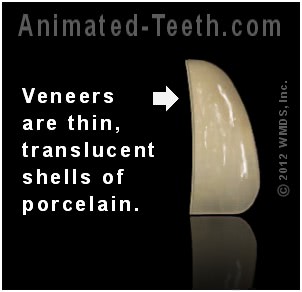
Veneers are thin shells of porcelain used to resurface the front side of teeth.
What are they used for?
Examples.
[See this page’s Uses and Applications section for case examples.]
Veneers are typically an elective cosmetic procedure.
Laminates are usually placed at the patient’s discretion solely to enhance the appearance of their teeth. That’s in comparison to other types of dental restorations that might also be used as a way of strengthening the tooth or preventing its further deterioration.
Why do they work?
You might wonder how a wafer-thin shell of porcelain can successfully withstand all of the wear and tear that they can be expected to be exposed to. The answer lies in these two facts:
- Although porcelain is inherently brittle and is easily fractured if dropped or flexed, when it’s firmly bonded to a sturdy substructure (a tooth) it’s supported in a manner that minimizes these weaknesses. (Minimal restoration flexure occurs. Forces directed to the veneer are passed onto and withstood by the strong, rigid tooth structure underneath.)
- The hard, ceramic (glass-like) nature of a veneer creates a very durable surface. (It’s impervious to the compounds it is exposed to and resists wear well.)
How do they work?
- With that process, a series of steps are used to create a strong bond between dental composite (tooth-colored filling material) and a tooth’s enamel.
- When veneers are placed, similar steps and materials are used but instead to establish a strong bond between enamel and porcelain.
The net result is one where the bonding acts as a layer of cement sandwiched between the veneer and its tooth, thus anchoring the restoration firmly in place.
What advantages do porcelain veneers offer?
As we detail below, there are three characteristics that make porcelain laminates especially unique. They are:
- Placing veneers is a relatively conservative process. – As compared to placing dental crowns, much less tooth trimming is required.
- The way they handle light is similar to natural teeth. – When taken advantage of, this property can result in laminates that give an exceedingly life-like appearance. And one unsurpassed by any other type of dental restoration.
- Due to their ceramic surface, they offer superior resistance to staining.
a) Placing veneers is a comparatively conservative process.
Dental crowns and veneers can both be used to create the same cosmetic end result. But they differ greatly in scope.
As compared to a dental crown, a veneer just covers the portion of a tooth that shows.

Despite that difference, however, both can be used to create a similar cosmetic change.
- A veneer just covers the front side of its tooth.
- A crown fully cups over all sides of the tooth on which it is placed.
With veneers …
In their most conservative form, porcelain laminates usually have a thickness that runs on the order of .5 to .6mm. (That’s less than the thickness of a credit card.)
So when one is made, the side of the tooth that it is placed on (the front side) only needs to be trimmed back by about that much.
FYI – A study by Edelhoff determined that the amount of tooth reduction needed when a porcelain veneer is placed can run on the order of as little as 3% of the tooth’s anatomical crown (the part of the tooth that lies above its gum line).
With some cases, however, a thicker veneer may be required. If so, the amount of tooth reduction needed may run as high as 30% of the tooth’s crown portion (see below for a comparison to dental crowns).
With dental crowns …
The required thickness for a porcelain crown typically runs on the order of around 2mm, which is about 4 times thicker than a veneer.
And when one is made its tooth needs to be trimmed by that much. Keep in mind however that that means on all of its sides, not just the front one. That’s because a crown fully encases the tooth on which it is placed.
Overall, that’s a very significant difference. (The Edelhoff study mentioned above determined that preparing a tooth for a crown typically involves removing 63% to 76% of its structure vs. 3% to 30% for porcelain veneers).
And since it’s usually the goal of a dentist to preserve as much of a tooth’s structure as possible, veneers are typically their preferred choice for making changes if the patient’s situation allows.
(This page shows examples and explains the differences between crowns and veneers in greater detail.)
b) Veneers can create a very natural-looking appearance.
Due to their ability to closely mimic the way natural teeth reflect light, well-crafted porcelain laminates can look astoundingly lifelike. Here’s why:
How a normal tooth handles light.

Light penetrates the enamel and then reflects back out.
1) How teeth handle light.
This penetration in and reflection back out is what gives a tooth its characteristic glass-like lustrous appearance.
2) How porcelain veneers handle light.
How a porcelain veneer handles light.
Light penetrates the veneer and then reflects back out.
- traverses the thickness of the porcelain and then gets reflected off the opaque cement that’s been used to bond the veneer in place …
(This is the case where an opaque cement has been needed to help to mask the dark color of the tooth underneath.)
- or else traverses the thickness of the porcelain/cement combination and then gets reflected off the opaque tooth structure that lies beneath them …
(This is the situation where only a minor color change was needed for the tooth and it was possible to use a very translucent cement.)
3) … the light then passes on back out of the tooth.
Either way, this “penetration in and then reflection back out” method of handling light is similar to enamel. And this is why a well-designed and well-crafted porcelain laminate (see Takeaways box) can give such a natural, life-like appearance.
3) In comparison, when dental bonding is used …
Just so you know, laminates for teeth can also be made out of dental composite (tooth bonding). And there’s a big difference between it and porcelain. It’s only semi-translucent.
That means when light strikes the surface of a composite veneer it’s mostly reflected off its front surface (there’s much less light penetration as compared to what’s possible with various types of porcelain). And for that reason, this kind of laminate typically has difficulty in creating a truly life-like appearance.
(We compare this and other aspects of porcelain vs. composite veneers on this page.
c) A porcelain veneer’s surface resists staining well.
Another advantage that ceramic veneers offer is that their impervious glass-like surface resists staining well.
This is in comparison to veneers made using materials such as bonding (dental composite). These laminates typically will stain or discolor over time (see bonding link above).
(It does bear mentioning that the cement used to hold a porcelain veneer in place may tend to stain, thus spoiling its appearance. Use the link for a more detailed discussion about this potential complication.)
How natural your veneers appear will depend on their fabrication and placement methods.
a) Methods of veneer construction.
Specifically how lifelike a porcelain veneer can or will look will in part depend on the way it’s been fabricated.
There are generally three different processes that can be used, and especially in the case where the appearance of your veneer is critically important, you should quiz your dentist about which one will be used and how this choice might affect how natural the results of your case will be.
1) Conventional ceramic (feldspathic porcelain). –
This is a technique where different types of porcelain, each having their own unique color and translucency characteristics, are hand layered to construct the veneer. When well crafted, the look and characterization possible with this type of restoration are hard to beat.
2) Heat-pressed ceramic. –
With this process, the porcelain is melted and then pressed into a mold. As a shortcoming of this technique, only one color of porcelain can be used. And this is a problem because the shade and degree of translucency of different regions of a tooth typically vary.
Adding characterization.
There are 2 processes that can be used to add characterization to this type of veneer (make it look more life-like).
- Stains (colored glazes) can be painted on and then fused to the restoration’s surface.
- Small portions of the veneer (usually right at its biting edge) can be trimmed back and then replaced with tinted porcelains.
Especially when the latter technique is used, the end result can be quite life-like.
3) Milled (CAD/CAM) ceramics. –
This is a process where CAD/CAM technology is used to grind the veneer out of a single, uniform-color block of synthetic porcelain.
Like above, the uniformity of color of this type of veneer creates a challenge. Characterization can be added by staining the veneer with glazes. But of the three processes, this is the one with which it’s most difficult to get an exceedingly natural-looking end result.
b) Methods of veneer placement:
As compared to the procedure used with conventional veneers, ultra-thin laminates (like Lumineers®, discussed below) can be placed using a no tooth trimming protocol. And which of these two processes is used can affect the esthetic outcome of a case.
Generally speaking, conventional veneer placement offers advantages that help the dentist create a more natural-looking result (we explain why here). So in situations where the esthetics of your case are of utmost importance, you should quiz your dentist about what placement method will be used and how this choice might affect the final outcome of your case.
When shouldn’t porcelain veneers be placed?
There can be situations where certain teeth, or even certain people, are not good candidates for this procedure. Some areas of concern are:
a) Teeth that need strengthening.
Veneers don’t make the right choice for teeth that need strengthening.
In this type of situation, dental crown placement makes the more appropriate choice.
b) Teeth that have little enamel.
A porcelain veneer won’t stay in place well unless it’s primarily bonded to tooth enamel. Here’s why.
- When it’s bonded onto enamel, the enamel is the more rigid of the two and it tends to absorb most of the forces applied to the tooth.
- When bonded directly to dentin (the layer underneath enamel), the laminate is the stiffer object and any forces directed to the tooth tend to become focused into it. This can lead to veneer fracture or debonding.
Some teeth may have little or no enamel remaining on their front surface due to: 1) Tooth wear or trauma. 2) The placement of previous dental restorations. 3) Erosion – Tooth wear caused by exposure to acidic foods and beverages, regurgitation of gastric acid, etc…
If so, they don’t make good candidates. A dental crown would make the more appropriate choice for these teeth.
c) Excessive forces are involved.
People who clench and grind their teeth (referred to as bruxism by dentists), or have a bite where their front teeth come together edge-to-edge, don’t make good candidates for porcelain veneers.
The level of forces generated by these conditions can be substantial and can cause laminates to chip, break or debond. One study (Beier) found that a habit of bruxism increased the failure rate of a subject’s veneers by a factor of 8.
As a measure against fracture, construction using a comparatively stronger type of “porcelain” can help (such as aluminum oxide / alumina, lithium disilicate, zirconia). The trade-off is that restorations made using these ceramics characteristically have a comparatively less lifelike appearance (similar to our description of dental bonding above).
Veneers typically give the best result with routine cases.
Generally speaking, porcelain laminates are best suited for cases where:
- The extent of change that’s needed is comparatively minor. (Such as making minor color or shape changes for teeth.)
- And the circumstances under which the veneers will function are relatively routine. (Tooth grinding and heavy chewing forces are a contraindication for placing porcelain veneers.)
For situations involving comparatively more-extensive or taxing applications, placing other types of restorations (usually dental crowns) likely makes the better choice in terms of being able to successfully and predictably accomplish the level of change that’s desired.
How can you determine if placing porcelain veneers makes the best choice for your situation?
It only makes sense that a patient would want to have an idea of how their case will turn out before committing to it. Here are two methods that dentists frequently use to demonstrate a case’s predicted outcome:
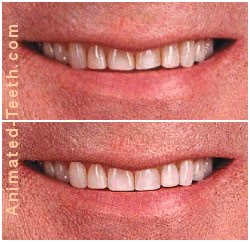
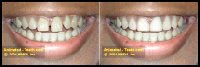
a) Digital makeovers.
With this technique, the dentist takes a “before” photo of their patient and then edits it to create an “after” picture that simulates the results they expect their work to deliver. This method is especially good for communicating with a patient about planned tooth color and shape changes.
This is the technique we’ve used to create the before-and-after picture sets found on this page. Also, throughout this page, we link to additional makeover cases you might be interested in viewing.
b) Diagnostic wax-ups.

A case “wax-up” allows you to evaluate the “after” version of your proposed dental work beforehand.
- The dentist takes impressions of their patient’s teeth that are used to create plaster casts of their smile.
- Wax is then added to the model to simulate the placement of veneers.
Related content: Fees for diagnostic wax-ups.
Ask.
Don’t be hesitant to request some type of before-and-after demonstration of how your case is expected to turn out. After all, in almost all cases porcelain veneer placement is elective dentistry. The only purpose to have it is to obtain the results you expect.
Applications for porcelain veneers.
What kinds of changes can placing veneers make?
Patients opt to have laminates placed for a variety of reasons. Below on this page, we’ve selected five cases that illustrate some of the more common applications for which they’re used.
Of course, with many if not most cases, it’s actually a combination of these kinds of changes that are all accomplished for the patient’s teeth simultaneously.
Common uses for porcelain veneers.
- A repair for minor tooth imperfections and defects.
- A more durable alternative to dental bonding (or repair for stained or deteriorated bonding).
- Whitening a person’s smile.
- “Instant” orthodontics (using veneers to “straighten” teeth).
- Closing tooth gaps.
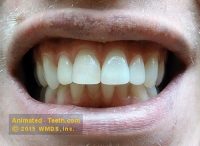
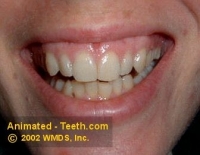
Veneer application #1: Perfecting the shape of teeth.
Porcelain veneers can make a good choice for repairing minor tooth damage.
But if a substantial portion of the front side of the tooth could benefit from resurfacing, the durability, stain resistance, and life-like appearance that porcelain laminates can offer can make them an excellent solution.
▼ Before.
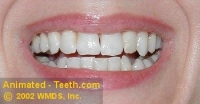
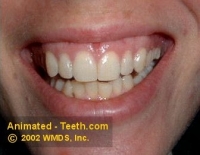
▼ After placing veneers on the upper teeth.
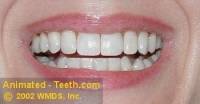
Our digital makeover case.
Issues to consider when using porcelain veneers for this application.
Disadvantages.
Advantages.
The big advantage that porcelain laminates would provide for a case like this is that their ceramic nature could be expected to create a more durable and lasting outcome.
Veneer application #2: Placing porcelain veneers as an alternative to dental bonding.
Porcelain veneers offer the most durable type of tooth resurfacing.
- Over time they tend to pick up stains and discoloration.
- With age and use, their shape may start to show signs of wear and tear.
In comparison, the ceramic nature of a porcelain veneer is typically able to provide more durable and longer-lasting service.
That suggests that when choosing between the two initially, or selecting how a deteriorated white filling will be rectified, placing a ceramic laminate may make the better choice.
▼ Before.
▼ After placing veneers on the upper incisors.
Our digital makeover case.
Issues to consider when using porcelain veneers for this application.
Advantages.
Disadvantages.
Despite the advantages just mentioned, placing porcelain veneers is a more aggressive dental procedure (more tooth trimming will probably be required), as well as more costly, than just placing bonding.
(A note about resurfacing existing fillings: The process that’s used to cement a veneer to its tooth will also create a bond with dental composite. So that means it is possible to resurface a deteriorated filling.
However, your dentist may feel that it’s important for them to remove 100% of the existing bonding first so the tooth can be fully evaluated. Or that they will achieve a superior bond for the laminate if a new (fresh) filling is placed first.)
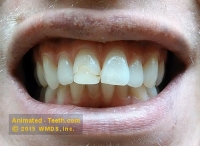
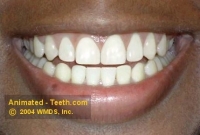
Veneer application #3: Using porcelain veneers to make color changes for teeth.
Exceptions.
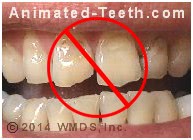
Veneers don’t usually make a good choice for treating teeth that are exceptionally dark. When they are:
- Aggressive tooth trimming may be needed (so the veneer can be very thick).
- The completed teeth may be bulky or poorly contoured (because so much veneer thickness has been needed).
- The use of exceptionally opaque porcelain may be required (resulting in a less life-like appearance).
A better approach would be to use routine whitening treatments (at home with strips or trays, or in-office) first, so to lighten the teeth at least somewhat. That way the degree of change that the veneers must accomplish is reduced.
▼ Before.
▼ After placing veneers on the upper teeth.
Our digital makeover case.
Issues to consider when using porcelain veneers for this application.
Advantages.
(In comparison, the lower teeth require quite a bit of correction. Only dental crowns would stand a chance of successfully accomplishing the degree of transformation we’ve shown.)
Disadvantages.
Veneers used to mask relatively dark staining may need to be made using comparatively more-opaque porcelain. If so, the result may be a “Chicklets” smile (non-characterized, uniformly white teeth).
Veneer application #4: Instant orthodontics. (Using laminates to “straighten” teeth.)
How porcelain veneers can be used to ‘straighten’ teeth.
This process is sometimes referred to as “instant orthodontics” because the transformation is made in just a short time span (usually two weeks or so) rather than the months or years needed for actual orthodontic treatment (braces).
▼ Before.
▼ After placing veneers on the lateral incisors.
Our digital makeover case.
Issues to consider when using porcelain veneers for this application.
Advantages.
And if the patient’s teeth need both “straightening” and resurfacing (due to noticeable color or shape imperfections), this approach might make a reasonable plan.
Disadvantages.
In cases involving severely misaligned teeth, choosing this approach can make an exceedingly poor choice. It may result in:
- Teeth that look nice head-on but are otherwise strangely shaped (too thick and bulky) and therefore interfere with some routine oral functions.
- Teeth that due to their new contours are now much harder to clean.
- Veneers placed on teeth requiring aggressive trimming to get them back in line may prove difficult to keep in place.
For cases involving severely misaligned teeth, the ideal solution would typically involve orthodontic work (braces). Either as a complete treatment or an initial partial treatment that’s then followed up by placing veneers.
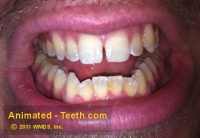
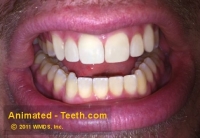
Veneer application #5: Using porcelain veneers to close spaces between teeth.
Placing porcelain veneers is one way to close tooth gaps.
We should point out however that with very small gaps dental bonding usually makes the better choice because it’s a quicker, cheaper, and more conservative (less tooth trimming is required) type of fix.
▼ Before.

▼ After placing veneers.
Our digital makeover case.
Issues to consider when using porcelain veneers for this application.
Advantages.
For sound healthy teeth, and especially those that have blemishes that need covering up, placing porcelain veneers should be considered a first choice.
Disadvantages.
Case selection is an important consideration. If the person’s situation is such that their teeth are routinely subjected to heavy forces (such as due to their alignment or a habit like tooth grinding), the strength characteristics of dental crowns may be needed instead.
(More information: What is the difference between porcelain veneers and dental crowns?)
Conventional vs. ultra-thin veneers.
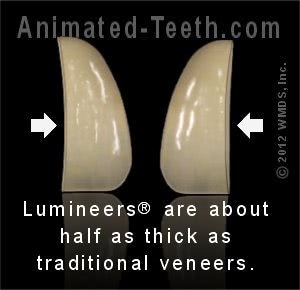
It’s the thinness of Lumineers® (ultra-thins) that makes them unique.
2) Ultra-thin porcelain veneers.
What are they?
Vs. regular veneers.
Why is this difference in thickness important?
Lumineers®, the first brand of ultra-thin porcelain veneers, was introduced along with a new “no tooth preparation” protocol that could include placing them without trimming back the surface of the tooth at all. (Referred to as no-prep veneer placement.)
And when this protocol is used, the thickness you add to the tooth by bonding an additional layer (the veneer) onto it can be a big deal. (Consequences of adding bulk to a tooth.) So, anything that can be done to help to keep the added amount to a bare minimum offers benefits, hence the advantage of an ultra-thin product like Lumineers®.
General advantages of no-prep vs. conventional veneer placement.
Here are some of the rationales used to justify a decision to place no-prep ultra-thin veneers.
Nothing to fear.
The fact that veneers can be added to a person’s teeth without having any tooth reduction performed makes this protocol ideal for people who want to make a change with their smile but are generally fearful of having dental work performed. Or want to (possibly) avoid receiving dental injections (“shots”) while having their dental work completed.
Tooth conservation.
The fact that no tooth structure is trimmed away makes no-drilling placement one of dentistry’s most conservative procedures and opens the door for what could be termed benign elective cosmetic dentistry.
(“Benign” in the sense that teeth are not harmed and the procedure is a reversible one [although possibly only in theory]).
Minimal tooth sensitivity.
Since treated teeth remain generally undisturbed, post-placement sensitivity is seldom a problem. This isn’t always the case with conventional veneers.
A very secure bond is created.
No-preparation veneers are bonded directly to tooth enamel and this is the strongest, most predictable, and lasting type of bond created in dentistry.
In comparison, during the trimming process that takes place with conventional veneering technique it’s possible that some of the tooth’s dentin will be exposed (the tooth layer under enamel). Bonding to dentin is less secure than enamel.
Better, not best.
Even with all of these advantages, this technique does have disadvantages and criticisms. So it’s probably best said that versus conventional veneers, no-preparation placement isn’t better but simply different. (It has different preferred applications, see below.)
Applications for ultra-thin porcelain veneers (Lumineers®) – Vs. conventional laminates.
Achieving a successful outcome has a lot to do with proper case selection.
People who know about ultra-thin veneer products like Lumineers® typically do because of advertisements they have seen. Unfortunately, ads can lead a consumer to form unrealistic expectations.
Most people understandably draw the conclusion that the use of the no-drilling technique can be used in their situation. And while in theory this may be true, any dentist can tell you that there’s often quite a bit of difference between what’s technically possible and what’s in the patient’s best interest.
In reality, ultra-thin products like Lumineers® when used with a no tooth trimming protocol are best used just to make simple upgrades and enhancements for teeth.
Who makes the ideal candidate?
- Only minimal changes are needed (so the laminate can be as thin as possible).
- Any resulting increase in tooth size can be used as an asset.
Favorable applications for no-prep veneers.
In general, here are the kinds of situations that make the most ideal applications for no-drill laminates like Lumineers®.
(For comparison purposes, you may also want to read our page that outlines common applications for conventional veneers, including digital makeover before-and-after picture sets of cases.)
A) Making minor color changes.
Background.
1) When using comparatively translucent veneers.
When a veneer is fabricated using relatively translucent porcelain (doing so tends to give the tooth a more life-like appearance), it will need to be comparatively thicker, so it can effectively mask the color of the tooth underneath.
This is the approach used with conventional placement technique. The tooth is trimmed back so a thicker/more translucent veneer can be placed without creating a result that’s too bulky or oversized.
Ultra-thin veneers are best for making just small color changes.
2) When using comparatively opaque veneers.
Appropriate applications.
By limiting the use of no-drill technique to just cases where only a minor amount of color change is needed (such as lightening teeth just a shade or two, or masking slight blemishes), the veneer can be both ultra-thin yet comparatively less opaque (win-win).
B) Making minor alignment changes.
Background –
Veneers can be used to even out the apparent alignment of teeth. But not trimming back portions of the most prominent ones first (which is the case with no-drill technique) can result in an outcome where the restorations make the teeth very thick. (We illustrate and explain this issue here.)
Appropriate applications.
Think of no-prep veneer placement as a way of tweaking and perfecting a smile, such as correcting minimal tooth misalignments or straightening out minor incisal (biting) edge discrepancies. Not as a substitute for involved orthodontic work.
C) Closing tooth gaps (diastema closure).
Dentists sometimes refer to these types of situations as “additive” cases.
Appropriate applications.
Probably more so than with any other type of case, patients who have spaces between their teeth frequently make good candidates for no-tooth preparation veneers. Even more so if the teeth involved are relatively small or lingually inclined (see next section).
The extra thickness of a Lumineer® would be a benefit for this tooth.
D) Enhancing the appearance of small or inclined teeth.
Background –
- Improving the look of comparatively small teeth. (Such as improving the appearance of “peg” laterals, or teeth that need a minor amount of lengthening.)
- “Straightening” the alignment of lingually inclined teeth. (Teeth that are tipped inward or backward as opposed to being flared out.)
As with the other examples given on this page, just relying on the veneer to make minor improvements is typically the key to a successful outcome.
E) Minor repairs.
Applications –
Teeth that have small chips, minor wear on their biting edges, or an irregular outline form can make appropriate candidates for no-drill laminate placement.
As with all veneering techniques in general, just improving the appearance of the tooth should be the goal. Other types of restorations (especially dental crowns) make a better choice for rebuilding or strengthening damaged teeth.
F) Masking existing fillings.
Applications –
White fillings (dental composite) tend to deteriorate and stain over time. Placing ultra-thin, no-prep veneers over these types of restorations can provide a more aesthetically pleasing and durable tooth surface.
What about situations where perfect conditions don’t exist for ultra-thin veneers?
Even if your dentist determines that your case really isn’t the perfect application for an ultra-thin/no-drilling approach, it doesn’t necessarily mean that choosing it always makes an absolutely terrible decision.
Weigh the pros and cons.
- When it comes to aesthetics, lots of people seem willing to accept the compromises generally associated with ultra-thin veneers.
- But when the concerns are functional and biological in nature, the choice to proceed with ultra-thins can be expected to be a poor one. (Details and examples.)
Beware of case rationalization.
Going ahead and placing no-prep veneers when less-than-ideal conditions exist is frequently rationalized as being acceptable by both patients and dentists alike. But before choosing this route, it’s critical to have thoroughly discussed matters with your dentist so you understand all of the possible short and long-term consequences of doing so.
The use of no-prep veneers for cases that lie outside of accepted norms is precisely when this technique is most likely to create a compromised outcome (in terms of appearance, function, maintaining dental health, and case longevity).
As discussed above, and especially in cases where there seems to be some question about the appropriateness of placing no-preparation veneers and the added tooth thickness they create, dentists will frequently have a diagnostic wax-up made that they can then evaluate.
Problems and concerns associated with ultra-thin veneer placement.
The placement of ultra-thin porcelain veneers, like Lumineers®, Vivaneers®, and DURAThin®, using a no-drilling/no-shots protocol has its critics. The two primary problem issues that are usually brought up are:
1) Placing them may result in below-average esthetics. – Ultra-thin veneers have a reputation for needing to be comparatively opaque, as opposed to more translucent and lifelike like conventional laminates.
2) They may create tooth bulkiness. – No-drill (no tooth preparation) placement can easily result in bulky, over-contoured teeth that can make new veneers hard to get used to. It can also make the teeth they’re placed on harder to properly clean.
Proper case selection is always the key.
In response to these criticisms, dentists who favor the use of ultra-thin veneers are typically quick to point out that these issues can be kept in check by way of proper case selection.
Buyer beware.
We’d generally agree. Many of the problems associated with ultra-thin placement tend to stem from the aggressive sales tactics of dentists who push the envelope related to when a no-tooth-preparation protocol should be used.
An attitude of “just as long as the patient is informed and willing to compromise” is frequently given as justification for going ahead with their placement.
We’re not so sure how ethical that stance is considering how little most patients seem to comprehend about this subject and the potential problems that may lie in store for them. Hopefully, the contents of this page can help with that.
It’s also important to state that every patient should consider all possible alternatives before opting for any type of veneering procedure.
Issues of concern with ultra-thin veneer placement.
1) Difficulty in achieving a natural-looking end result.
a) Ultra-thin veneers frequently need to be very opaque.
The wafer-thin veneers placed using a no-drilling protocol are often criticized because with some applications they must be made out of comparatively more-opaque porcelain, or placed using relatively more-opaque cement, so they are able to adequately mask over the color of the natural tooth structure that lies underneath.
How tooth enamel handles light.
(Use the in-text links for an explanation.)
Why are opaque veneers a problem?
If a veneer (or veneer/cement combination) doesn’t accurately simulate enamel’s light-handling effect (as in it’s too opaque and keeps light from entering), your tooth’s appearance won’t look quite right. It might look white, but it won’t look perfectly natural.
An example.
Take the case where an ultra-thin veneer is used to lighten the color of a darkly stained tooth.
- Since it’s so thin, to effectively mask the stained tooth structure that lies underneath the veneer must be made using relatively opaque porcelain.
- But due to this opaqueness, light will tend to be reflected off the veneer’s front surface and not penetrate into it like it does when it strikes enamel (the link below illustrates this point).
- Because of this difference in light handling, the veneer won’t look truly lifelike.
(This is the exact same problem that occurs with dental bonding. This page explains and illustrates this phenomenon in detail, just substitute the words “dental bonding” with “opaque veneer.”)
How traditional veneers differ.
Because they are thicker, conventional porcelain veneers can be made out of comparatively more-translucent porcelain, yet still be able to mask dark tooth structure that lies underneath them.
And due to this translucency, light will be able to enter into the veneer and reflect back out in a fashion that truly mimics the lustrous look of a natural tooth. (This link explains and illustrates this issue in detail.)
▲ Section references – DiMatteo
A lot of people simply don’t appreciate this difference.
We do have to admit that when it comes to the issue of obtaining a precisely lifelike result, many people just don’t seem to care.
The ease and pain-free advantage that no-drilling/no-shots technique offers simply outweighs the disadvantage of a less than perfectly natural-looking outcome.
Trends have changed.
That’s probably because people’s attitudes about tooth appearance have changed over the last couple of decades, likely due to the explosion of tooth-whitening options that have become available over this same time frame.
Whitening processes tend to rob tooth enamel of translucency. And as a result, the patient ends up with a set of uniform snow-white “Chiclets” (teeth).
Nowadays, it seems that that is the look a lot of people are seeking. And if that’s the one you want, it’s easy enough to get with a set of ultra-thin veneers.
b) Conditions that can make achieving perfect aesthetics a challenge.
Especially in the case where only one or a few veneers are being placed, the increased characterization that’s possible with a (thicker) conventional veneer may be an important asset in creating a perfect match with the patient’s neighboring teeth.
It’s the characterization of a veneer that helps it to look lifelike or match well.
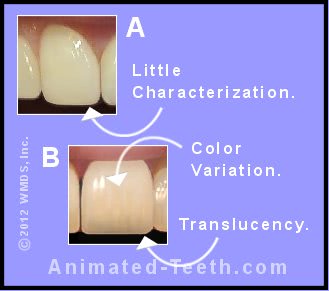
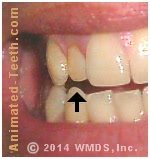
While a lot of people like the perfect look of “A”, there’s nothing natural-looking about it. Natural teeth display color and translucency variation.
An example.
- A – This tooth displays pronounced color uniformity and lack of characterization (the term “monochromatic” applies).
It would be relatively easy for a dentist to place an ultra-thin veneer that would match this tooth.
- B – This tooth demonstrates a fairly high degree of translucency at its biting edge (the grayness you see). And its color is not perfectly uniform.
It would be relatively difficult to mimic this look with an ultra-thin no-prep veneer.
2) Ultra-thin placement may result in bulky, over-contoured teeth.
Another criticism of placing Lumineers® using a no-tooth-preparation technique is that it can result in teeth that are bulky and over-contoured.
Background.
It’s easy enough to see how placing no-prep veneers could result in this outcome. After all, if you bond a shell of porcelain over the surface of a tooth without trimming it back first, its overall dimensions will be larger. It’s only a question of how much, and if it’s enough to cause problems.
Case selection is key in avoiding this outcome. When Lumineers® are placed to just make minor enhancements and upgrades, the results can be acceptable. But when what is trying to be achieved lies beyond general guidelines, a problematic outcome can be expected.
(An excellent way to get to evaluate how the addition of ultra-thin veneers may affect the size and thickness of your teeth is to view a pre-treatment diagnostic wax-up of your case.)
a) What are some of the potential problems?
1) An artificial appearance.
Placing restorations that create larger, fuller teeth can easily result in a look that’s artificial. In extreme cases, the term having “horse teeth” may certainly apply.
Of course, the degree to which this occurs is the key. And toward keeping it to a minimum case selection is always a primary determinant.
Some people don’t care.
Despite this outcome, the convenience and comfort of being able to take advantage of no-drilling/no-shots placement may be so attractive to some people that this is an easy enough trade-off to choose. Having bigger, larger teeth is not a concern as long as they’re whiter and more perfect.
2) Problems with function.
Another area of concern is how the increased size of the veneered teeth will affect the person’s daily activities.
- Larger teeth can be cumbersome, affect a person’s speech, or even the way they bite into things.
- Fuller teeth can also change the way a person’s lips are supported by or rest over their teeth. In extreme cases, it may be difficult for the person to close their lips together.
Fortunately, over time people tend to adapt to these types of difficulties. It’s just a matter of how extreme the change has been.
3) Plaque retention – Periodontal and tooth decay problems.
No-tooth-preparation veneers (like Lumineers®) must be ultra-thin so they don’t add too much bulk to the tooth.
(A primary concern is the amount of thickness added at the gum line.)
The underlying problem.
- Make it more difficult to remove dental plaque at the gum line.
- Tend to interfere with the natural cleansing action created by a person’s lips and cheeks as they slide over a tooth’s surface.
(In general, under contouring a dental restoration typically makes a more benign error than over-contouring. And placing no-drill Lumineers® seems to break this rule of thumb.)
Problems that may develop.
When dental plaque cannot be adequately removed, issues associated with tooth decay and gum disease may occur. Of the two, experiencing gum problems is the more common occurrence (persistent gingivitis, periodontal disease).
The consequences of either can be problematic to resolve.
- Repairing cavities frequently means that the restoration must be replaced. In extreme cases, the decay may be so extensive that just replacing the veneer may no longer be an option for the tooth.
- Treating gum disease can be successful. But any degree of gum recession that occurs (either triggered by the disease process or its treatment) can easily spoil the appearance of an entire set of veneers.
The solution. / The dilemma.
The way to ensure that a veneer’s contours don’t promote plaque retention is to make its gum line edge as thin (knife-edged) as possible. And generally speaking, this is easy enough to do.
The dilemma lies in the fact that in some cases doing so may compromise the esthetics of the restoration. That’s because the thinness of the veneer in this region may not effectively mask over the underlying tooth structure. (For example, this could be a problem in cases where veneers are used to lighten the color of teeth.)
(Here’s a solution for this problem if the patient allows.)
Research into the matter.
Several studies have evaluated how an over-contoured dental restoration tends to affect the health of the surrounding gum tissue.
As an example, one study (Deng) determined that:
- Increasing the contours of a tooth as little as .5mm can cause adverse effects.
- A .2mm increase resulted in no statistically significant problems.
Since Lumineers® can be fabricated as thin as .2mm in thickness, the above findings seem to confirm that placing them using a “no drilling” technique can produce acceptable results.
Ultimately, a person’s oral home-care habits may be the most important factor.
Some studies (Ehrlich, 1980 and Kohal, 2003) have determined that the most significant issue associated with over-contoured restorations is the effectiveness of the person’s oral hygiene. Those people who put in the effort and do an effective job do not develop problems.
▲ Section references – Ehrlich, Kohal
b) Problem situations where ultra-thins may add too much tooth bulk.
Here’s an example of the type of case where the placement of no-drill Lumineers® could easily result in teeth that are too oversized.
Placing no-drill veneers may be able to even out the alignment of teeth …
… but at the expense of making them too bulky.
That’s the crux of the problem we’ve been discussing. With a no-tooth-preparation approach, the veneers alone make up the needed thickness variations. And as you can see, using this method can easily result in bulky or over-contoured teeth.
Preparing (trimming the teeth back) as a first step …
… gives a result where the teeth are even yet not bulky and over contoured.
With it, the most prominent portions of the teeth are trimmed back first and then the veneers are made and placed.
Note: Lumineers® can be placed using no-drill or conventional veneering techniques. It is the method of placement that is the issue here, not the specific brand of veneer.
Ultra-thin (Lumineers®) vs. conventional veneers – Which makes the better choice?
Clearly, only you and your dentist can make this determination. But by answering the following questions we can point out many of the important issues that need to be considered when choosing between conventional or no-drilling (Lumineers®) placement protocol.
Factors in deciding between conventional and Lumineers® placement.
a) Is dental fear an important factor for you?
What are you most fearful of?
1) Drilling?
If this is your main concern about having dentistry performed, then when it can provide results that are acceptable enough, no-drilling technique makes the easy choice.
2) Dental shots?
If it’s only getting shots that you’re concerned about, quiz your dentist. In many cases, the small amount of tooth trimming that’s required for conventional veneer placement may be minor enough that no anesthetic is needed.
3) Everything dental?
If placing Lumineers® is expected to create an acceptable enough result, beyond no need for tooth trimming or dental shots, no-drilling protocol also offers the advantage of shorter, simpler appointments.
b) What kind of results are you seeking?
The whitest teeth possible.
One difficulty associated with no-drill Lumineers® is that their ultra-thin nature frequently means that they must be fairly opaque to be able to adequately mask the natural tooth structure that lies underneath them.
If you’re willing to accept the look of very opaque veneers (“Chiclets” uniformity, no characterization), then even ultra-thin Lumineers® can probably be used to produce the color change you want, even bleach white.
The most life-like results possible.
Natural teeth exhibit luster, a degree of translucency, and individual tooth characterization. In most cases it’s the goal of the dentist to create restorations that mimic these characteristics (so to obtain the most life-like results possible).
Toward this goal, it’s easier to accomplish this task with a thicker rather than thinner veneer (which implies that some tooth trimming will be needed). We explain here.
c) How many teeth will be veneered?
Just a few.
In cases where only one or just a few isolated veneers will be placed, a dentist may need all the help they can get in being able to perfectly match the color and characterization of the adjacent teeth.
If so, a comparatively thicker veneer (like that placed following tooth trimming) makes this task easier as opposed to an ultra-thin Lumineer®. (See the “What kind of results do you want?” boxes above.)
4, 6, or more.
Smiles are more likely to look normal and pleasing to other people if they display left-right symmetry.
So with cases where using no-drill protocol might result in a reasonable but lesser aesthetic outcome (see the “What kind of results do you want?” boxes above), if the veneers are placed either all across, or else if 2, 4, or 6 are placed as matching left-right pairs, the shortcomings of the case might be fairly unnoticeable because the smile displays symmetry.
d) Will having dental work performed interrupt your lifestyle?
Once your teeth have been trimmed for conventional veneers, one of two scenarios will play out:
- Temporary veneers will be placed.
Potential inconvenience – They may not look realistic or stay in place well.
- No temporaries are placed.
Potential inconvenience – The patient is left with roughened, irregular-looking, and possibly sensitive teeth while waiting (days/weeks) for their veneers to be fabricated and placed.
If you have a lifestyle where your smile is constantly scrutinized, you may not want to take a chance with dealing with the above. If not, no-drill Lumineers® avoids the potential for these difficulties altogether because your teeth remain unchanged until the day your new restorations are placed.
e) Are your teeth crooked?
Yes.
Conventional veneer placement tends to make the better choice for cases where an improvement with tooth alignment is needed. Here’s why.
No.
Either veneering technique can make a good choice.
f) Is the shade of your teeth very dark?
Yes.
When a relatively large shade change is needed, it’s typically easier for a dentist to produce a natural-looking result with conventional, thicker veneers.
To get the same outcome, no-drill Lumineers® would need to be relatively more opaque. And this can result in a less life-like tooth appearance.
No.
Either veneering technique can make a good choice.
g) Do you have tooth gaps or undersized teeth?
Either method can make a good choice with these situations. But of all of the different types of initial conditions, this is the one that’s most favorable for no-drill Lumineers® placement.
h) How is your oral home care?
Good.
Either method can make a reasonable choice. Here’s the rationale.
Sketchy.
As an elective procedure, neither veneers nor dental work of any type should be considered. By having restorations placed, you’re simply setting yourself up for the potential for a lifetime of dental problems, including tooth decay and periodontal (gum) disease. (The link below explains.)
In the case where some type of veneer is required, conventional placement (where the tooth is trimmed before the veneer is placed so no change in tooth size or shape occurs) typically makes the better choice. This page explains.
Last reviewed: June 16, 2022
Author: Paul Cotner, DMD — retired dentist.
Published by: WMDS, Inc. — owner of Animated-Teeth.com.
Educational information only — not a substitute for professional dental care.
Page references sources:
Beier US, et al. Clinical Performance of Porcelain Laminate Veneers for Up to 20 Years.
Deng X, et al. Effects of change of crown contour on health of gingiva.
DiMatteo AM. Prep vs No-Prep: The Evolution of Veneers.
Edelhoff D, et al. Tooth structure removal associated with various preparation designs for anterior teeth.
Ehrlich J, et al. Alterations on crown contour–effect on gingival health in man.
Kohal RJ, et al. Effect of different crown contours on periodontal health in dogs.