Looking for information about other Dental Topics?
Full Website Index• Animated-Teeth.com •

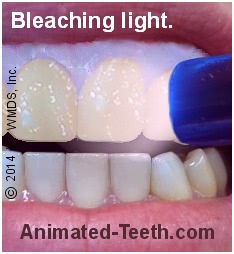
Is a bleaching light really needed during whitening treatments? (With either at-home or professional systems?)
Teeth bleaching lights – Is using one necessary?
If you’ve been online searching for teeth whitening products, you may have noticed that several at-home kits come with (blue, LED, UV) bleaching lights included. Or, maybe while in your dentist’s office you’ve noticed that they have an impressive-looking bleaching light sitting in the corner of their treatment room.
In response to these experiences, you may just assume that the use of a light is an important part of the teeth whitening process. And without it, your results won’t be as good.
However, is that really accurate? Is using a bleaching light really important?
A lot of manufacturers would like you to think so.
Several (but not all) makers of professional teeth whitening systems recommend that a bleaching light should be used when their whitener is applied. Some even insist on it. Here are some examples:
Professional (in-office) whitening systems that utilize a bleaching light.
Aladdin®, Beyond®, BriteSmile®, iBrite®, Iveri®, Lumalite LumaCool®, LumiSmile®, LumaLux®, Sinsational Smile®, and Zoom®
And in the last several years, more and more at-home systems have started to include a “personal” (blue, LED) whitening light with their products too. Some of these are:
At-home kits that come with a bleaching light.
AuraGlow®, Cali White®, Active Wow®, Crest 3D White®, Shine Whitening®, Pearl Teeth®, SmileBrilliant®, Glo Brilliant®, Snow®, and MagicBrite®.
The question then becomes …
Is using a light unit really necessary?
Spoiler Alert: It’s not.
Background.
Over the past several decades there’s been continued debate in the dental community about whether or not “light activation” really benefits (speeds up, enhances) the tooth-whitening process. And whether you get the same whitening results with or without light use.
What’s the light supposed to do?
In a nutshell, here’s the usual explanation that’s given about what a bleaching light does.
Some systems recommend “light activation” of the whitener.
- A manufacturer formulates its whitener with a special catalyst (a “photocatalyst“) that’s sensitive to the kind of light output by the company’s bleaching light.
(Nowadays, that’s frequently a blue-wave length LED light.)
- After the whitener has been applied, shining the light on the patient’s teeth activates the photocatalyst.
- Once activated, the catalyst, in turn, triggers a reaction that assists in the decomposition of the hydrogen peroxide molecules in the whitener into its reactive components.
(These components are termed “free radicals.” They are the molecular agents that actually break down the stain molecules in your tooth’s enamel.)
- Because the whitener’s production of free radicals is enhanced (the catalyst either helps to create more of them, or creates them more rapidly, or both), your whitening results are enhanced too (whiter teeth, quicker acting).
Is this plausible?
Well, somewhat …
It is true that creating more free radicals, or producing them at a quicker pace, does enhance whitening results. But whether today’s bleaching lights accomplish this feat is the question.
It seems that the current state of affairs is one where manufacturers of light-based systems continue to claim that they do. But independent researchers, when trying to confirm these claims, still continue to come up short.
What has dental research shown about the effectiveness of using bleaching lights?
When reading through published dental research, it’s easy enough to conclude that the use of a bleaching light adds no significant benefit. As evidence, in our next section …
- We first explain some of the historic studies that initially lead the way to this conclusion.
(Yes, that’s right. Even the newly introduced at-home products you see are dredging up a practice that studies began discrediting well over a decade ago.)
- And then we cite the findings of a recent literature review. With it, you’ll see that after evaluating studies published over 25+ years, they too have concluded that using a light provides no real benefit.
Research studies –
Study – Hein 2003
In a split-arch study, each side receives a different version of the treatment.
( A no vote on bleaching light effectiveness. )
(Split-arch design is the gold standard of teeth-whitening results testing because outcome differences due to variances among test subjects are eliminated.)
Findings:
Study – Tavares 2003
( A yes vote on bleaching light effectiveness.)
This study evaluated the BriteSmile® system.
Findings.
The authors reported that the use of a bleaching light did make a substantial difference in the whitening outcome.
Criticisms of this study:
- It did not use a split-arch design. (The “gold standard” type of testing described above.)
- The improvement in tooth shade was measured immediately after the treatment session was completed. (Our “Kugle study” section below explains why this is a study flaw.)
▲ Section references – Tavares
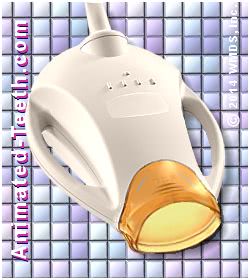
An in-office tooth-bleaching light.
Study – CRA 2003
( A no vote on bleaching light effectiveness.)
Findings.
This evaluation determined that the use of a light did not enhance the bleaching process over the use of just whitener alone.
▲ Section references – CRA, Christensen, Haywood
Study – Kugel 2006
( A no vote on bleaching light effectiveness and an explanation. )
This paper’s findings seem to explain the conflicting results found by Tavares vs. the Hein and CRA studies discussed above.
Findings:
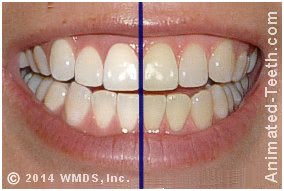
Using a split-arch study design, it was determined that results using a light-activated system did appear lighter but only initially.
When the subjects’ teeth were re-evaluated at a point 2 weeks after their treatment, no difference was found between the light and non-light sides.
Explanation: This paper attributed the initial improvements seen with the teeth exposed to a bleaching light to the dehydration effect that occurs as teeth dry out during their treatment process, and not to an increase in whitening efficacy due to light activation.
- As teeth become dehydrated their color tends to lighten.
- Then, as they regain moisture (over the following hours and days), the lightening effect begins to fade.
This explains why the evaluation made 2 weeks after the treatments showed no difference in whiteness whether a light had been used or not.
- Both whitening protocols created the same level of color improvement.
- The extra lightening effect that was seen initially with cases where a bleaching light was used ended up fading over time. (It was due to a temporary dehydration effect.)
A more recent literature review –
This next piece of evidence we share comes from a paper we’ve selected because it evaluated published studies on this subject over a 25+ year time frame. That span encompasses the entire duration of the “teeth whitening mania” that’s taken place in this country and its abundance of associated research.
Study – Maran 2017
( A no vote on bleaching light effectiveness.)
Findings:
After evaluating research studies published between 1990 and 2016 and passing judgment on the standards according to which they had been conducted, the authors of this paper stated: “Although it is commercially claimed that in-office bleaching associated with light improves and accelerates color change, this study did not confirm this belief …”
Study – Maran 2019
▲ Section references – Maran, Maran
So, is the use of a bleaching light really necessary?
No, as evidenced by what’s been discussed above, one would have to conclude that it’s not. And it’s hard to understand how anyone could arrive at any other conclusion.
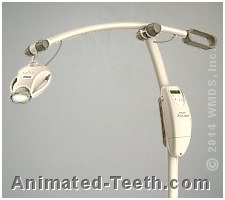
Bleaching light units look impressive.
Why do some dentists use bleaching lights?
- Because it came with my system.
- Because patients ask for it.
- Because it’s good for marketing.
▲ Section references – Haywood
What about the lights that come with at-home whitening kits?
We’ll concede that the bulk of the information discussed above comes from research that evaluated the use of professional-level bleaching lights. And you might wonder if somehow the light that comes with your at-home kit is different, and therefore possibly is effective.
We’ll point out that it seems fairly preposterous to suggest that the $5 light that comes with your at-home kit possesses some technology that the $1000 bleaching lights designed for dentists don’t.
Why do manufacturers emphasize the use of lights?
Companies that make in-office systems are eager to claim that their product’s bleaching light is an important part of the whitening process.
Why wouldn’t they be? Doing so helps to ensure sales of their light units, a piece of equipment that can cost your dentist hundreds to thousands of dollars. Or in the case of an at-home kit, the slightly more expensive version of their product.
Additionally, the use of a bleaching light adds fanfare and makes a patient’s whitening process seem more impressive. And the idea of having something special done tends to appeal to consumers and helps to drive demand for their product.
How about the reverse. Will bleaching light use alone whiten teeth?
We’ll simply point out that the proposed theory used to support the use of bleaching lights is one where the light “activates” the whitener (which makes it more effective). So no, using a light alone would produce no substantial lightening effect.
We’ll also point out that if this approach did work, you could perform your own teeth whitening treatments by just sitting in the sun and smiling a lot.
Treatment without light activation.
Are there any systems that don’t require the use of a bleaching light?
Professional whitening systems.
At-home whitening systems.
There are simply too many to try to mention them all here.
Are there any reasons why a light shouldn’t be used?
1) The need for a bleaching light adds expense to the whitening process.
Your dentist is a business person just like anyone else. And if the whitening protocol they use includes the use of a light unit, it will simply add to their expenses and ultimately yours too.
In the case of at-home whitening kits, the same holds true. This is especially obvious in the pricing of various Whitestrips® kits that do and do not include a light.
2) Exposing the patient’s teeth to heat must be avoided.
The concern.
Overheating teeth increases their potential for experiencing post-operative sensitivity, pain, and/or nerve tissue damage. An increase on the order of 10 degrees F within a tooth’s nerve space is thought to be able to cause irreversible nerve damage. (Sulieman)
Background.
Historically, the whole idea of using a light with in-office procedures was to create a heating effect (dentists literally used heat lamps as bleaching lights). That’s because hydrogen peroxide will break down into its reactive components (the free radicals mentioned above) more quickly when heated up.
Dentists know better nowadays. And today’s professional-level lights are designed so they have minimal potential for creating a heating effect, or else are used in a manner (constantly moved around) so no substantial heating takes place. (Companies that manufacture bleaching lights often state that they have a “cool” or “cold” output.)
What about at-home lights?
▲ Section references – Sulieman
Above on this page, we mention how split-arch testing is the gold standard for documenting teeth whitening product effectiveness. Here’s more information about this testing method.
Split-arch testing.
In a split-arch study, each side receives a different version of the treatment.
The same person left vs. right side comparisons.
This test is considered to be the gold standard for evaluating whitener effectiveness.
Page references sources:
Christensen GJ. Bleaching Teeth–Which Way is Best?
Haywood VB. In-office Bleaching: Lights, applications and outcomes.
Hein D, et al. In-office Vital Tooth Bleaching-What Do Lights Add?
Kugel G, et al. Clinical evaluation of chemical and light-activated tooth whitening systems.
Maran BM, et al. In-office dental bleaching with light vs. without light: A systematic review and meta-analysis.
Maran BM, et al. Different light-activation systems associated with dental bleaching: A systematic review and a network meta-analysis.
Sulieman AM. An overview of tooth-bleaching techniques: chemistry, safety and efficacy.
Tavares M, et al. Light augments tooth whitening with peroxide.