Dental stitches / Gum tissue flaps (as utilized with extractions and wisdom tooth surgery). –
Gum tissue flaps and suture placement.
Table of contents –- Introduction.
- Types of stitches (suturing materials).
- Resorbable sutures – Stitches that dissolve.
- Nonresorbable sutures – Stitches that don’t dissolve.
- Comparing resorbable vs. nonresorbable stitches – Advantages and disadvantages.
- Effects of placing stitches – Benefits and disadvantages.
- An aid in wound healing – Tissue approximation and stabilization.
- An aid in wound hemostasis – Bleeding control.
- Inhibition of wound healing.
- Gum tissue flaps.
- When is rasing a dental flap needed for an extraction?
- Creating and raising the flap – The steps.
- Flap size – Why it’s bigger than you’d expect.
- Closing the flap and placing sutures – The steps.
- Continuous vs. interrupted sutures – Pros and cons.
- Other ways to learn.
- This page’s highlights as a video.
- Associated pages.
- How stitches are taken out – The procedure (by your dentist or DIY.)
- Lost or loosened sutures – What happens if a stitch comes loose or falls out early? What to do.
- Resorbable sutures – Stitches that dissolve.
- Nonresorbable sutures – Stitches that don’t dissolve.
- Comparing resorbable vs. nonresorbable stitches – Advantages and disadvantages.
- An aid in wound healing – Tissue approximation and stabilization.
- An aid in wound hemostasis – Bleeding control.
- Inhibition of wound healing.
- When is rasing a dental flap needed for an extraction?
- Creating and raising the flap – The steps.
- Flap size – Why it’s bigger than you’d expect.
- Closing the flap and placing sutures – The steps.
- Continuous vs. interrupted sutures – Pros and cons.
- This page’s highlights as a video.
- How stitches are taken out – The procedure (by your dentist or DIY.)
- Lost or loosened sutures – What happens if a stitch comes loose or falls out early? What to do.
Raising gum tissue flaps and placing stitches – What purpose do they serve with tooth extractions?
Some tooth extractions require the creation of a gum tissue flap so to gain better access to the tooth being removed and/or the bone that surrounds it …
… And then the placement of one or more sutures (stitches) whose purpose is to stabilize soft tissues loosened up during the extraction procedure (whether a formal tissue flap has been raised or not) …
… for a period of time while a preliminary degree of healing has had a chance to occur.
Most people who visit this page are interested in the subject of stitches, so we’ll cover them first.
This page’s highlights as a video –
Subscribe to our YouTube channel.
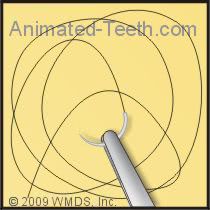
Suture needle and thread.
1) Types of stitches – suture materials.
a) Stitches that dissolve.
Resorbable (absorbable) stitches offer the advantage that they don’t need to be taken out later on. Your body breaks them down and disposes of the byproducts.
These types of stitches are sometimes called “catgut” or just “gut” sutures, related to the fact that some are actually made from intestines of animals (usually sheep or cattle).
Beyond natural materials, various synthetic compounds are used to make dissolving stitches too (polyglycolic acid, glycolic and lactic acid copolymer, glycolide and epsilon-caprolactone copolymer, polydioxanone).
How long does it take resorbable stitches to dissolve?
The amount of time it takes for disintegration depends on the type of suture material placed and what type of treatment it has received.
- Plain gut sutures have usually substantially deteriorated (have lost most of their original strength) by day 8 post-placement. (This type of suture is often yellowish-tan in color.)
- Chromic-treated gut lasts a little longer, on the order of 12 to 15 days, due to the fact that the chromium salt treatment makes it more resistant to body enzymes. (This type of suture usually has more of a brown coloration.)
- Stitches made from synthetic materials, like glycolic acid, may retain their strength for up to a month.
So if you weren’t told at the time of your surgery, in order to know exactly what to expect you’ll probably need to touch base with your dentist’s office.
What will you notice as your sutures dissolve away?
As the strength of your stitches deteriorates, it may seem as if they’re getting loose or coming untied. There’s usually a point where they have become so fragile that their exposed portions just break off and fall away.
Within your tissues, the completion of the absorption process by your body will take many weeks. Once again, the kind of suture material used and the treatment it has received are factors. Other issues include the type and conditions of the tissue in which the stitches have been placed, and even the general health status of the patient.
▲ Section references – Fragiskos, Dunn
b) Stitches that don’t dissolve.
In comparison to stitches that dissolve away, nonresorbable (nonabsorbable) sutures are made out of materials that the body can’t degrade and dispose of. This includes: silk, polyester, polyvinylidene fluoride, polypropylene and nylon.
When should they be taken out?
Since their strength characteristics far exceed the duration of their needed service, nonresorbable sutures must be removed.
This appointment is usually scheduled somewhere between 7 to 10 days after the stitches were originally placed. (Fragiskos)
▲ Section references – Fragiskos
Resorbable vs. Nonresorbable stitches – Which kind is better?
Resorbable stitches.
- The biggest advantage of using this kind of suturing material is convenience. Because these stitches just dissolve away on their own, you won’t have to make a special trip back to your dentist’s office to have them removed.
That can be a nice time saver for all involved, and the primary reason this option is chosen.
Nonresorbable stitches.
- Braided silk is easier for the dentist to handle and tie. Knots are less likely to come loose.
- The cut ends of silk sutures tend to lie flat and are not pointed or stiff, making them less noticeable, and less irritating to the patient’s cheeks and tongue.
- Of course, their main disadvantage is simply that they require an added trip to your dentist’s office to be removed.
2) How stitches affect wound healing (positively and negatively).
As a point of interest, here are some of the effects that placing sutures in a wound can have. Different than you’d expect, they’re not all entirely positive.
Functions and effects of placing stitches –
a) An aid in wound healing.
A primary function of stitches is stabilizing movable soft tissues (like a tissue flap that’s been created during a surgical extraction).
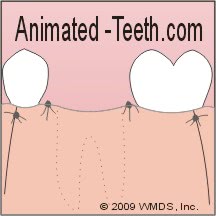
The loose gum tissue between two extracted teeth has been sutured together so to stabilize it.
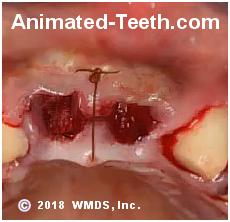
Note that no attempt has been made to pull the gum tissue across the empty sockets.
- Help to minimize the distance between wound parts. – Placing stitches helps to approximate (bring together) the edges of gum tissue where an incision or separation has been made. This is referred to as primary wound closure. Shortening this distance helps to decrease the amount of time that’s needed for healing.
(After the extraction of just one or a few teeth, opposing portions of gum tissue may be sutured together. But only to stabilize the tissue, not to draw it over the empty socket(s). See picture.)
- Hold loose gum tissue in close contact with its underlying bone. – This helps to protect the bone, prevent foreign materials (saliva, bacteria, debris, etc…) from getting into the space in between, and promotes quicker tissue reattachment.
- Strengthen the wound. – This is an important function that helps to minimize the wound’s potential for disruption during its early stages of healing.
▲ Section references – Hupp
b) An aid in wound hemostasis (bleeding control).
Placing stitches in an extraction site tends to create soft tissue compression. This pressure in turn can help to minimize the amount of postoperative bleeding that occurs, help to bring the wound’s bleeding under control more quickly, and generally aid with blood clot formation.
▲ Section references – Hupp
c) Wound healing inhibition.
- Your body considers suture material to be a foreign object. And as such, the placement of stitches triggers an inflammation reaction in the surrounding tissues. This will tend to inhibit wound healing at least to some degree. (This level of this effect varies with the type of suture material used.)
- The stranded nature of some types of suture material, like silk, tends to create a wicking effect that draws oral fluids and debris into adjacent tissues, thus interfering with their healing process either by way of creating inflammation or infection.
3) Dental flaps.
Some extraction procedures (such as removing impacted wisdom teeth) require the creation of a gum-tissue flap.
- When the gum flap is reflected (peeled back), it gives the dentist improved access to and visualization of the tooth and bone tissue that surrounds it.
- Once the tooth has been removed, the flap is returned to its original position and tacked in place with stitches.
- A basic premise of utilizing a flap during surgery is that it will heal more quickly and uneventfully than a torn, traumatized area of gum tissue.
(This page outlines extraction situations where the creation of a dental flap might be needed.)
The gum tissue flap procedure.
Here’s the process that a dentist uses to “lay” a flap when performing a surgical tooth extraction.
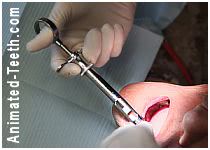
- With most cases, the routine injections that your dentist has given you to numb up your tooth for its extraction will numb up the flap area too. If so, no extra “shots” will be needed. [More information about dental injections.]
2) They’ll then use a scalpel to score the outline of the flap, cutting all of the way through the gum tissue down to the bone. (This is termed creating a “full-thickness mucoperiosteal flap,” indicating that all of the soft tissue layers covering the bone will be peeled back.)
- Since you’re numb, you won’t feel any pain. You will, however, feel the pressure of the scalpel as it makes the incisions.
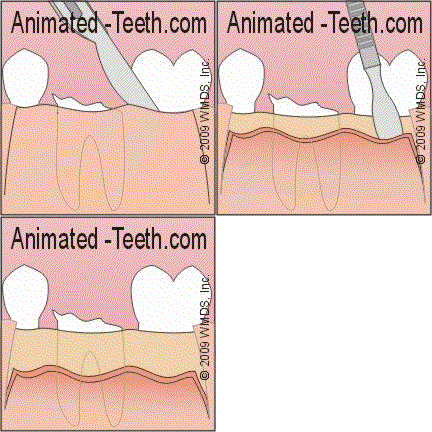
A dental flap provides access to both a tooth and its surrounding bone.
- At an edge of the flap near where your gums and teeth meet, your dentist will insert a tissue “elevator” (a hand instrument that looks like a flat-bladed screwdriver, only its blade is rounded and smooth).
- As the elevator is pushed both along and underneath the outline of the flap, the gum tissue will peel back.
- Since you’re numb you won’t feel any pain. You will, however, feel the pressure of the elevator being worked against the bone.
4) At this point, the three sides of the flap are loose and free. The underlying bone surface is entirely exposed.
- Your dentist can now perform whatever procedure is required as a part of the tooth extraction process (such as bone removal or tooth sectioning).
- Afterward they will position the flap back into place and tack it there with stitches (see below).
▲ Section references – Koerner
Why are tissue flaps so large?
A tissue flap stitched back into place following an extraction.
Notice how the flap’s base is wider than its free margin (edge).
- Since the whole idea of creating a tissue flap has to do with visibility and access, the flap must be large enough to fulfill these needs.
- If the flap is too small, your dentist will tend to pull and stretch on it. Creating trauma like this will complicate its healing. Postoperative pain, swelling and bleeding will be more likely.
- Your dentist needs a firm base over which to suture (stitch) the flap back into place. This means that its edges must extend over and rest upon undisturbed bone.
- The flap must maintain an adequate blood supply. For this reason, the base (still attached) portion of a flap is designed so it’s always at least the same width, and preferably broader, than its free (loose) edge.
▲ Section references – Koerner
4) Closing flaps. / Placing stitches.
Here’s an outline of what your dentist will need to do when “closing” the flap they created for your extraction process.
1) To start, your dentist will thoroughly flush your wound with saline solution or water. They’ll also evaluate the surface and edges of the exposed bone to make sure it has smooth and rounded contours.
- The goal here is to remove debris (tooth chips, bone spicules) and smooth off sharp edges that might interfere with the healing process.
- Sharp or rough edges can be smoothed down using a dental drill or else a hand instrument called a “bone file” (a rasp-like tool). During this process, you may feel the action/vibrations of the tools as they’re used but there shouldn’t be any pain involved.
2) The flap is usually positioned back into pretty much its original position. Stitches will be placed to hold it there.
- The usual goal is one of approximating the edges of the wound. (Bringing the tissues on each side of the incision close together.) Doing so aids in how quickly this aspect of the wound will be able to heal.
- The number of stitches used will vary with each individual case, simply depending on how many your dentist feels are necessary to create adequate tissue stabilization.
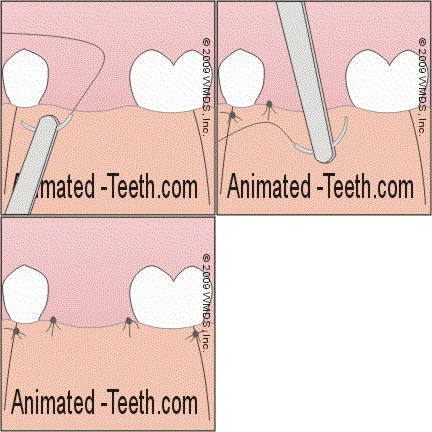
Placing sutures to tack a tissue flap back into place.
- Dentists usually use a prepackaged, pre-assembled curved needle with attached suture material (silk, nylon, “gut”, etc…).
- The suture needle is grasped with a pair of hemostat-like forceps (a needle driver) and inserted through the thickness of the flap. The curved nature of the needle makes it so it tends to poke back out of the tissue once it’s gone through.
- You will feel the tug of the needle and thread as each individual stitch is placed and tied off. But you will not experience pain.
- Your dentist will avoid tying your stitches too tight. Doing so would tend to reduce the blood flow into your gums (blanching would be a sign of this), which would tend to delay or even complicate the healing process to follow.
4) Your extraction site has now been closed and your procedure completed.
- Your dentist will provide you with post-operative directions detailing steps and precautions you must take.
- Among these should be specific instructions as to if and when your stitches need to be removed.
▲ Section references – Koerner, Fragiskos
Types of suturing.
The stitching pattern that your dentist uses will vary depending on the size and needs of the wound being closed.
a) Interrupted sutures.
This is the simplest, and most frequently used, type of suture placement following oral surgery procedures.
The term “interrupted” simply means that each stitch is placed and tied off independently (one-at-a-time placement). The advantage being that if one comes loose or unties, the integrity of the wound’s other sutures won’t be affected.
b) Continuous sutures.
“Continuous” stitches are the situation where a single line of suture thread is woven multiple times through the flap being anchored, with the whole placement being secured by the same knot(s).
▲ Section references – Fragiskos
Return to page surgical extractions. ►
Page references sources:
Dunn DL. Wound closure manual. Chapter: The suture.
Fragiskos FD. Oral Surgery. (Chapter: Principles of Surgery.)
Hupp JR. Guide to suturing with sections on diagnosing oral lesions and post-operative medications.
Javed F, et al. Tissue Reactions to Various Suture Materials Used in Oral Surgical Interventions.
Koerner KR. Manual of Minor Oral Surgery for the General Dentist. (Chapter: Surgical Extractions.)
Wray D, et al. Textbook of General and Oral Surgery. (Chapter: Wound healing and suture materials.)
All reference sources for topic Tooth Extractions.
Video transcription.
Hello, and welcome to Animated Teeth.com and our page that covers the subject of stitches, like those placed by a dentist as part of the tooth extraction procedure.
In this video we cover details like: When are stitches needed? What purposes do they serve? When aren’t they needed? What are the disadvantages associated with placing them? We also explain sutures that dissolve away and how long that takes. And, when do non-resorbable sutures need to be removed? By the way, the word suture is just the more formal term for the word stitch.
As a starting point, we need to mention that there are two kinds of suture materials. Those that after being placed ultimately dissolve away on their own. These are termed absorbable or resorbable stitches. And then, those that don’t and instead must be removed.
The slang term “cat gut” is sometimes applied to dissolvable sutures. This name reflects the fact that they are made from compounds derived from animal intestines. But besides just that, they can be made out of synthetic materials too.
All of these options, natural and synthetic, vary in the length of time it takes before they start to break down. Untreated gut sutures start to weaken the fastest, on the order of 8 days or so. Chemically treated gut takes almost twice as long. Some synthetic resorbables can provide service for almost a month. When placed following a tooth extraction, stitch strength is usually needed for about a week, so your dentist will choose accordingly.
As far as what happens with them, over time you’ll notice that the visible portion of your resorbable suture will start to break apart as it weakens. The section still in your gums will ultimately be broken down by your body. But that takes much longer than the service life of the stitch, on the order of many weeks before it’s 100% gone.
As an alternative to dissolving stitches, your dentist may choose to place non-resorbable ones. The classic non-adsorbable is the “braided silk” suture, although a number of other materials can be used too, like polyester or nylon. As their name implies, these types of stitches won’t dissolve away on their own. They have to be removed. The usual time frame for doing so is 7 to 10 days following your extraction.
So, what’s the deal? Why would a dentist place resorbable versus non-adsorbable sutures? Well, with the dissolving kind you don’t have to go back to your dentist’s office to get them taken out. That’s great for you. And since time is money, it’s great for your dentist too.
But non-resorbable threads have a reputation of being easier to work with. And they typically hold a knot better than their comparatively stiffer adsorbable counterparts. Also, their knots tend to lie down as opposed to sticking up, so they’re less likely to be irritating to tissues or your tongue.
Oh …, by the way, how do you know which kind of stitches you have? Well, a different dentist could probably look in your mouth and tell at a glance but you, on your own, probably can’t. So, if you don’t remember what you were told, you’ll need to check back with your dentist because it’s important that your stitches are removed if they won’t dissolve away on their own.
You might wonder why sutures are required after some extraction procedures but not others. Most people would guess it has to do with tissue stabilization, and they’d be mostly right.
For example, a dentist may raise a tissue flap so they can get at the tooth they’re pulling. If so, when they’re finished, they’ll need to tack everything back into place using stitches. Actually, sometimes a formal flap hasn’t been raised but the patient’s gum tissue is still mobile, like where multiple adjacent teeth have been pulled. If so, the dentist might feel it’s necessary to place a few stitches. It’s their judgment call.
Stabilization plays a couple of important roles. For example, anchored tissues will heal more quickly and predictably. Also, the edges of tissues can be approximated, as opposed to their having a gap between them that would take longer to fill in. And specifically positioning the gums, like in relation to the teeth, can help to idealize the case’s overall outcome.
Probably less known is that sutures are sometimes placed to help control post-operative bleeding. The pressure they apply to the extraction site favors the clotting process.
Now that you know about the benefits that stitches provide, you might be surprised to learn that there’s a downside to them too. Your body identifies suture material as a foreign body, meaning something that shouldn’t be there. And as such, a response is mounted.
So, technically speaking, the presence of stitches interferes with, and therefore to some minor extent slows down, the healing process. When stitches are needed, those benefits far outweigh this downside. But if they’re not, you’re technically better off without them. Like we stated previously, placing sutures is simply a judgment call that your dentist has to make.
Well, that covers everything we promised. Don’t overlook that there’s a lot more information on this page than what we’ve covered in this video. So, give it a read. Goodbye.
Comments.
This section contains comments submitted in previous years. Many have been edited so to limit their scope to subjects discussed on this page.
Comment –
Extent of stitches.
Hi, I had a molar extracted 4 days ago. Swelling has finally gone done & I’m in much less pain, however is it normal to have stitches anchored to an adjacent tooth because it seems I have a stitch around that tooth. Also, I have white gums laterally where the tooth was pulled.
Lisa
Reply –
Sling suturing is a technique. And as you describe, the suture thread is wrapped around the circumference of the tooth. And yes, sometimes this technique is used to close flaps associated with molar extractions.
The white gum tissue you notice might be tissue that was traumatized during the extraction process (as your tooth was rocked back and forth). If your body has decided that it can’t be salvaged, it will reduce the blood flow to it. During the healing process this tissue will be replaced with new.
Staff Dentist
Comment –
Cleaning stitches
I got one of my lower molars extracted about 2 weeks ago and now the stitches in my mouth have begun to smell/taste bad. I can’t brush the area, so how do I clean them? I’m not getting the stitches out for two more weeks!
RS
Reply –
It’s possible that what you smell and taste is related to the accumulation of debris and bacteria underneath and around your stitches, or possibly even within their thread strands. If so (at this point, 2 weeks post op) gentle rinsing with a hydrogen peroxide solution should be a way to help to clean them up (dislodge debris, kill bacteria). (3% hydrogen peroxide diluted with an equal amount of water, or use the product Peroxyl.) Pass this suggestion by your dentist to get their OK.
Staff Dentist
Comment –
Nonresorbable Stitches
I had an upper molar extracted 4 days ago, the dentist stitched the area using black nonresorbable stitches and asked me to return after 10 days to remove them. The swelling has reduced in my face but the gums are still swollen some.
The stitches (which have been irritating my cheek and tongue) seem to have loosened up to the point where the knotted part is now a long hanging stitch. Its irritating me even more now, and is so much more sore since coming loose.
Would it do any harm for me to remove the stitch myself? Also the area where the stitches are is now a white gum surface rather than pink – is this normal?
FM
Reply –
These are all pretty simple questions for your dentist to answer. You need to give them a call.
In general terms:
If an individual stitch that has been placed to stabilize tissues is extremely loose, then we’d agree that it is no longer serving its function, and at least in theory is actually retarding the healing process.
But if what seems loose is a part of continuous stitches (where cutting one undoes others), or what has been seen has been misinterpreted, then at just 4 days (according to our tissue healing graph) removal might be problematic.
The white gum tissue you notice might be tissue that has been traumatized during your procedure. During the healing process your body may find that some tissue can’t be or shouldn’t be salvaged. As such, it will reduce the blood flow to it.
All of the above is just general information. Only your dentist can tell you how these issues apply to your case.
Staff Dentist
Comment –
Stitches in cheek.
Hey I had 3 wisdom teeth removed and the dentist stitched the wounds close. It’s looks as if he has stiched them to the cheek. Is this normal?
Benjamin H.
Reply –
You’ll need to check back with your dentist for specifics about your case but generally, there is no clear demarcation between the skin of the cheek and the gums surrounding the area of a 3rd molar. And in order to be able to close the extraction wound, the stitches placed may need to impinge somewhat on what’s interpreted as being cheek tissue.
Staff Dentist
Comment –
How long?
Due to Covid-19 Pandemic, dental offices are closed, preventing post surgical exam and suture removal. How long can sutures remain?
Michael
Reply –
It’s not possible to provide an answer for your specific case. Surely someone must be answering emergency calls for your dentist and you can discuss matters with them.
In general terms:
Following oral surgery, non-absorbable stitches are usually left in place for 7 to 10 days, here’s why.
And generally, after they have served their purpose (often/typically as an aid in strengthening the healing wound), leaving them in place for longer tends to delay healing.
It’s common that toward the end of the stitches’ intended lifespan, they have started to loosen and sag (just part of the evidence that they no longer are needed). And especially if so, they are usually easily removed, as explained here.
Not removing them leads to the potential that some of the suture material will remain within the tissues as it fragments and deteriorates. And while not usually resulting in a significant complication, isn’t the ideal scenario. (More details here.)
Staff Dentist