Looking for information about other Dental Topics?
Full Website Index• Animated-Teeth.com •

The steps of the dental post-and-core procedure (crown build-up procedure).
Guide to the steps of “core” and “post and core” placement.
placement.

placement.

If your dentist has decided that your tooth requires a “core” or “post-and-core” What are these?, this page outlines the process they will use when placing these kinds of “crown buildups.”
This guide outlines of the steps of both the core-only and post-and-core procedures. It also explains decisions your dentist must make along the way such as selecting the type of post to use (e.g., prefabricated or custom-made | metal, glass-fiber, or ceramic) and determining if additional retention methods, like pins, are necessary to fully anchor the core. This guide also addresses common patient concerns, such as whether the procedure is painful and how long the procedure typically takes.
By familiarizing yourself with the placement process and the decisions your dentist may make, you’ll be better prepared to discuss your treatment plan and understand the role the core-only or post-and-core procedure will play in the long-term success of your tooth’s new crown.
A) The steps of the post and core placement procedure.
Background – Why is one needed?
A post and core is sometimes required for severely broken-down root-canalled teeth in preparation for making a permanent crown for them. Here’s why:
- To stay in place well, a dental crown needs some tooth structure extending up inside it. This may be missing in severely damaged teeth. If so, the “core” aspect of a post and core replaces this missing tooth structure.
- In situations where so much natural tooth structure is missing that adequately anchoring the core on the tooth seems questionable, a post is placed. The post helps to anchor the core build-up.
- The post is cemented inside the root canal space of a tooth root. That’s why a post and core can only be placed in a tooth that’s already had endodontic therapy.
FYI: More details – Post and cores. Reasons for placement.)
The initial frame of our animation below illustrates just this type of situation.
1) It shows a tooth that has been endodontically treated. (The red in our illustration represents the root canal filling material (gutta-percha What’s this?) that was placed during its procedure.
2) And its crown portion has broken off, almost flat with the gum line.
Using a drill to create the post space.
Step #1 – Creating the post space.
As an initial step, your dentist will need to create the location (“post space”) inside your tooth in which the post will be cemented.
This prepared area will lie within one of the tooth’s root canals, which during its endodontic treatment was filled in (sealed) with a rubber-like compound called gutta-percha (see link above).
How is the post space created?
1) Via using a drill.
Most dentists use a (slow-speed) dental drill to create the needed channel for the post.
Since gutta-percha has the consistency of a soft pencil eraser, the dentist’s drill will usually burrow through it, following along the path of the root’s canal, without much resistance or heading off course.
To assist this process, the dentist may touch a heated instrument to the gutta-percha to soften it up, so the drilling process proceeds more easily and predictably.
2) Working by hand.
A more cautious approach involves the dentist heating the canal’s gutta-percha to soften it up, and then scraping/scooping it out using hand tools. The shape of the empty canal is then refined via the use of root canal files or a dental drill.
This is a safer approach because when a drill is used by itself to create the post space, there’s always a chance it will go off course. As a worst-case scenario, a perforation (a hole out the side of the root) may be created.
Issues your dentist will consider as they create the post’s space.
When placing a post and core, first on the dentist’s mind is performing the procedure without damaging, unduly weakening, or placing the tooth’s root at increased risk of fracture.
Guidelines for dental post placement.
- With this procedure, the size of the post that’s placed isn’t as much of a concern as the goal of minimizing the amount of internal tooth structure that must be removed to place it.
Placing a comparatively smaller diameter post, and therefore leaving a greater thickness of root structure, places the tooth at less risk for fracture. As a general rule, a post shouldn’t be more than about 1/3 the diameter of the root that it’s placed in.
- The post’s retention (stability, resistance to being dislodged) generally correlates with the length it extends into the tooth’s root.
At a bare minimum, the post should extend at least a distance equal to the height of the crown being placed. Most ideally, it will extend around 2/3rds the length of the root. However, 3/16ths of an inch or so of gutta-percha needs to be left undisturbed at the root’s tip to maintain an adequate endodontic seal.
- Juggling all of the above issues (post diameter, post length) with the concern of not causing any procedural harm (root perforation, loss of endodontic seal integrity) can be challenging for the dentist. Especially in cases where the root being treated is small, curved, or has a noncircular cross-section.
▲ Section references – Rosenstiel
Step #2 – Fitting the post.
Once the post space inside the tooth has been created, the dentist must then evaluate how the specific post they have selected for placement fits in its prepared channel.
Evaluating the fit of a post in its post space.
How is a post chosen?
While a dentist typically has a collection of post sizes to choose from, it’s easy enough for them to know which one from their assortment to try first.
Posts typically come in sizes (diameter and taper) that match drill and root canal file sizes (the instruments that have been used to create the post space).
What they’ll do.
- The dentist will measure the length of the channel they’ve created, and trim the post they’ve selected to match.
- They’ll then slip the post into place. If it’s too long, they’ll remove it and trim it some more. If its fit is slack, wobbly, or exceedingly tight, the dentist might select a different post size, or re-prepare/further refine the post space.
Posts typically have a passive fit.
When being evaluated, most types of posts can be slipped in and out of their tooth relatively easily because they’ve been designed to have a fairly passive fit. Here’s why.
- The biting threads of screw-like posts tend to create tension and stress points within a tooth’s root, thus leaving it at greater risk for fracture.
While just backing a screw-style post off a partial turn will typically relieve most of this stress, non-threaded designs are more frequently used. But in cases where extra retention is needed, like with short roots, your dentist may decide that the use of a screw design makes the right choice.
- A passive-fit post gets its retention from factors such as how snugly it fits in its channel, its shape (straight rod vs. tapered), its surface texture (grooved or smooth), its length, and the type of cement used (adhesive vs. non-bonding).
▲ Section references – Rosensteil
Step #3 – Cementing the post.
Once the fit of the post has been checked, it’s ready to be cemented inside its tooth.
What kind of cement is used with dental posts?
Historically, the types of cement dentists used did little to aid with post retention. The cement filled in around the post but created no adhesive bond with it or the tooth.
Nowadays, dentists have a number of different types of adhesive cement to choose from. However, even so, the physical characteristics of the post (its length, how well it stays in its post space on its own, etc…) still play the dominant role in achieving adequate post retention. (The use of adhesive cement is unlikely to overcome the deficiencies associated with a poorly designed post system.)
How is a dental post cemented into place?
The protocol is simple. The cement is mixed and then smeared onto all sides of the post. The dentist may coat the walls of the post space inside the tooth with cement too.
The coated post is then gently slipped into the tooth to the point where it’s fully seated in the space that’s been created for it. (Pushing the post in place too quickly or forcefully can create excessive pressure within the tooth.)
Any excess cement that extrudes is removed. Although, the timing of this step (before, after, or during its setting period) varies with the type of cement used.
Some cements are light-cure or dual-cure. Their set is triggered by exposure to blue-wavelength light. So, you may see your dentist shine their (blue) “curing light” on your tooth.
▲ Section references – Rosensteil
Step #4 – Adding the core portion of the post-and-core restoration.
Once the post’s cement has set, the restoration’s core buildup portion can then be added to complete the tooth’s dental crown build-up.
What kind of core material is used?
The kinds of materials that are most frequently used for cores are routine dental restoratives, with the most common ones being dental amalgam (silver filling material) or composite resin (dental bonding).
How the core portion of a post-and-core is fabricated.
The dental restorative is packed over and around the post’s exposed end. And is typically added until the dimensions of the core somewhat approach those that the tooth had originally.
Placing the core …
… and shaping the tooth for its crown.
(The actual dimensions needed will vary according to the plans and timeline associated with the tooth’s future dental work. However, the main goal is simply one where the size of the crown build-up will provide the dentist with the optimal amount of tooth structure for the crown that will be placed over it. Explained. | Diagram.)
Extra retention for the core may be needed.
In some cases, the tooth being rebuilt may have experienced a significant amount of previous damage (like from fracture or tooth decay) and therefore have a substantial amount of tooth structure missing.
If so, what remains may be deemed unable to adequately anchor the core. (Note: Although the only reason to place a post is to anchor the tooth’s core build-up, relying on the post alone for retention and stability may not be enough to prevent case failure.)
In these types of situations, a dentist may create additional retention for the core by placing pins (screws) in the tooth, around which the restorative can then be packed and anchored (we discuss the use of pins below).
▲ Section references – Rosensteil
Step #5 – Completing the tooth’s reconstruction.
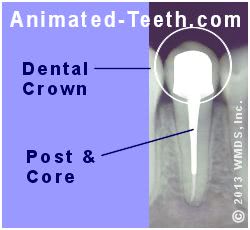
Once the process of placing the post and core has been completed, the tooth’s dental crown can be fabricated, just like for any tooth. We outline this process here: How dental crowns are made. The steps.
X-ray of a tooth that has a completed post & core and dental crown.
How soon after a post and core has been placed can the tooth’s crown be made?
- Depending on the materials that have been selected for the post and core buildup, it may be possible for the dentist to begin the tooth’s crowning process during the same office visit.
- In cases where this won’t be done, a dentist may rely on the completed post and core to serve as the tooth’s interim (temporary) restoration.
If so, ask your dentist about what precautions to take (like avoiding heavy biting forces and generally favoring the tooth), and the acceptable time frame before your new crown should be started.
What the post-and-core procedure is like for the patient.
a) How long does the post and core procedure take?
If placing a prefabricated post, and when creating the crown build-up is combined with performing additional treatment for your tooth, the steps needed to construct your post-and-core (alone) may be completed in as little as 15 minutes or so.
If instead this procedure is scheduled as a stand-alone process, your appointment will probably take about 30 minutes or so.
In cases where a cast/milled/indirect post and core is planned, the process typically takes two separate appointments, with a period of about a week or two in between. (The period a dental laboratory will require to fabricate your restoration.)
b) Does having a post and core placed hurt? Will you require an anesthetic?
Usually not. By definition, post & cores are only placed in endodontically treated teeth (teeth whose nerve tissue has been removed). So, there’s literally no nerve inside your tooth to register pain.
Minor vibrations associated with performing the procedure (like from the dentist’s drill) may be felt but feeling pain should not be a factor.
Even so, there are some reasons why your dentist might go ahead and numb you up with an anesthetic anyway.
- A frequent reason involves the case where the tooth has broken off at a level at or below the gum line. If so, your dentist performing their work may prod or poke at your gum tissue and for that reason, you may need to be numbed up.
- Another reason is that your dentist may want to perform this procedure under the protection of a rubber dam. (So the interior of the tooth isn’t exposed to saliva and contaminants. And as protection for you from swallowing items.)
Because the placement of a clamp What’s this? | Picture. is involved (to hold the dam on its tooth), when one is used an anesthetic may be needed.
c) What will you feel during the post and core placement procedure?
Whether an anesthetic is used with your procedure or not, you will feel minor vibrations during the drilling process, or the use of hand instruments as your dentist creates the space for the post inside your tooth.
The same goes when the core portion of the build-up is added, which may involve tooth trimming, pin placement, and restoration shaping/contouring.
Types of dental posts.
a) What are dental posts made out of?
Traditionally, the kinds of posts dentists have most frequently placed have been metal ones (stainless steel, titanium, cast dental alloy). Nowadays, dentists have an ever-increasing assortment of post materials to choose from including zirconia, engineered dental ceramic, glass fiber, or carbon fiber.
b) Characteristics of dental posts.
1) Mechanical properties – Stiffness (flexible vs. rigid).
Historically, rigid metals were chosen as post materials. More recently, dentists have become aware of the advantages offered by materials like carbon fiber and glass fiber that are strong yet offer some flexibility when placed under stress.
Which is better, placing a flexible or rigid post?
Flexible dental posts offer the advantage that as a tooth’s root flexes under load, its post will too. That little bit of give results in less stress being transferred to the root, and therefore may help to prevent its fracture.
Considering that studies show that case failure may result in tooth extraction (because of resulting tooth damage Why? ), your dentist may feel that placing a flexible post is important.
2) Color – White vs. Metallic
Some of the newer materials used for posts are white in color. These include zirconia, dental ceramic, and some types of fiber materials.
Which is better, placing a tooth-colored or metallic dental post?
Using a white post and core may provide a cosmetic advantage for all-ceramic dental crowns placed on front teeth. That’s because these kinds of crowns frequently have a high level of translucency. (Translucency tends to give a crown a more lifelike appearance.)
For those that do, the grey color of a metallic post and core may cause an effect where the all-ceramic crown that covers over it appears darkened. Placing a tooth-colored post and core helps to avoid this problem.
3) Fabrication method – Custom vs. Prefabricated post and cores.
A custom post and core is a single-unit object (post and core combined) that is specially made for your tooth (cast from metal or milled from a block of ceramic) in a dental laboratory. As for disadvantages, placing one is a two-appointment procedure, and typically involves a higher fee. Cost estimates for posts.
Which is better, placing a custom or prefabricated post and core?
The main advantage of placing a milled or cast post and core is that it’s custom-made for your tooth. That could be important in cases where the root it’s placed in has unique anatomical characteristics (noncircular cross-section, extreme canal taper) that would be difficult to manage with standard-sized posts.
Studies have shown that both types of post and cores generally offer the same survival rate. Study findings. That seems to suggest that placing a prefabricated post (the quicker, cheaper procedure we describe and illustrate above on this page) can make a good choice in most situations.
▲ Section references – Rosensteil
2) The steps of the dental core placement procedure.
Background – When is a core needed?
Core build-ups are needed for severely broken-down teeth in preparation for making a permanent crown for them.
- To stay in place well, a dental crown needs some tooth structure extending up inside it. This may be missing in severely damaged teeth. If so, the core “build-up” replaces this missing tooth structure.
Note: Cores can be placed in vital (live nerve) and non-vital (root canalled) teeth. In contrast, a post and core can only be placed for a tooth that has had endodontic therapy.
FYI: More details – Core build-ups. Reasons for placement.)
The procedure.
When placing just a core alone (no post) as a crown build-up, a dentist simply applies the dental restorative (usually dental amalgam or bonding) to fill in the missing portions of the tooth, not unlike when a regular filling is placed.
In fact, the only real differences between placing a dental filling and this kind of crown build-up are that:
- The final contours of a dental core aren’t as critical as with a filling, since it will ultimately be trimmed down for crown placement anyway.
- The dentist must envision in advance how the retention of the core might be compromised as it’s trimmed down, and ensure that this does not become an issue.
Creating adequate retention for the core is important.
When is extra retention (pins) for a core buildup needed?
Many teeth that have sustained damage will still have enough remaining tooth structure to provide good anchor points for the core that needs to be placed.
But in cases where there’s been a larger amount of tooth damage, and therefore the tooth has a large amount of missing tooth structure, the dentist will need to employ additional retention techniques in order to create adequate core stability. Here are some of the options they have:
- Dentists routinely screw tiny “pins” into a tooth around which the dental restorative used to create the tooth’s core buildup is then packed.
(These little screws are around 1/4 inch in length and about 1/2 the diameter of a common straight pin. The procedure is quick and simple. It literally takes a dentist just seconds to place one.)
- As an alternative, a dentist might cut grooves or “post holes” in the tooth and then pack the restorative down into them to achieve the extra retention that’s needed.
(This is an even simpler, and just as quick, solution as placing a pin.)
- If the tooth has had root canal treatment but a post isn’t required, the dentist has the option of extending the core’s dental restorative down into the tooth’s root canal system as a way of obtaining added retention.
▲ Section references – Rosensteil, Shillingburg
Does having a core buildup placed hurt? Will you need an anesthetic?
In cases involving vital teeth (the situation where the tooth has a live nerve), then the answer is yes. Getting a “shot” will be required when having the tooth’s dental core placed.
As mentioned above, placing a core isn’t substantially different than placing a filling, a procedure that typically does require local anesthetic use to maintain patient comfort.
If instead, your tooth has had endodontic treatment (its nerve removed via root canal therapy), no anesthetic may be required at all unless the gum tissue around your tooth will be extensively manipulated and therefore needs numbing.
Related pages about restoring root canalled teeth.
- Post-and-Core or Core? Which is needed?
- Final restorations – When is a crown required after root canal treatment? The factors that decide.
- Can the tooth’s original crown just be reused? Considerations.
- This topic’s full menu. Go
Last reviewed: January 10, 2025
Author: Paul Cotner, DMD — retired dentist.
Published by: WMDS, Inc. — owner of Animated-Teeth.com.
Educational information only — not a substitute for professional dental care.
Page references sources:
Rosenstiel SF, et al. Contemporary Fix Prosthodontics. Chapter: Restoration of the Endodontically Treated Tooth.
Shillingburg HT, et al. Fundamentals of Fixed Prosthodontics. Chapter: Preparations for Severely Debilitated Teeth.